Moving the Submission from Review to Production
Once all activities in the Review stage have been completed, including the peer review process, revision process (if applicable), final editorial decision, APC process, and payment confirmation, the editorial user can proceed with moving the accepted submission to the Production stage.
The Move to Production action should be performed only after confirming that all required review and APC-related activities have been completed.
Steps to Move the Submission to Production
-
Go to the manuscript in the Review stage.
-
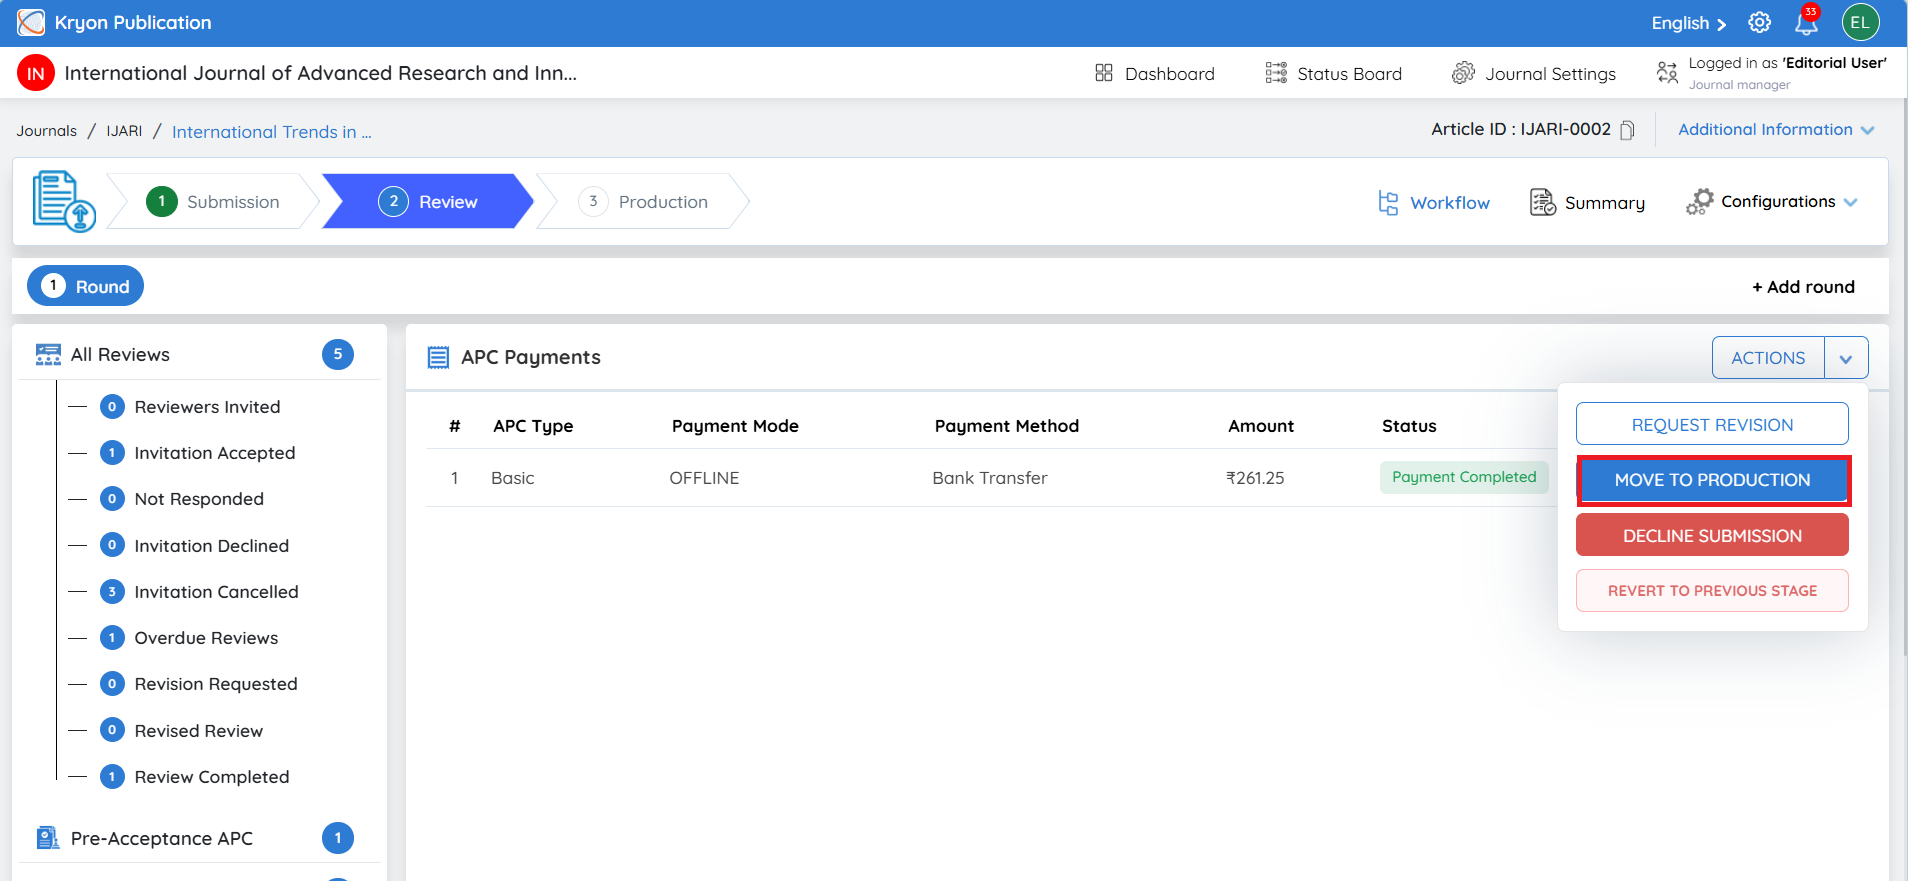
Confirm that the required processes have been completed. For APC-enabled submissions, the APC payment status should show Payment Completed before proceeding.
-
Click Actions and select Move to Production.
-
The Accept & Move to Production window will open.
-
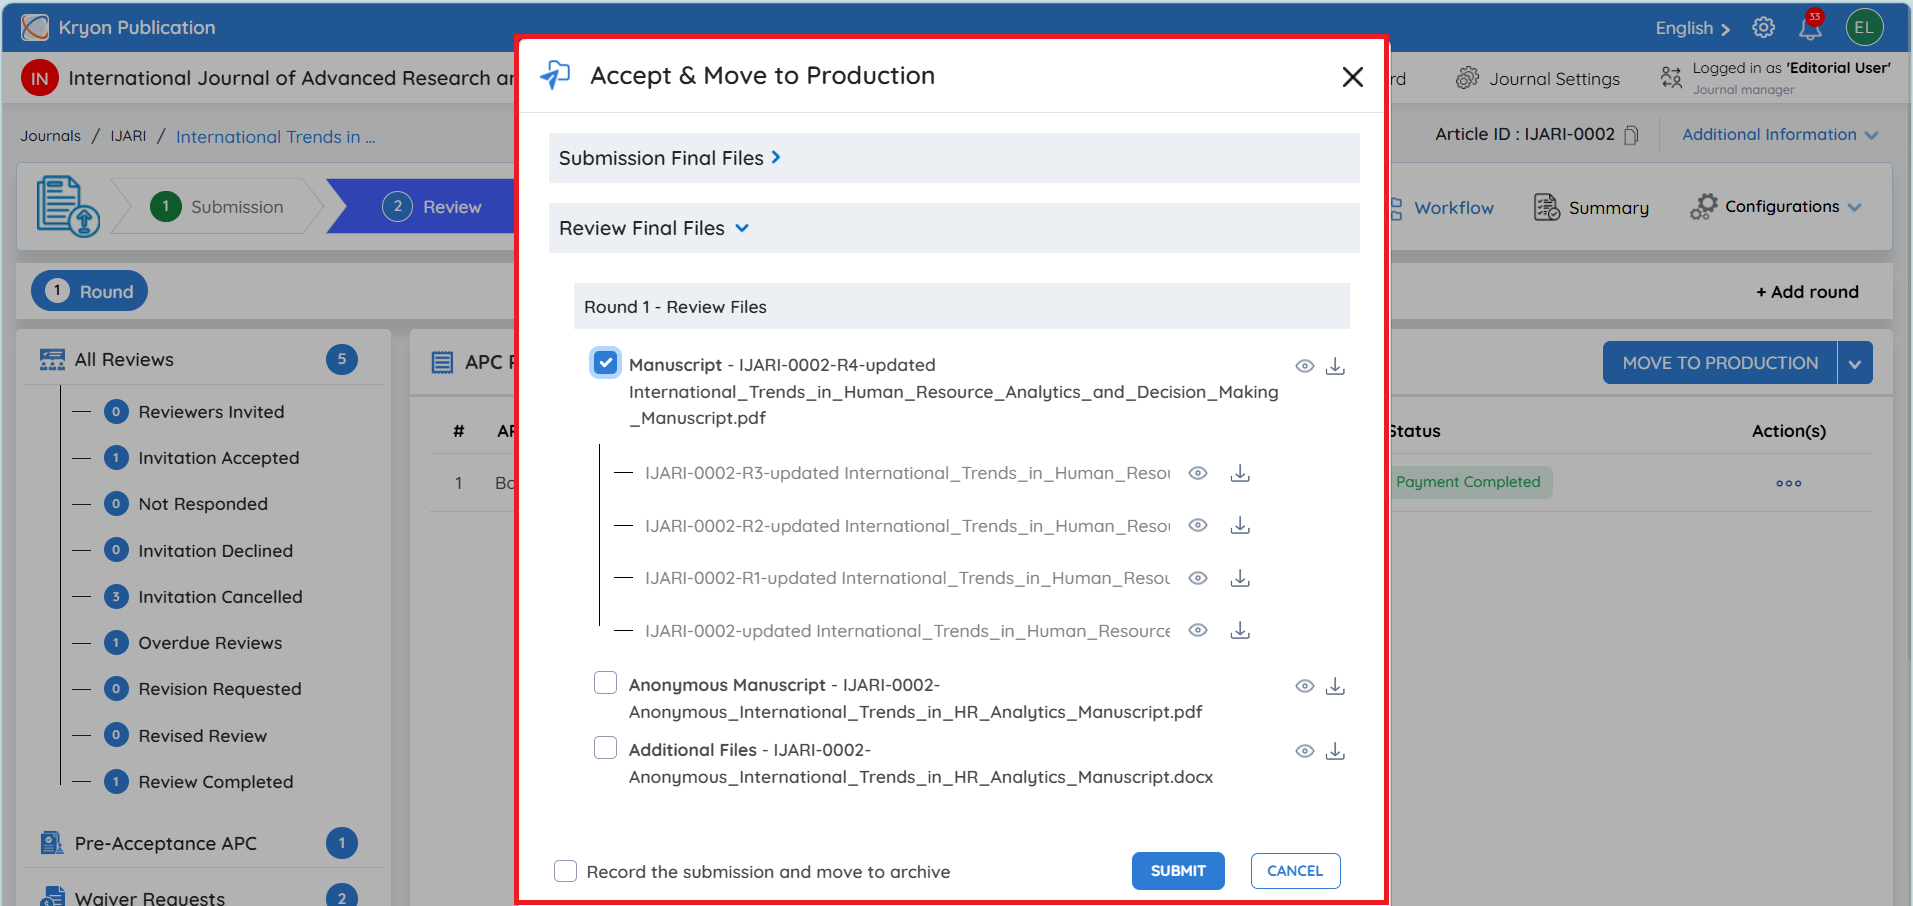
The system displays the files available from different stages of the submission. These are organized mainly under:
Submission Final Files – Files submitted or finalized during the submission process.
Review Final Files – Files available from the review process, including files from the applicable review round.
-
Expand the relevant file sections to review all available files.
-
Before moving the article to Production, identify the latest and final version of the manuscript. If revisions were completed during peer review, make sure the revised/final manuscript is selected rather than the original version submitted at the beginning of the workflow.
-
The editorial user can use the View icon to preview a file or the Download icon to download and verify it before making the selection.
-
Select the checkbox next to each final file that needs to be transferred to Production. More than one file can be selected when multiple files are required for production.
-
After selecting all required final files, click Submit
After Submission
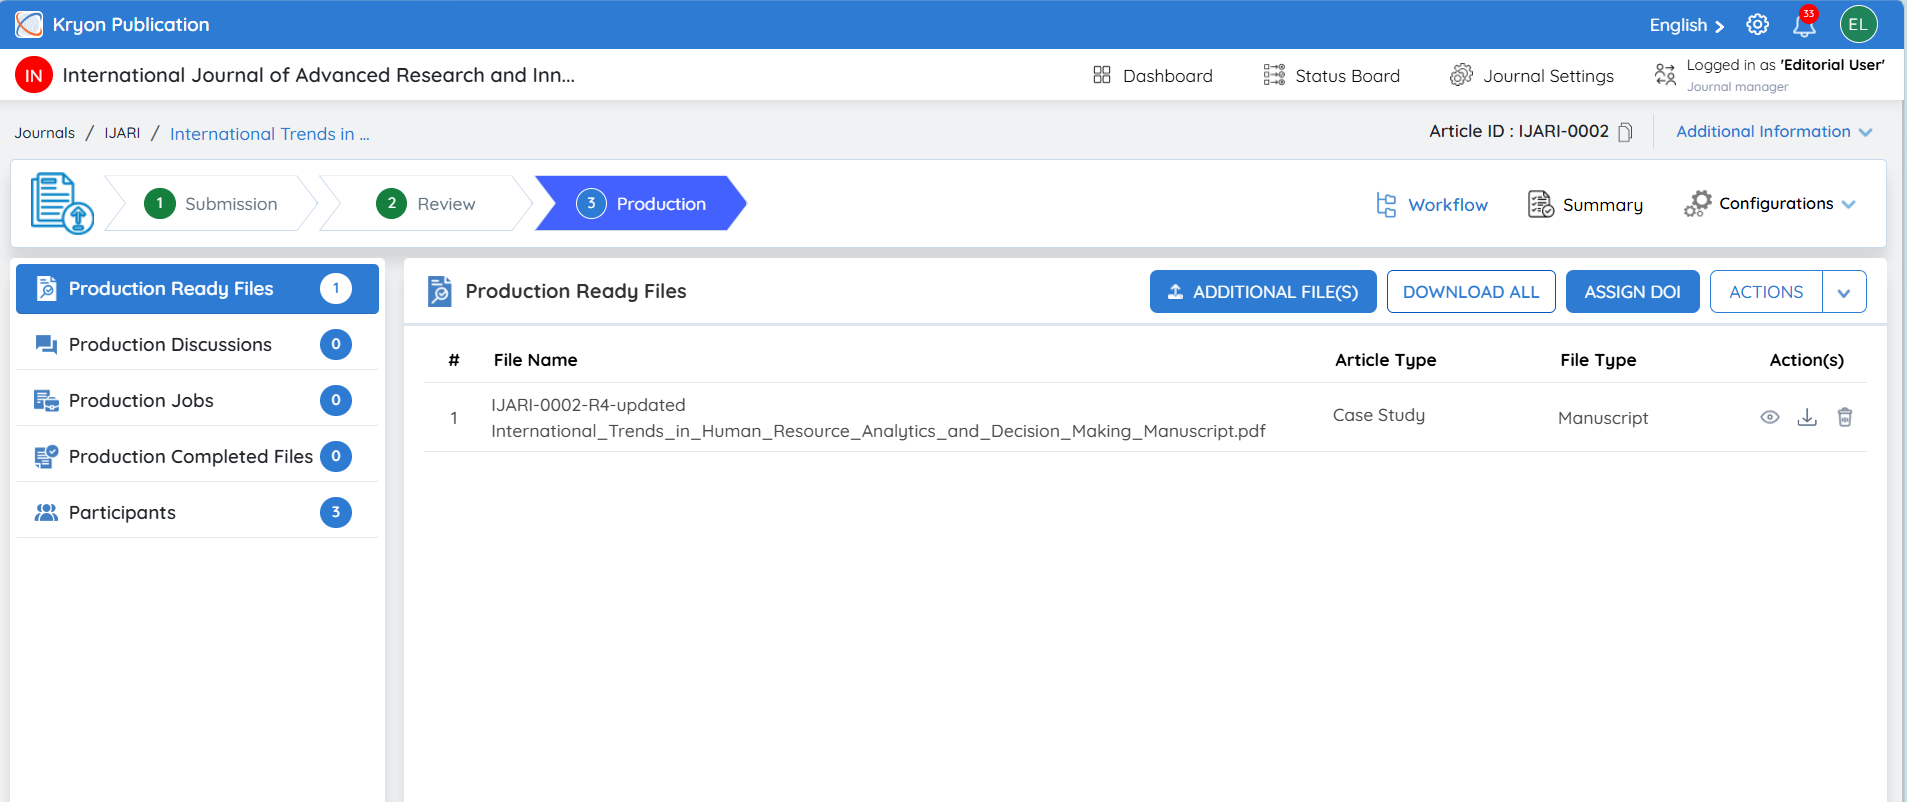
Once Submit is clicked, the selected files will be carried forward and the manuscript will move from the Review stage to the Production stage.
The Production team can then use the selected final files for the subsequent publishing activities
PRODCUTION
Production Stage
Once the submission has successfully completed the Review stage and the required files have been selected using Move to Production, the article will move to the Production stage.
The Production stage provides the editorial and production teams with the files, communication tools, production jobs, and completed outputs required to prepare the article for publication.
Production Stage Sections
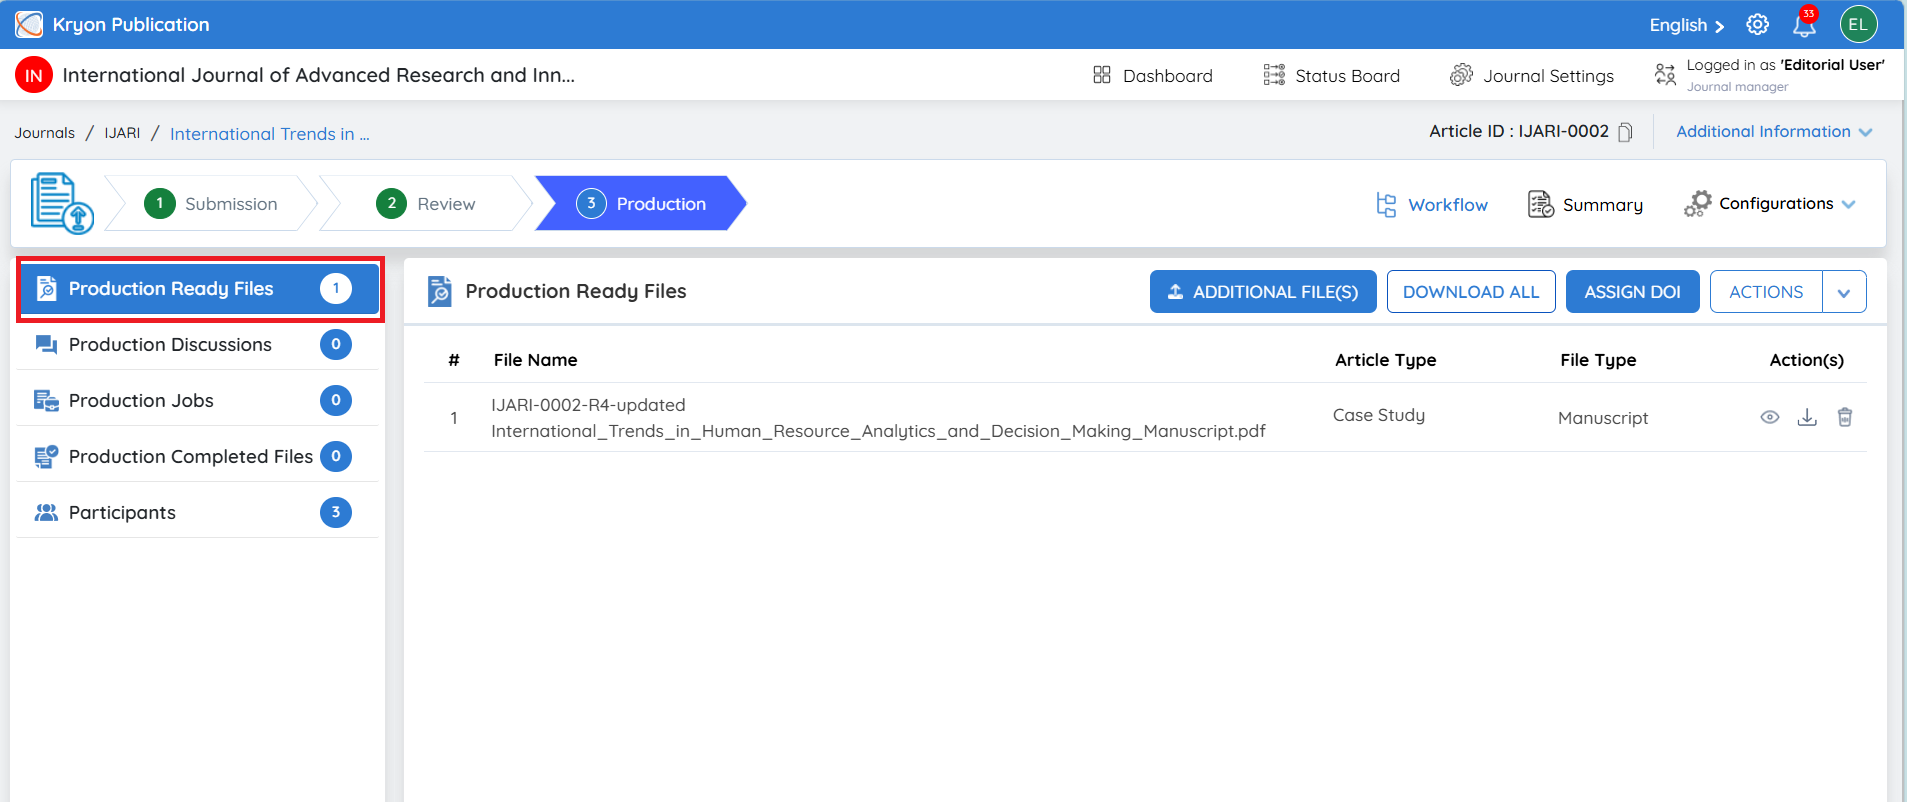
The following sections are available on the left-hand side:
1. Production Ready Files
All files selected while moving the article from Review to Production will be displayed under Production Ready Files.
These are the finalized source files that can be used for production activities. The editorial/production user can:
a. View individual files.
b. Download individual files.
c. Use Download All to download all available production-ready files.
d. Upload Additional File(s) if any additional material is required for production.
2. Production Discussions
Production Discussions can be used for communication related to the production process.
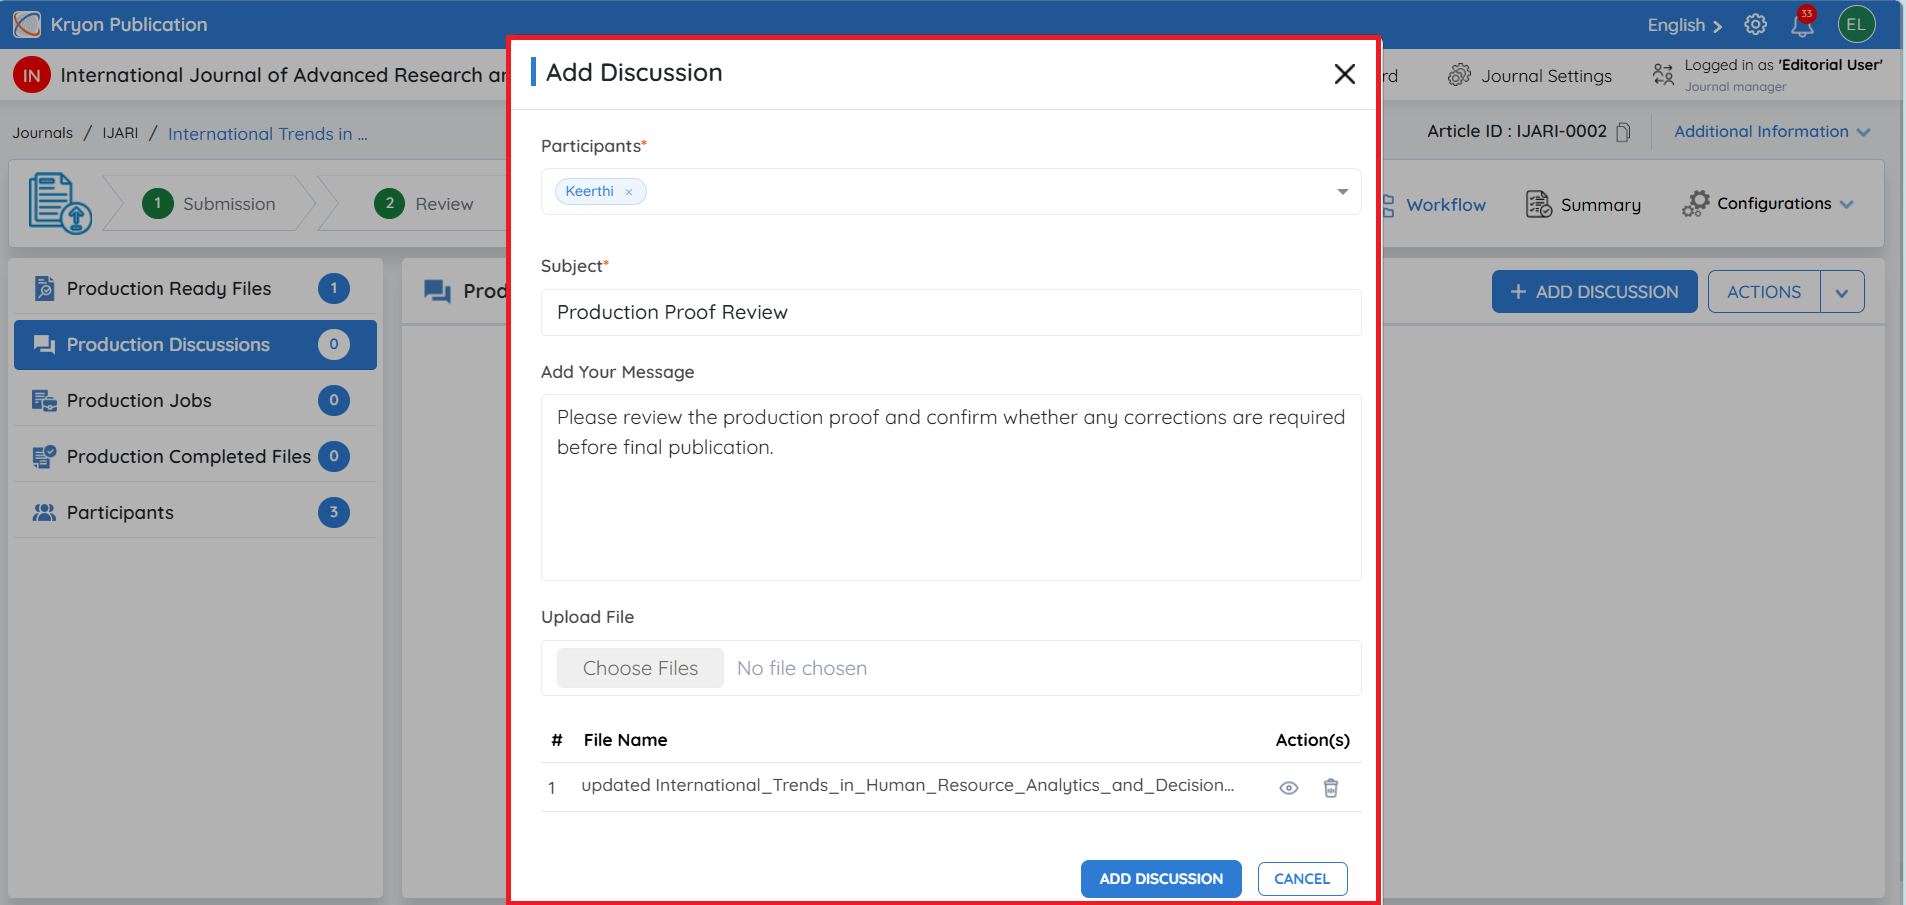
To start a discussion, click Add Discussion and:
a. Select the required Participant(s).
b. Enter the Subject.
c. Enter the message.
d. Upload a file, if required.
e. Click Add Discussion.
This allows production-related communication and supporting files to be maintained within the article workflow.
3. Production Jobs
If the journal is configured to use the Production Workflow Management process, the corresponding production job will be available under Production Jobs.
The production job can be used to manage and track the configured production activities for the article.
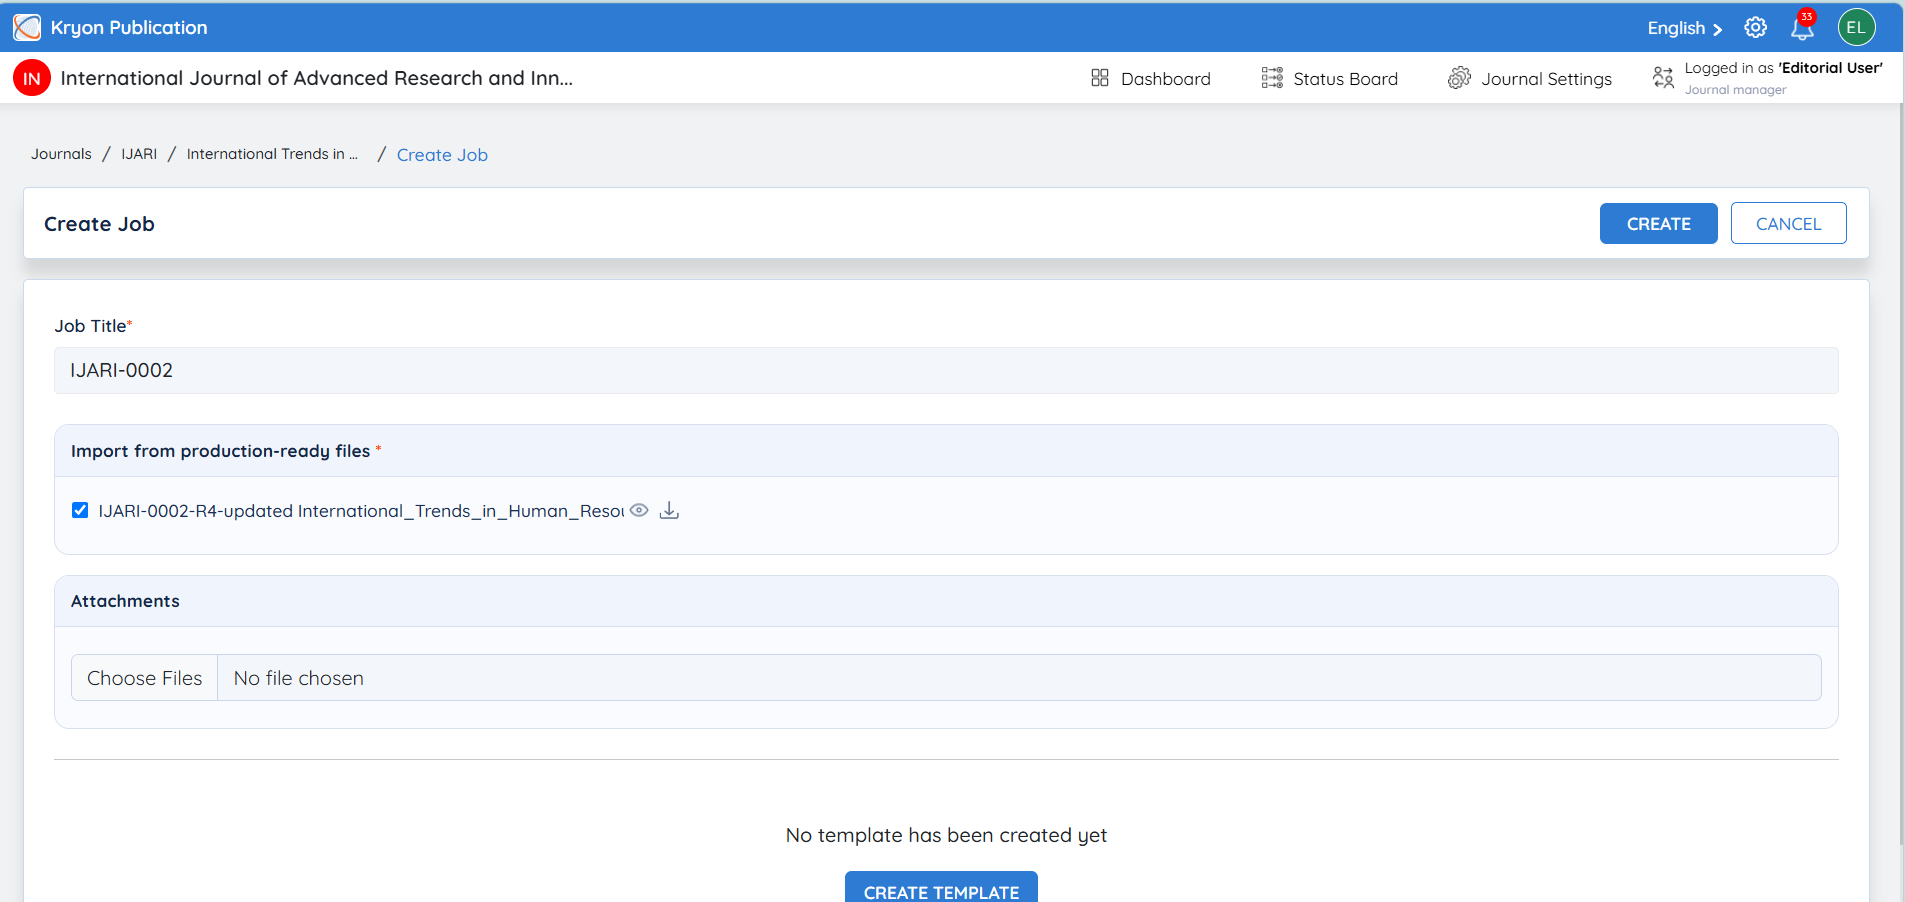
The detailed Production Job workflow can be covered separately under the Production Workflow Management guide
4. Production Completed Files
This section contains the final files produced after the production process has been completed.
When Production Workflow Management is used:
Once the configured production job is completed, the completed production files will be automatically fetched and displayed under Production Completed Files.
When production is managed manually:
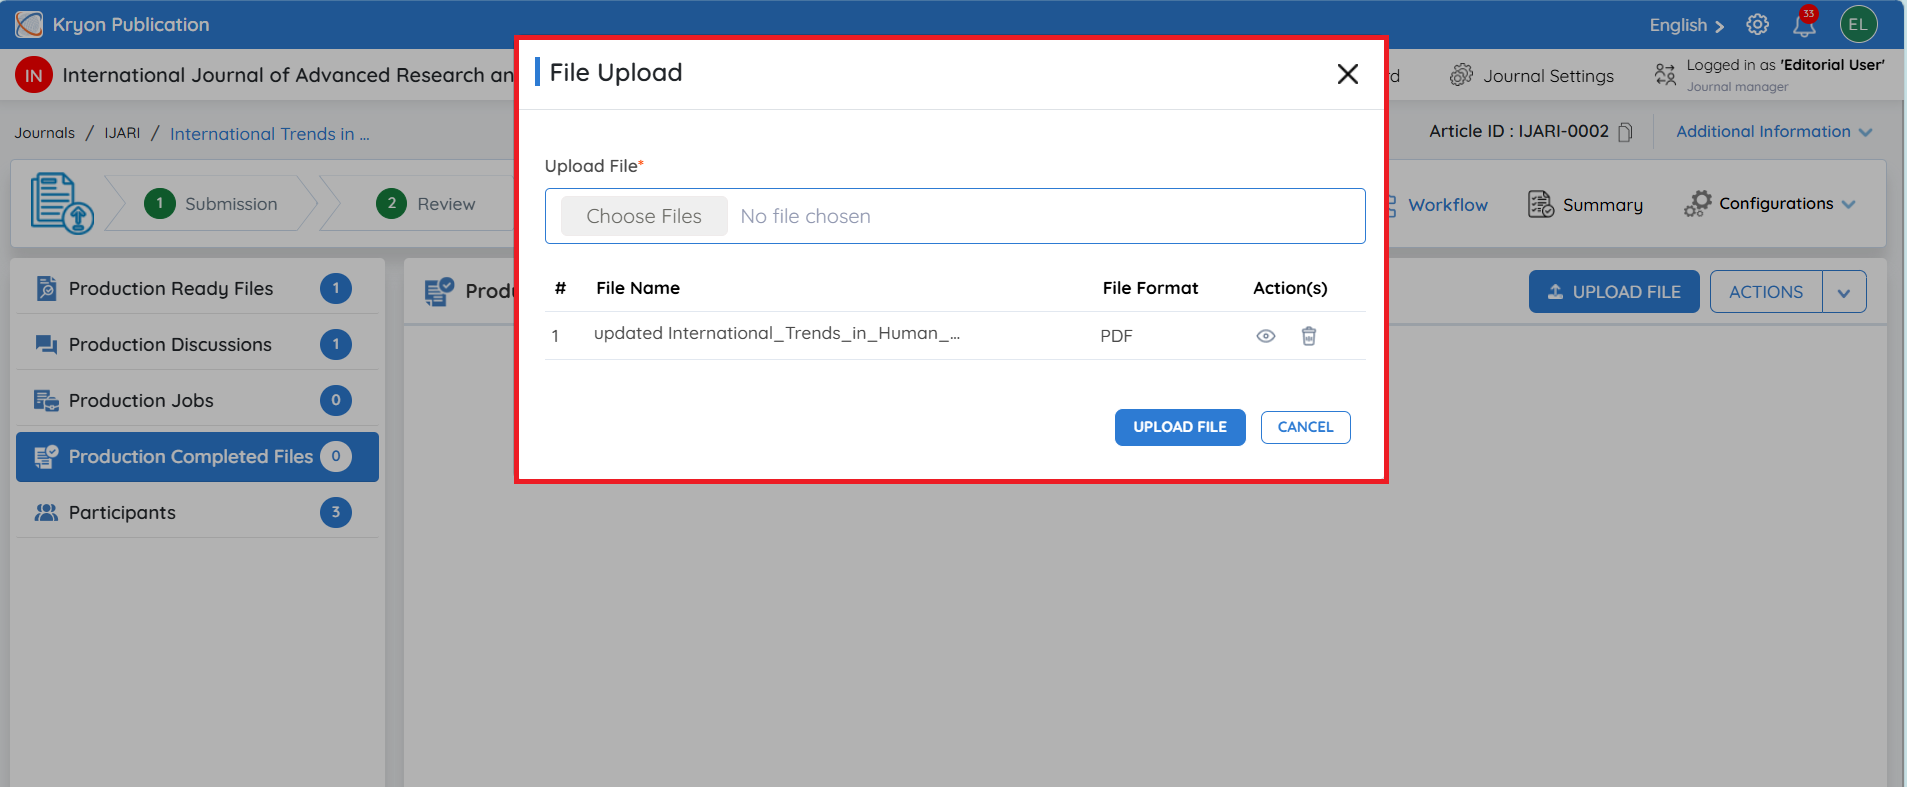
If the editorial team handles production outside the system, such as through email or another external method, the final production files can be uploaded manually.
To upload a completed file:
a. Open Production Completed Files.
b. Click Upload File.
c. Click Choose Files and select the completed production file.
d. Click Upload File.
The uploaded file will then be available under Production Completed Files.
Participants
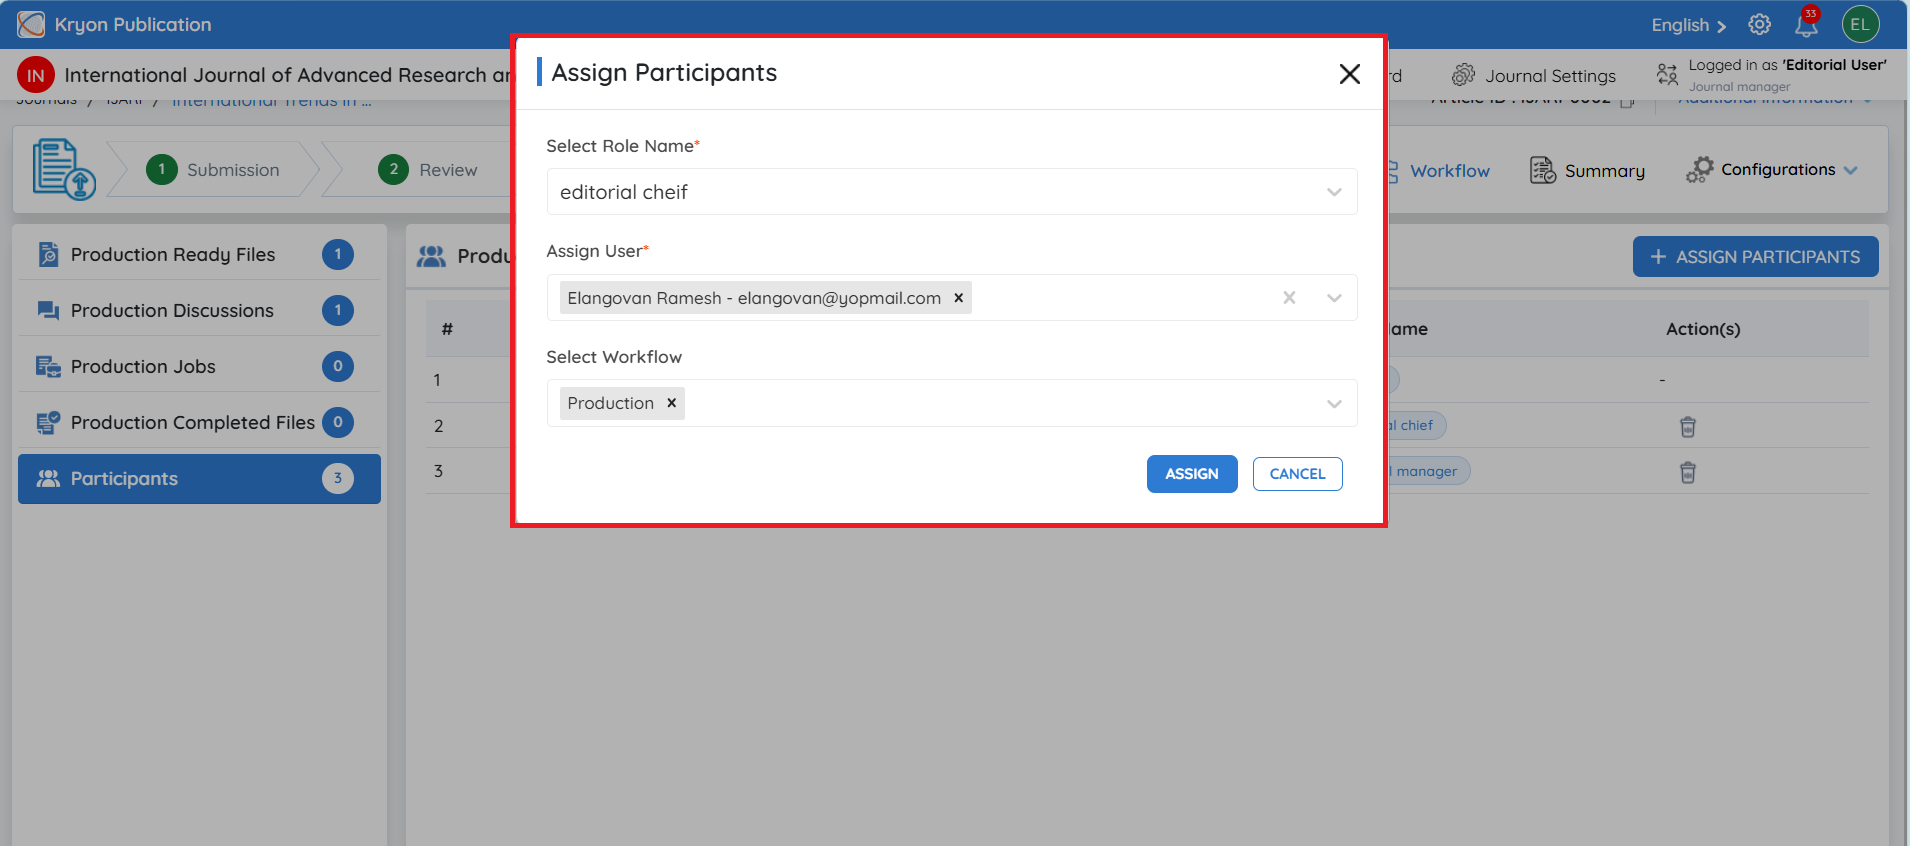
The Participants section is used to assign users who will be involved in the article’s Production stage.
To assign a participant:
-
Open Participants from the left-hand menu.
-
Click Assign Participants.
-
Under Select Role Name, choose the required production role.
-
Under Assign User, select the user who needs to be assigned to the article.
-
Under Select Workflow, choose the production workflow in which the participant will be involved, if applicable.
-
Click Assign.
Once assigned, the participant will be displayed in the Participants section and can take part in the relevant production activities based on their assigned role and workflow.
Participants can also be selected when creating a Production Discussion, allowing production-related communication to be directed to the appropriate users.
Summary
The Summary tab provides an overview of the article and its submission information in one place. It includes key details such as Journal Name, Article Type, Article ID, Manuscript Title, Subject, Discipline, Submission Language, Keywords/Tags, Abstract, Conflict of Interest, Similarity Proof Document, License Agreement, and Contributors.
Available documents can also be viewed or downloaded directly from this section.
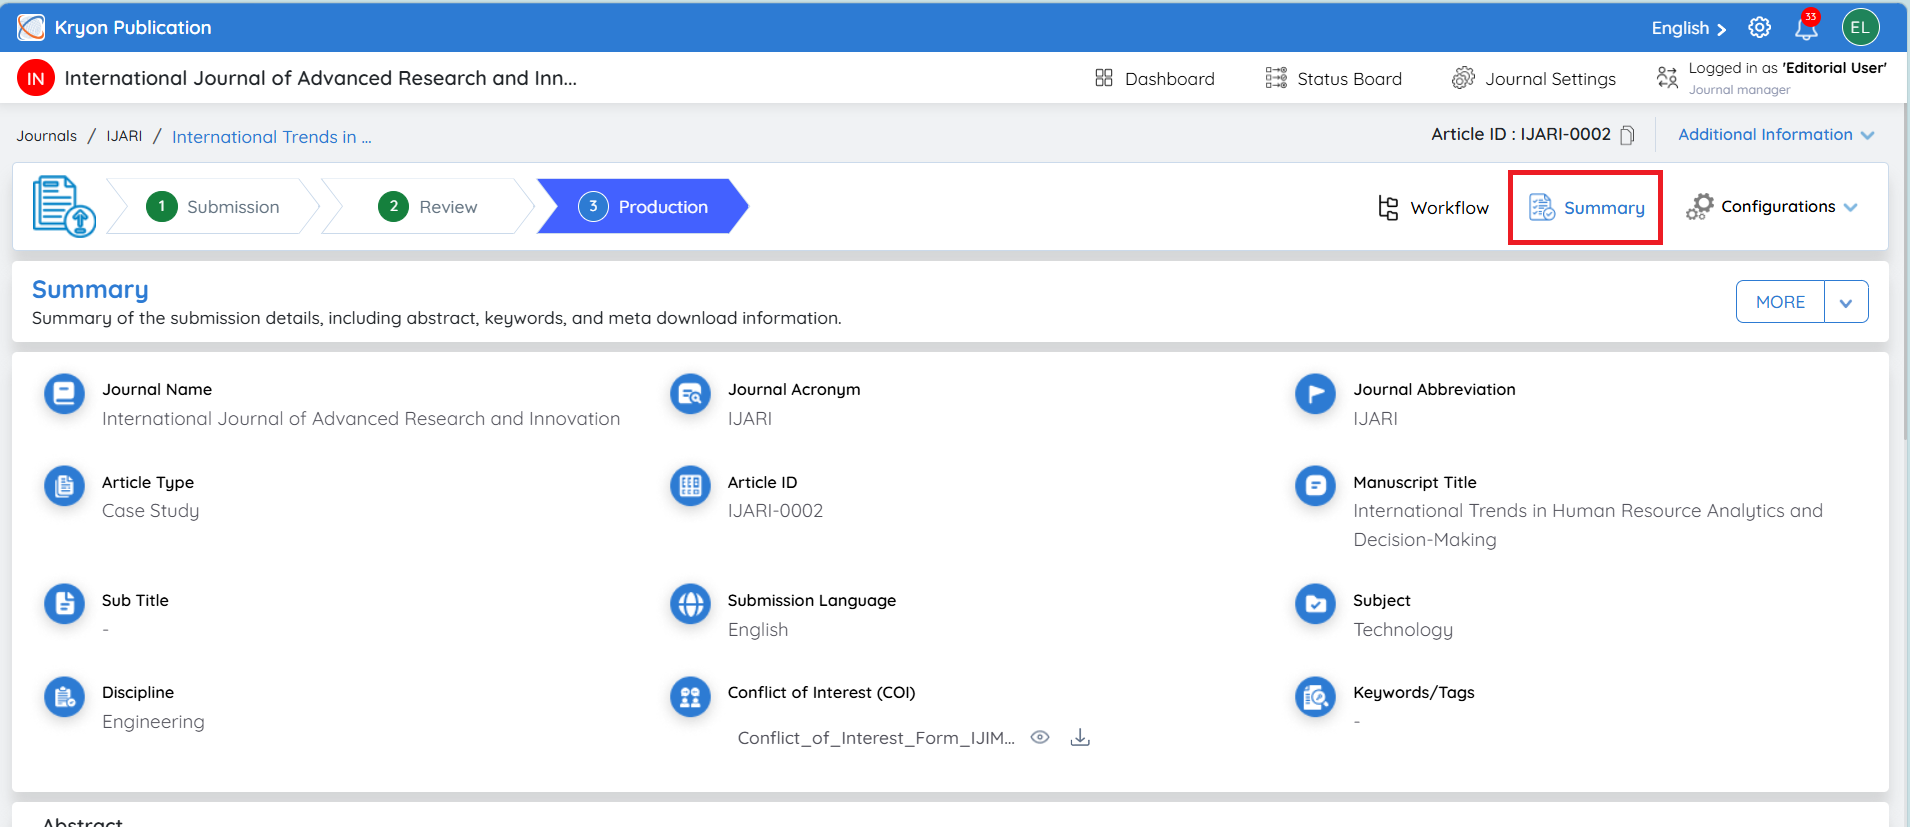
More
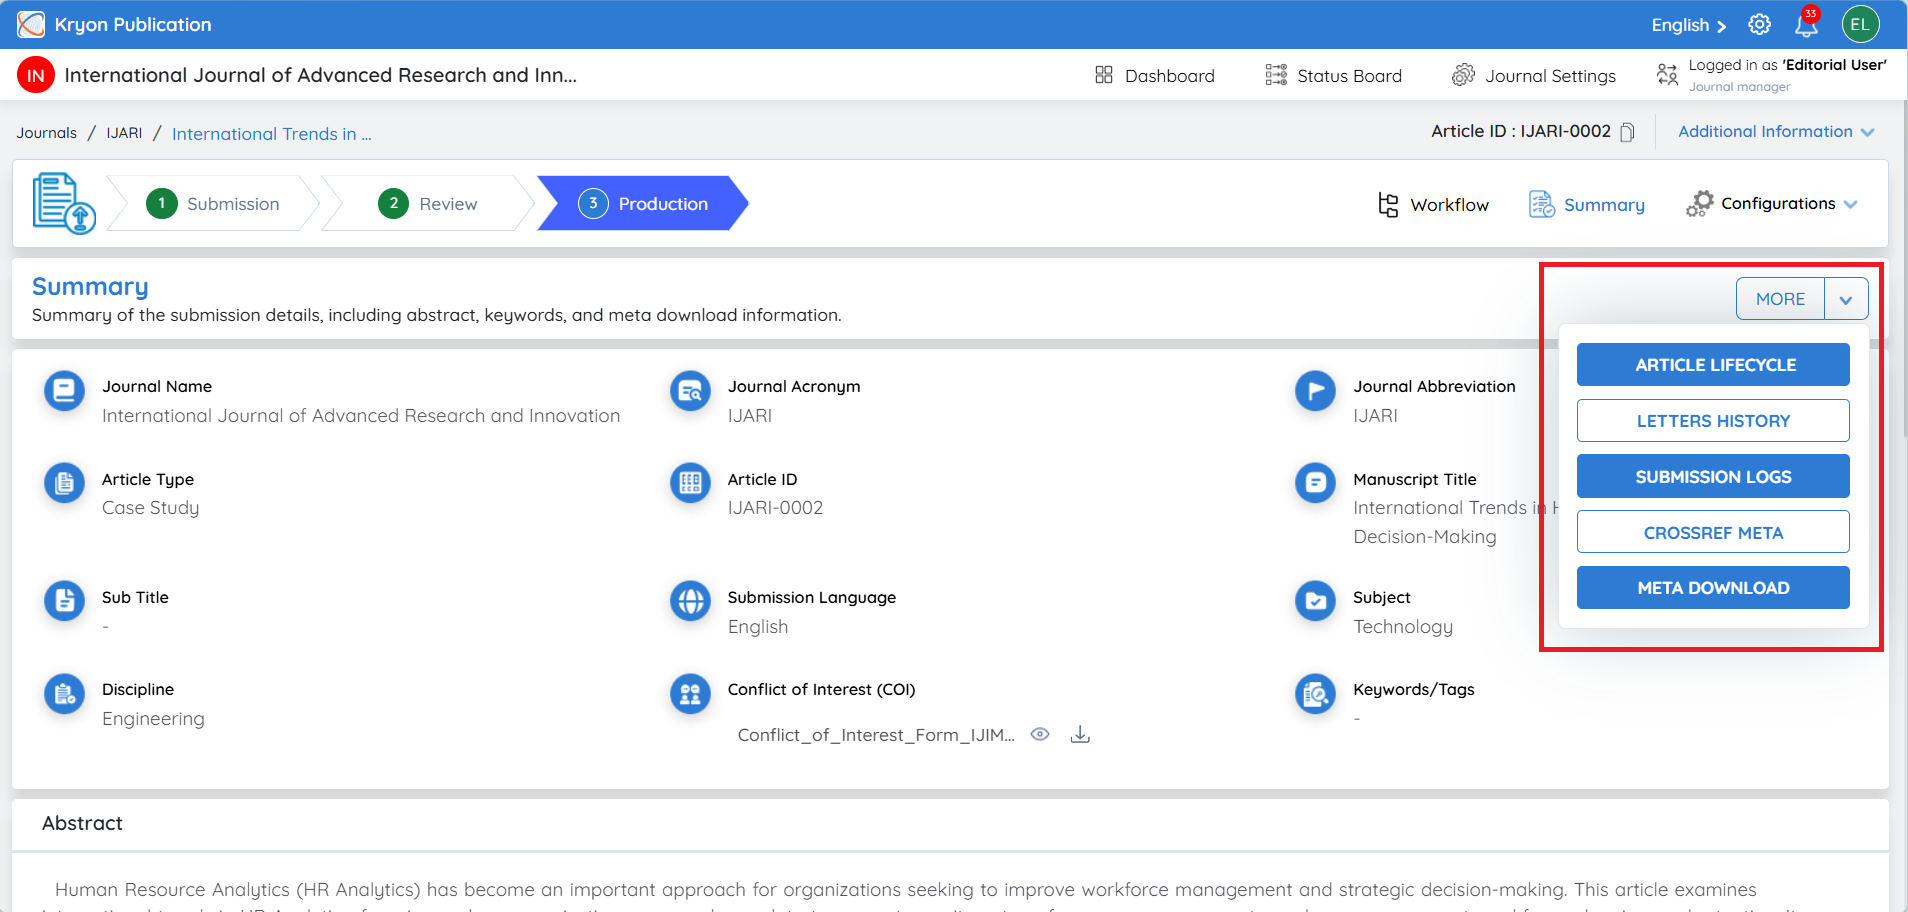
Click More to access additional submission-related information and records:
-
Article Lifecycle – View the complete progression and status history of the article.
-
Letters History – View letters generated or sent during the submission workflow.
-
Submission Logs – View the activity and action history associated with the submission.
-
Crossref Meta – Download the article metadata prepared for Crossref.
-
Meta Download – Download the available article metadata.
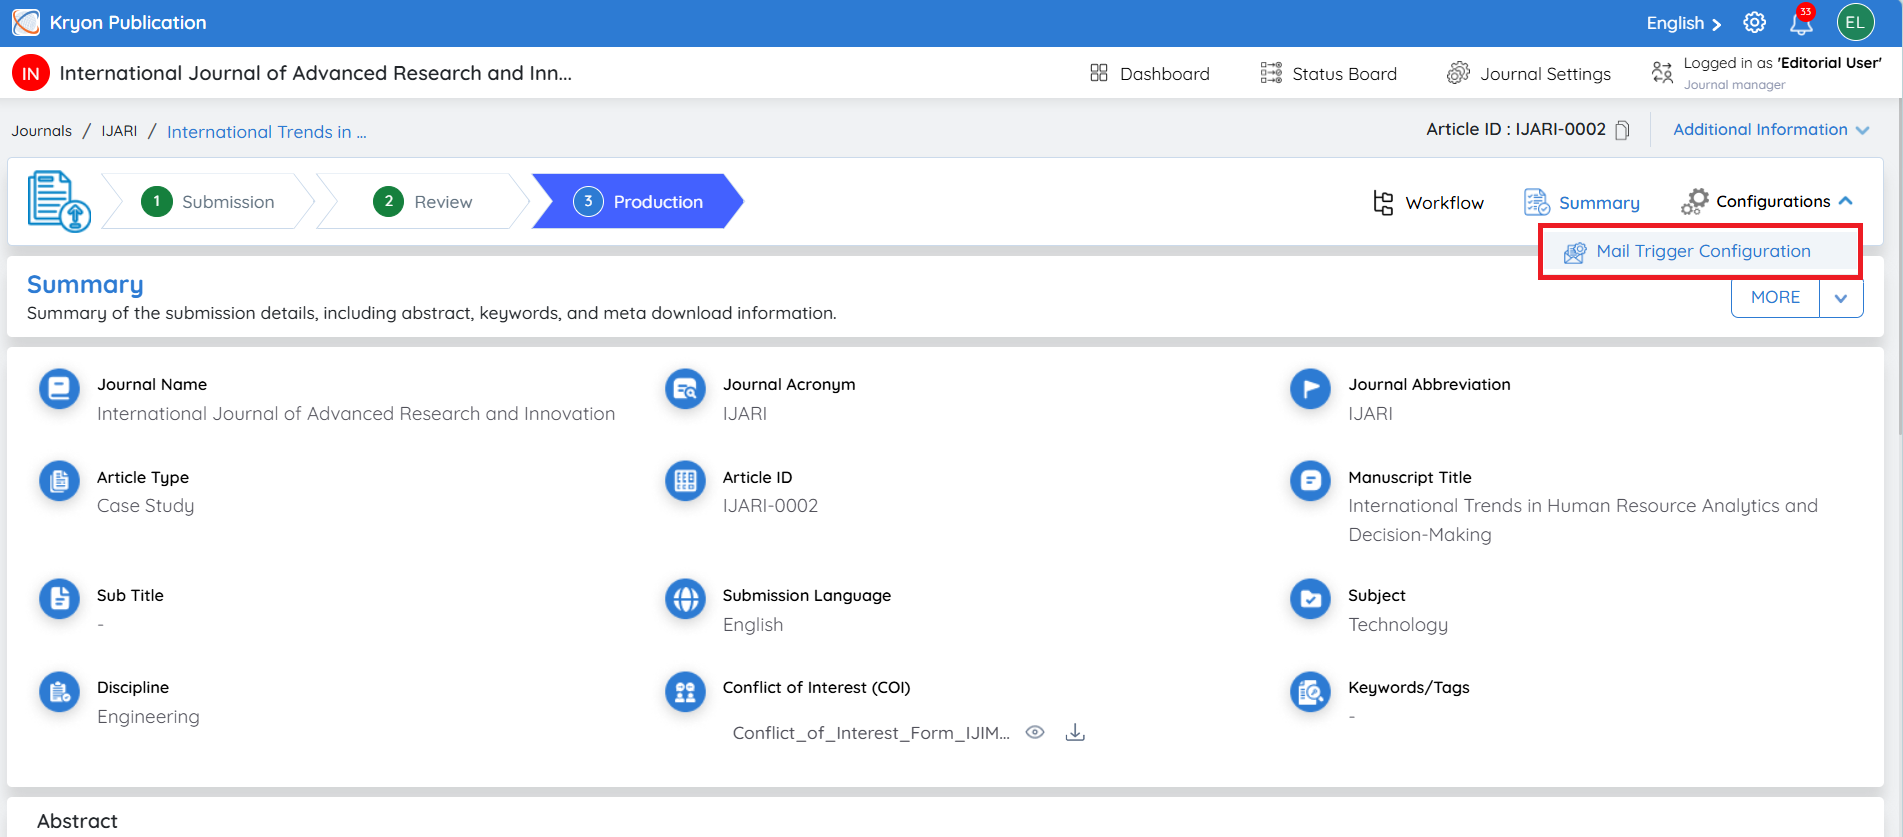
Mail Trigger Configuration – Production
The Mail Trigger Configuration allows the editorial user to configure automated email reminders and escalation notifications when a Production Job task remains incomplete after its delivery due date.
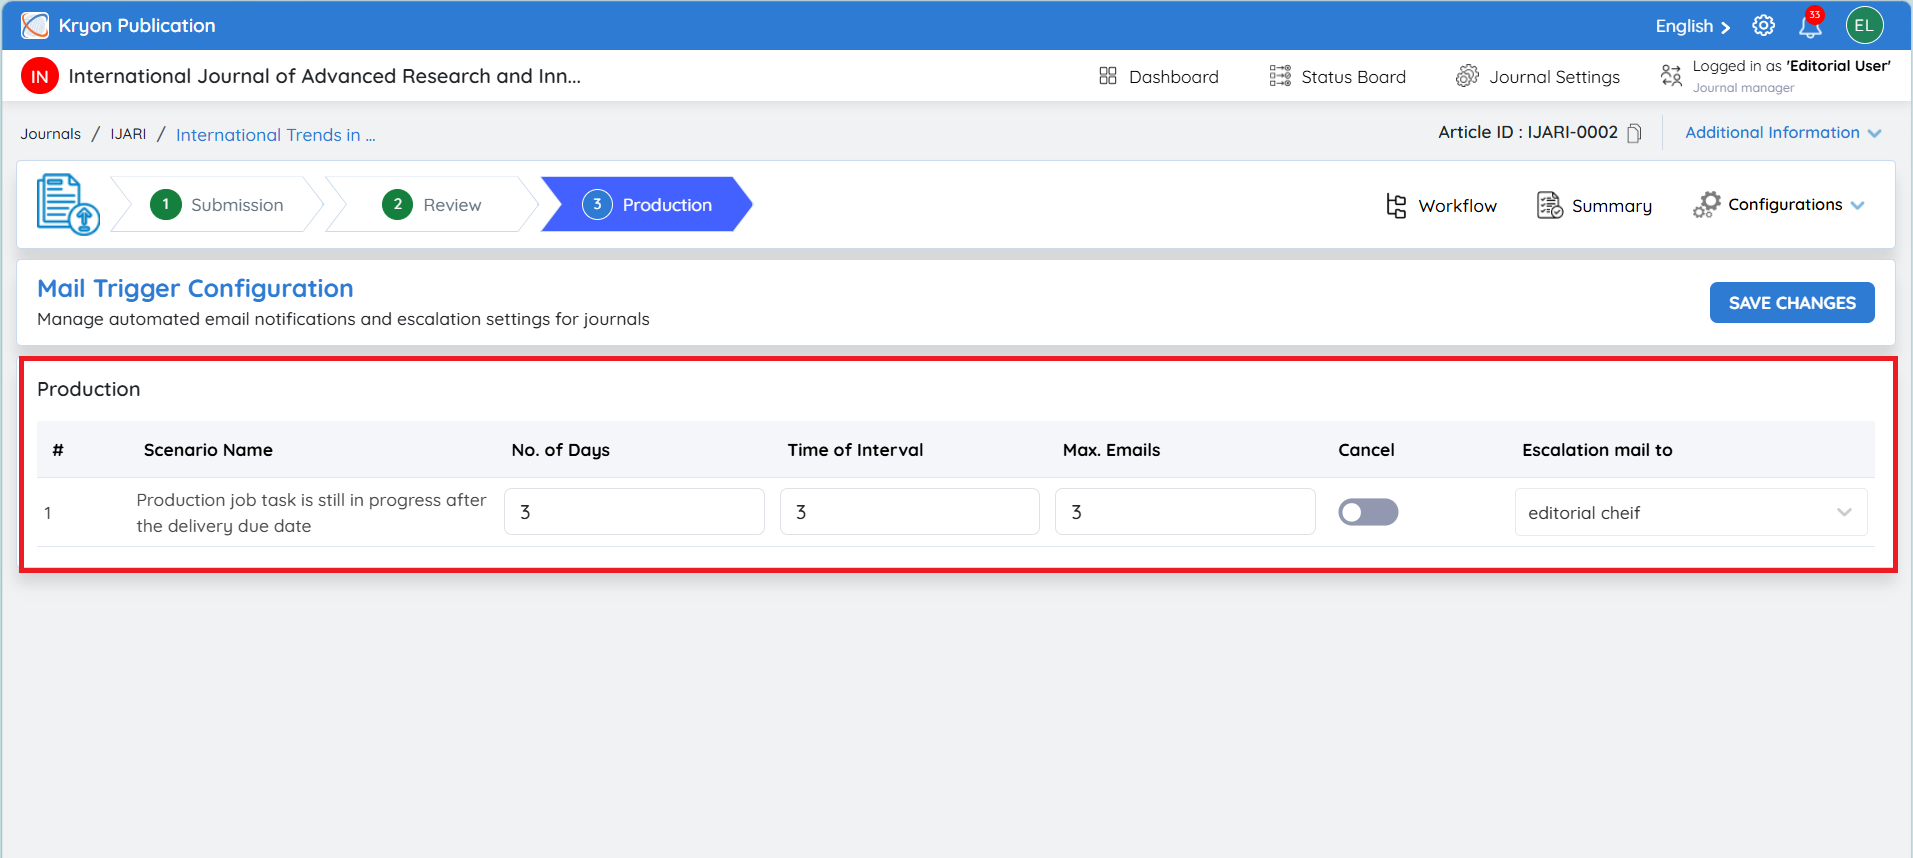
For the Production stage, the available scenario is:
Production job task is still in progress after the delivery due date
Configure the following settings:
-
No. of Days – Specify the number of days after the delivery due date when the reminder emails should begin.
-
Time of Interval – Specify the interval between subsequent reminder emails.
-
Max. Emails – Enter the maximum number of reminder emails that can be sent for the overdue production task.
-
Cancel – Enable this option if the configured reminder/escalation process needs to be cancelled.
-
Escalation Mail To – Select the role that should receive the escalation email when the production task remains incomplete.
-
After completing the required configuration, click Save Changes.
Example: If No. of Days = 3, Time of Interval = 3, and Max. Emails = 3, the system will begin sending reminders after the configured 3-day period and continue based on the specified interval, up to a maximum of three emails.
This configuration helps the journal team follow up on overdue production tasks without having to manually track and send reminder emails.
Assign DOI
Once the manuscript has completed the required production process and is ready for publication, a Digital Object Identifier (DOI) can be assigned to the article in Kryoni JMS.
The DOI is generated using the DOI prefix and suffix configuration defined in the journal settings.
For instructions on configuring the DOI Prefix and Suffix Pattern, refer to the DOI Configuration section: [Refer Link].
How to Assign a DOI
-
Open the article in the Production stage and go to Production Ready Files.
-
Click Assign DOI.
-
The DOI Generation window will open.
-
Under Select Content Type, select the required option based on how the DOI needs to be generated.
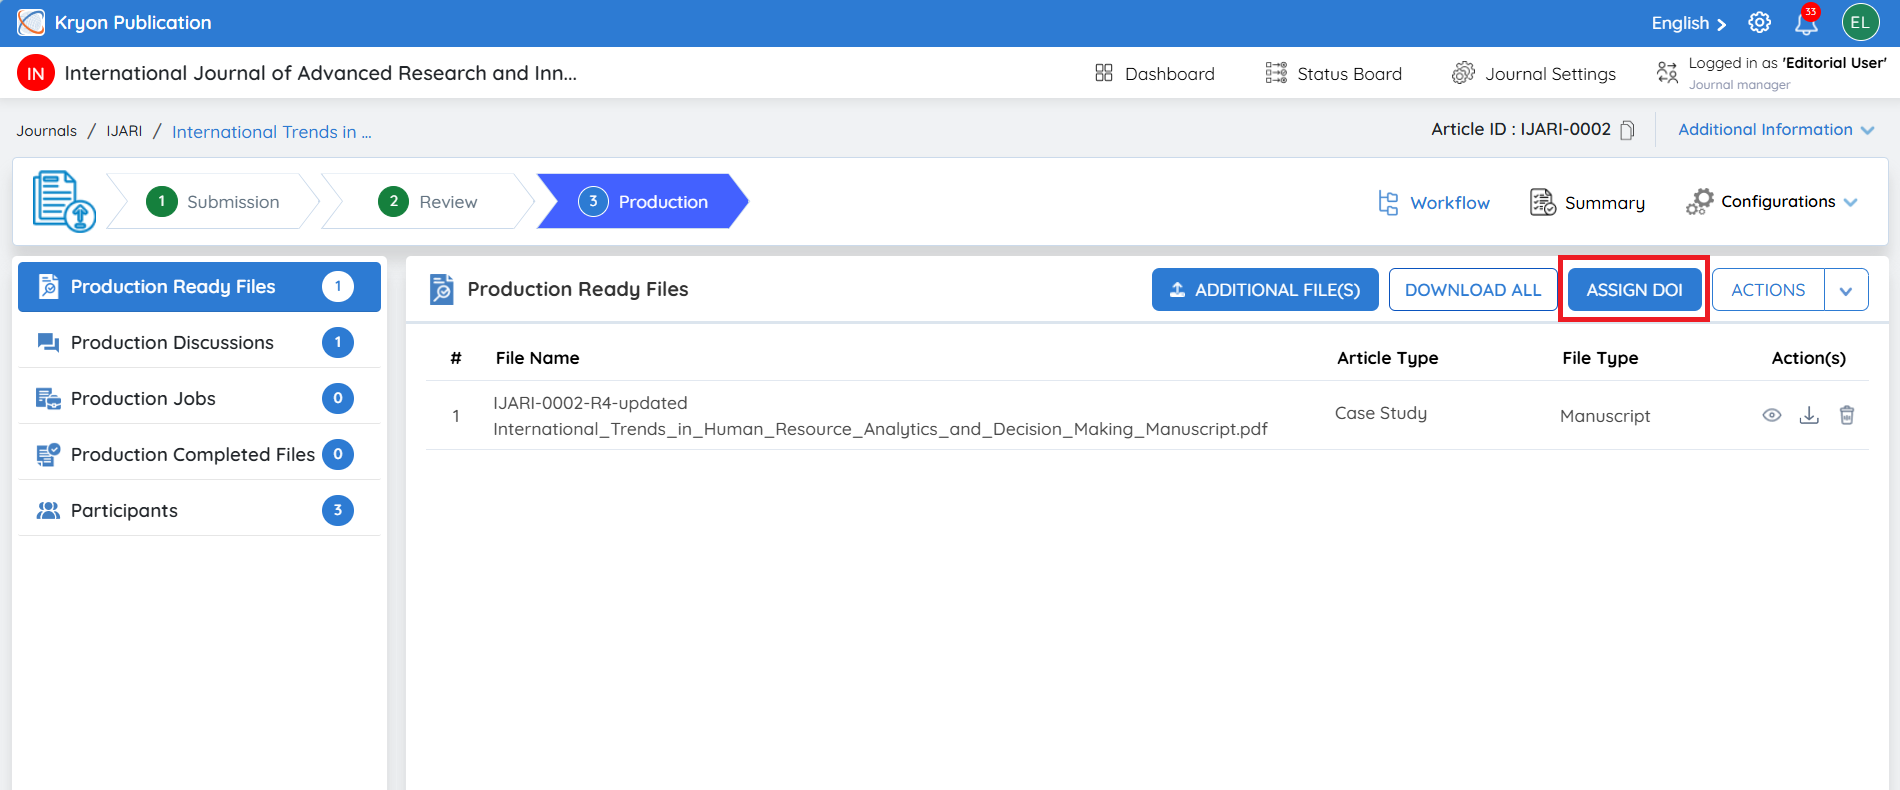
Article – Select this option to generate the DOI automatically for the individual article using the DOI prefix and article suffix pattern already configured in the journal settings.
The generated DOI will be displayed under DOI Preview. Review the DOI carefully and click Generate DOI to assign it to the article.
No additional information needs to be entered for the Article option. The DOI is generated automatically based on the configured pattern and article information.
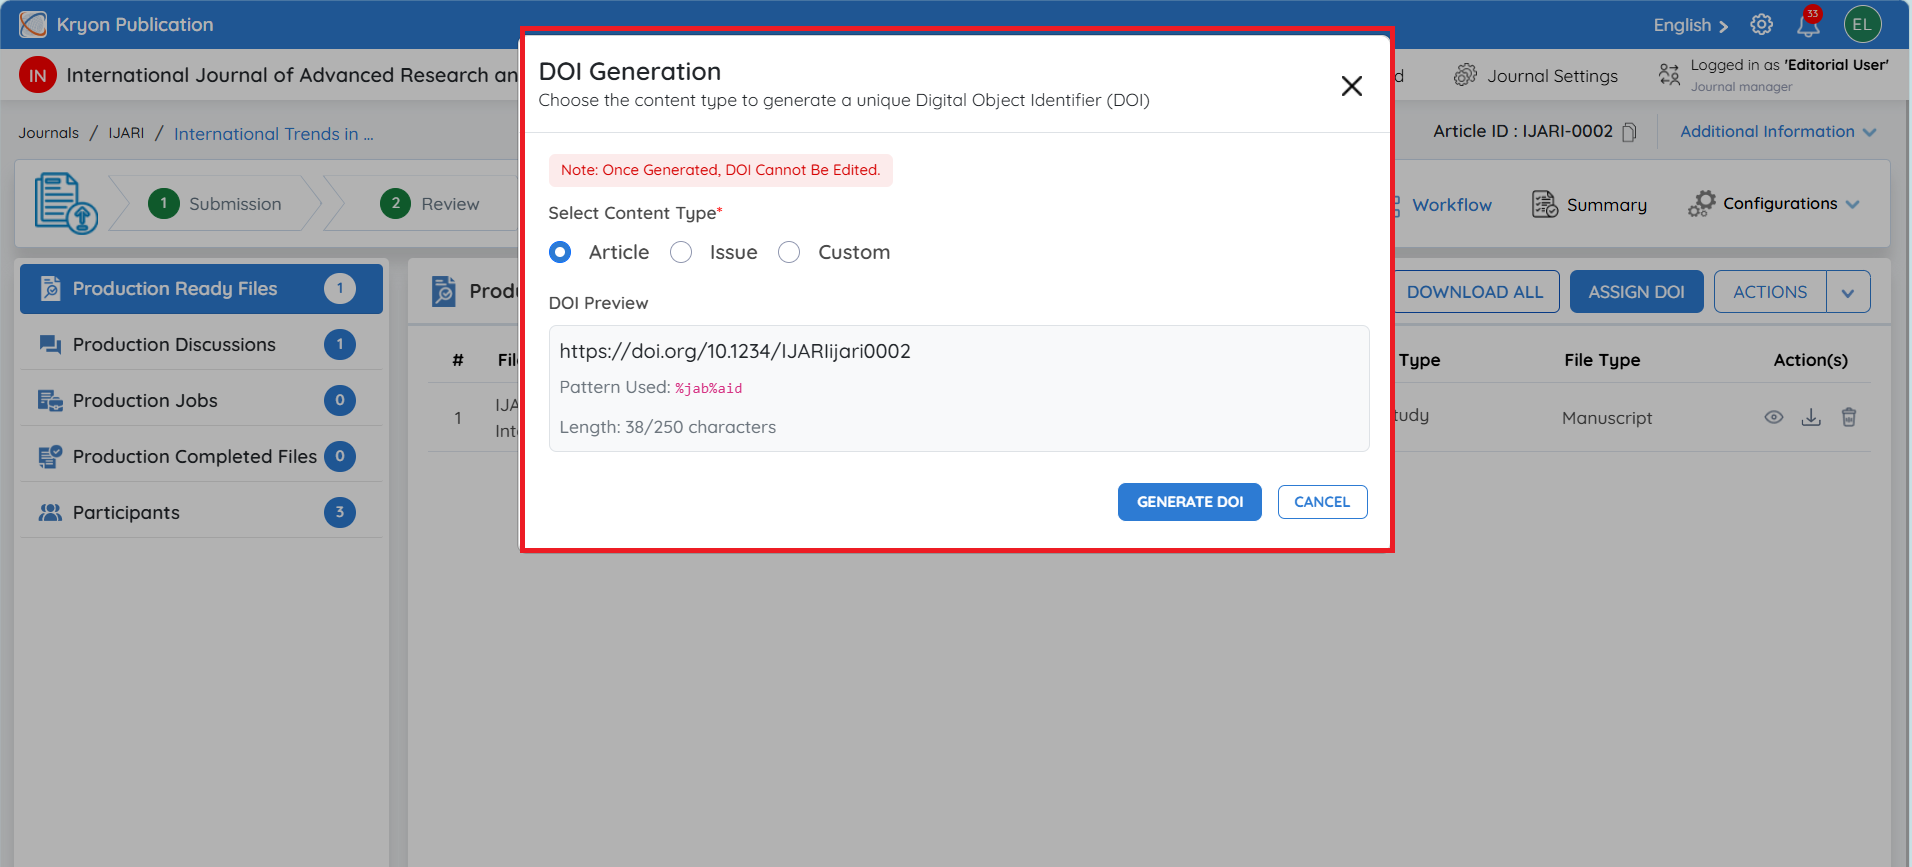
Issue
Select Issue when the DOI needs to be generated using the configured DOI suffix pattern along with issue-specific information.
Example:
-
Enter the Volume Number.
-
Enter the Issue Number.
-
The system will automatically generate the DOI Preview using the configured DOI prefix and suffix pattern.
-
Review the generated DOI before proceeding.
If the configured suffix pattern is based on the Journal Abbreviation, Volume Number, Issue Number, and Article ID, the values entered for the volume and issue will automatically be incorporated into the DOI.
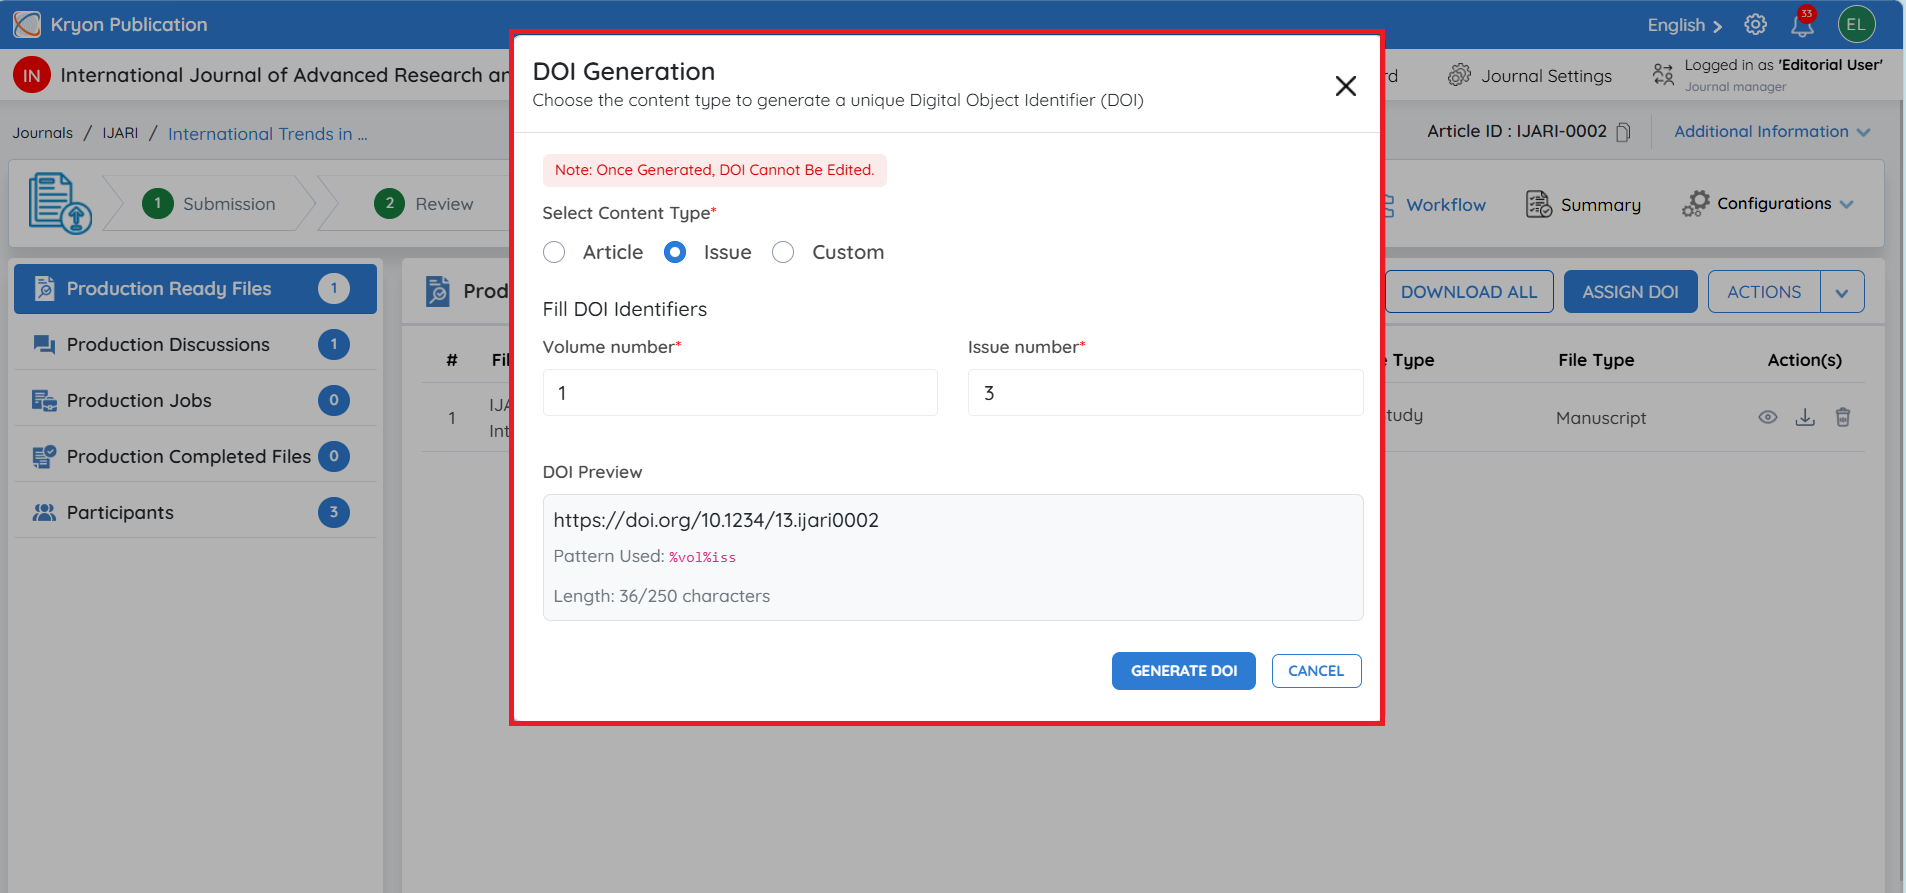
Custom
Select Custom when you want to assign a DOI suffix manually instead of using the journal's configured suffix pattern.
-
The configured DOI Prefix will remain unchanged.
-
Enter the required value in DOI Suffix.
-
The complete DOI will automatically appear under DOI Preview.
Example:
DOI Prefix: 10.1234/
Custom DOI Suffix: IJEST-129/1213
DOI Preview: 10.1234/IJEST-129/1213
This option provides flexibility when a specific DOI suffix needs to be assigned to the article.
After reviewing the DOI Preview, click Generate DOI.
Important: Once the DOI has been generated, it cannot be edited. Verify the DOI prefix, suffix, volume/issue information, and DOI Preview carefully before generating the DOI.
After DOI Generation
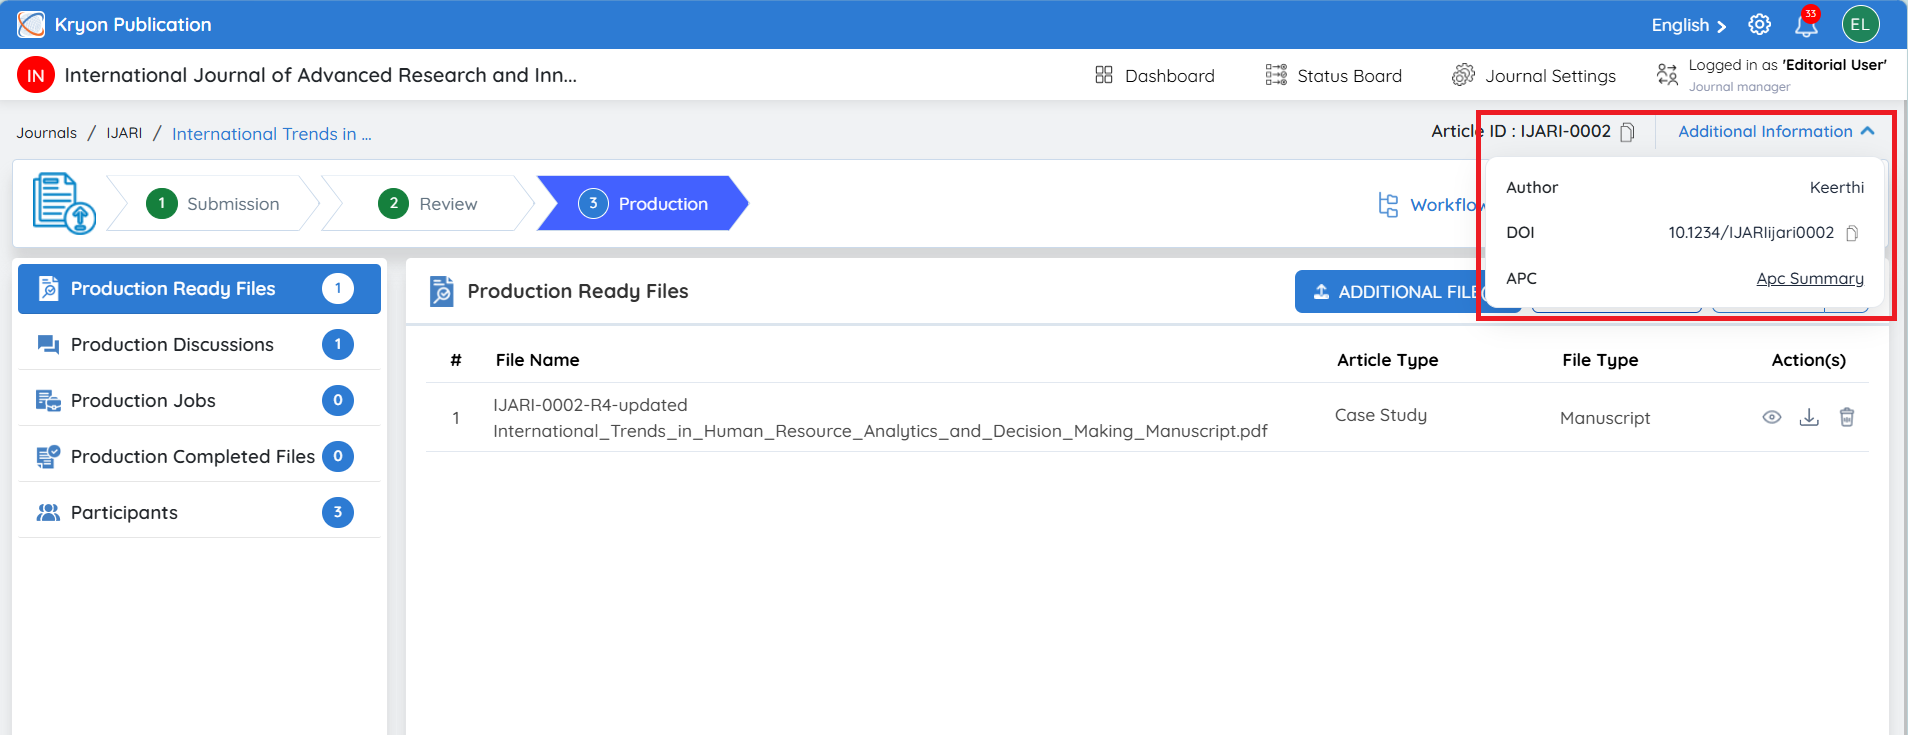
Once the DOI is successfully generated, it will be displayed under Additional Information for the article.
Click Additional Information to view:
-
Author – Displays the author name.
-
DOI – Displays the DOI assigned to the article. The copy icon can be used to copy the DOI.
-
APC – Click APC Summary to view the article’s APC and payment details.
Once a DOI has been generated and assigned, it cannot be edited.
Complete the Production Stage
Once all production activities have been completed and the final files have been verified, the Editorial User can complete the Production stage.
Click Actions. Two options are available:
-
Mark as Completed – Select this when all production work is finished and the article is ready to complete the production workflow.
-
Revert to Previous Stage – Select this if the article needs to be moved back to the Review stage for further corrections or required actions.
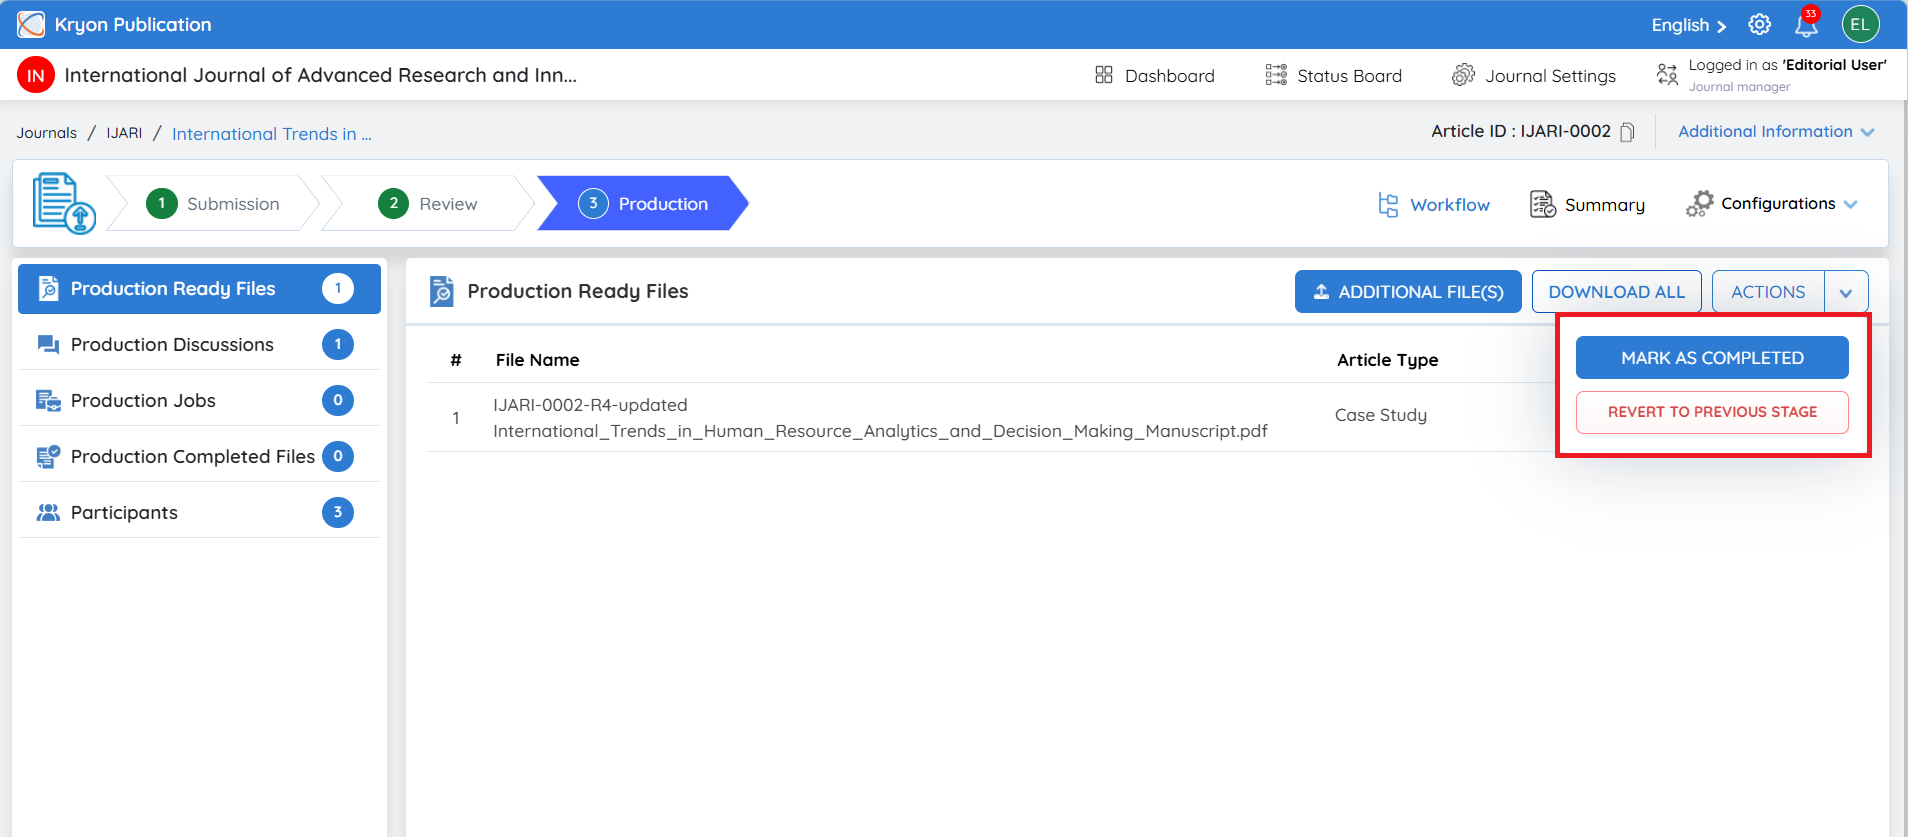
To complete the process, click Mark as Completed and confirm the action. The article will then be marked as Production Completed.
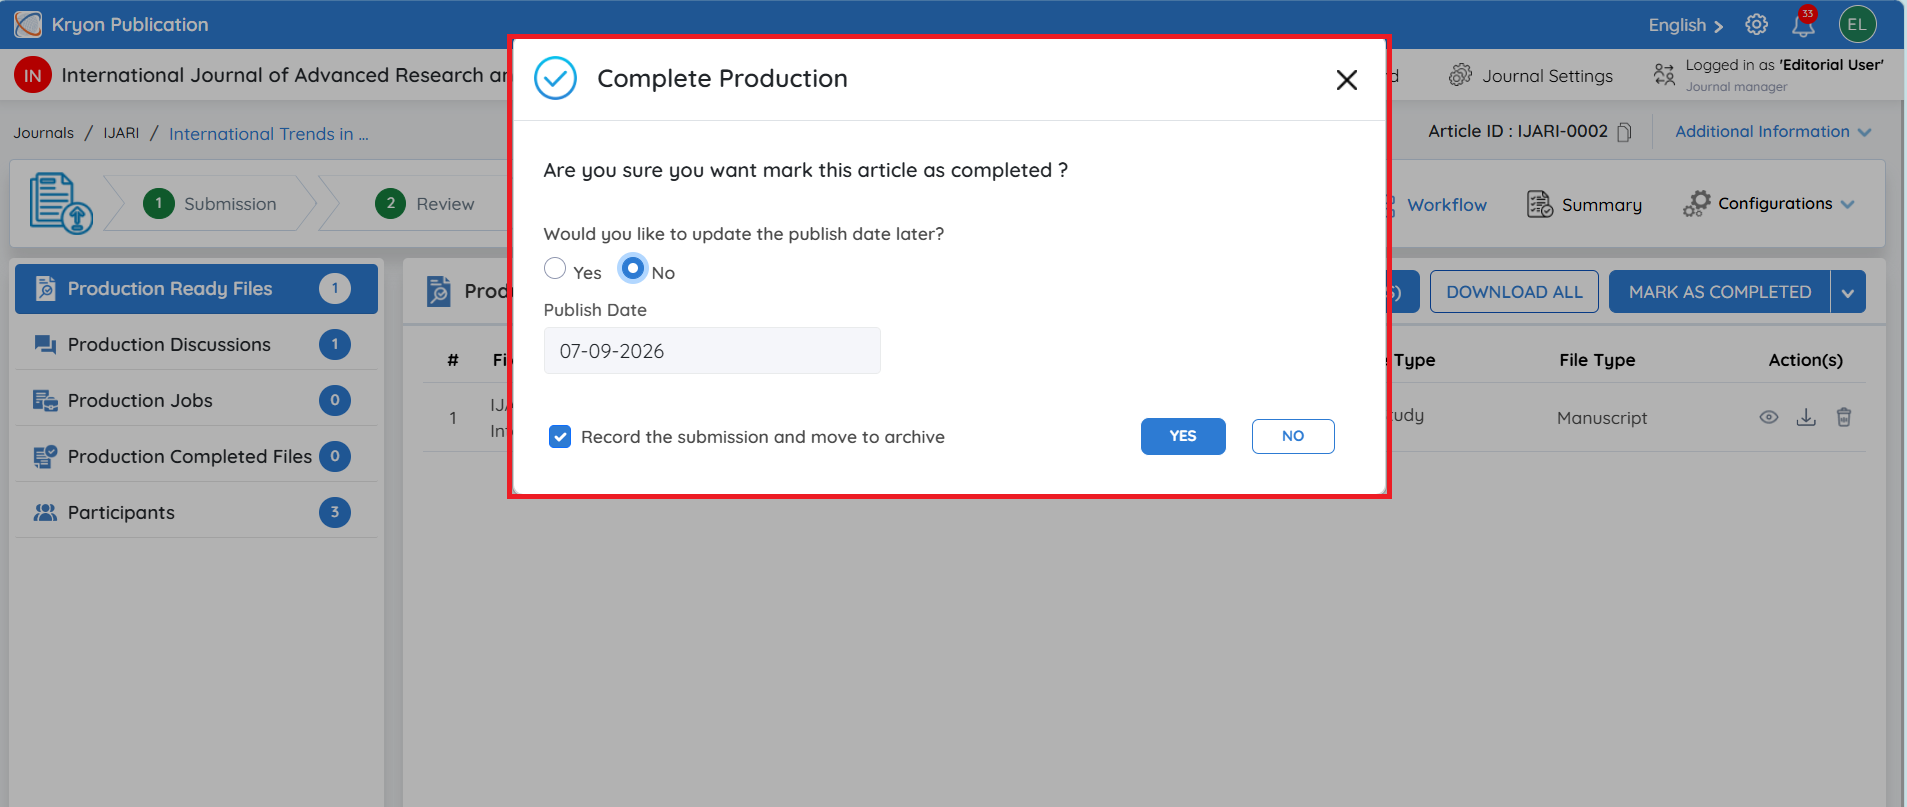
After selecting Mark as Completed, the Complete Production window will open.
-
Confirm that you want to mark the article as completed.
-
Under Would you like to update the publish date later?, select:
a. Yes – The publication date can be updated later.
b. No – Use the Publish Date displayed/selected during completion.
-
Enable Record the submission and move to archive if the completed submission should be recorded and moved to the archive.
-
Click Yes to confirm and complete the Production stage.
-
Click No if you do not want to proceed with production completion.
Once confirmed, the article's Production stage is completed, and the submission will be moved to the archive if the archive option is selected.
Crossref Metadata XML Download
Once the manuscript has completed the editorial, review, APC, and production processes and the final article has been published online, the article metadata may need to be submitted to indexing and discovery services.
If the journal is using Stream Space for content hosting, the required indexing XML files can be generated through the hosting platform itself for supported services such as Crossref, DOAJ, PubMed, EBSCO, and others, based on the journal's indexing requirements and eligibility.
If the journal is not using Stream Space, Kryoni JMS provides the option to generate and download the Crossref Metadata XML for the published article.
How to Generate the Crossref XML
Open the required manuscript in Kryoni JMS and go to the Summary tab.
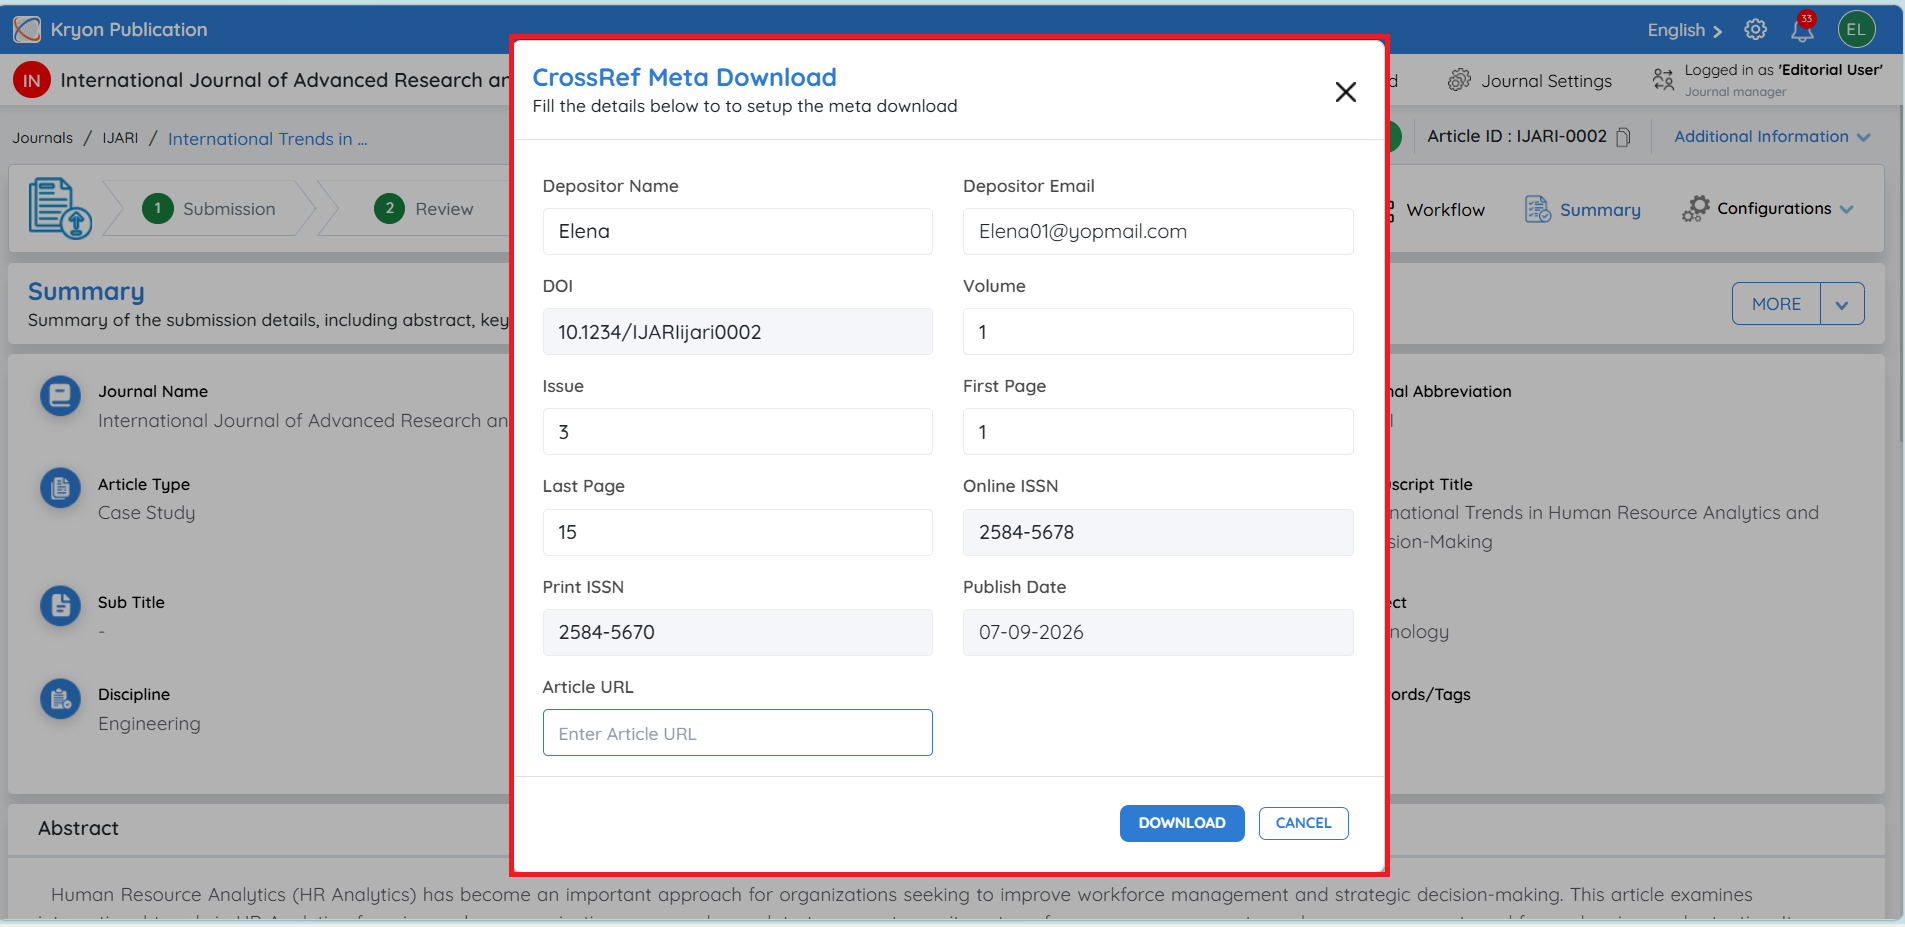
Click More and select Crossref Meta. The CrossRef Meta Download window will open.
This window collects the publication information required to prepare the Crossref metadata XML
Complete the following information:
-
Depositor Name – Enter the name of the person or organization responsible for submitting the metadata to Crossref.
-
Depositor Email – Enter the email address associated with the depositor.
-
DOI – Displays the DOI already assigned to the article.
-
Volume – Enter the volume number in which the article has been published.
-
Issue – Enter the corresponding issue number.
-
First Page – Enter the first page number of the published article.
-
Last Page – Enter the last page number of the article.
-
Online ISSN – Displays the journal's configured Online ISSN.
-
Print ISSN – Displays the journal's configured Print ISSN.
-
Publish Date – Select the actual online publication date of the article.
-
Article URL – Enter the final published URL where readers can access the article.
Download the XML
After completing all the required fields, carefully verify the publication information and click Download.
Kryoni JMS will generate the Crossref Metadata XML using the article information available in the system together with the publication details entered in this window.
The downloaded XML can then be used as part of the journal's Crossref metadata deposit process.
Important: The article should already have its final publication information before generating the XML. Ensure that the DOI, volume, issue, page numbers, publication date, ISSNs, and article URL are correct so that the generated metadata represents the published article accurately.
PRODUCTION CONFIGURATION
What is Production Configuration?
In Editorial Management, Production Configuration refers to the process of designing and organizing the workflow that a manuscript follows after it has been accepted at the review stage. It serves as a blueprint for how the manuscript transitions through various production stages —culminating in final publication.
This setup involves defining:
-
A step-by-step workflow that outlines each stage of the production cycle
-
The specific actions to be performed at each stage (e.g., typesetting, proofing, corrections)
-
The roles and responsibilities of users involved (e.g., Supplier, Author, Journal Manager)
In simple terms:
Production Configuration helps you plan and organize the steps a manuscript follows acceptance. It allows you to automate tasks such as copyediting, typesetting, approvals, and reviews—ensuring a smooth and well-structured transition from acceptance to final publication.
It also defines who is responsible for each task, making job management clear, traceable, and efficient. In Kryoni JMS, each stage of the production process is clearly outlined with defined roles, timelines, and requirements—ensuring that no step is missed and all actions are completed accurately and on schedule.
With Kryoni JMS, you can efficiently manage and streamline your production process by:
-
Defining and configuring custom production workflows that align with your organization’s editorial policies and publishing standards.
-
Assigning tasks and approvals to designated users or teams with precise role-based access and responsibilities.
-
Automating workflow progression, allowing each stage to advance automatically once required actions—such as task completion or approval—are fulfilled.
-
Tracking and monitoring production tasks in real time, providing complete visibility into ongoing activities, status updates, and approaching deadlines.
-
Establishing clear accountability by enforcing mandatory actions at each step, including file submissions, comments, and approval decisions.
How to Create a Production Configuration
Follow the steps below to create and manage a Production Configuration in Kryoni JMS:
Log in
- Sign in to Kryoni JMS using your credentials.
Select Your Journal
- From the dashboard, click on the Journal Name for which you want to set up the production workflow.
Access Production Configuration
-
Navigate to Journal Settings from the right-side menu.
-
Select Configuration.
-
Click on Production Configuration to open the production setup page.
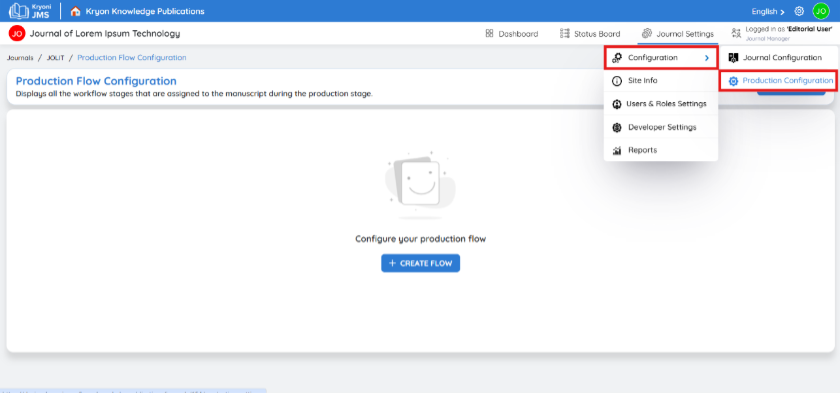
Configure the Production Workflow
- The Production Configuration page will open, displaying options to define your workflow.
Create a New Workflow
On the Production Configuration page, click Create Flow to begin creating a new workflow.
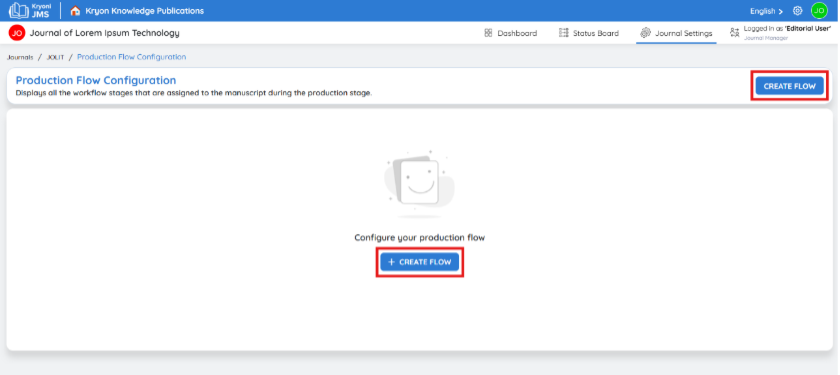
Enter Flow Title
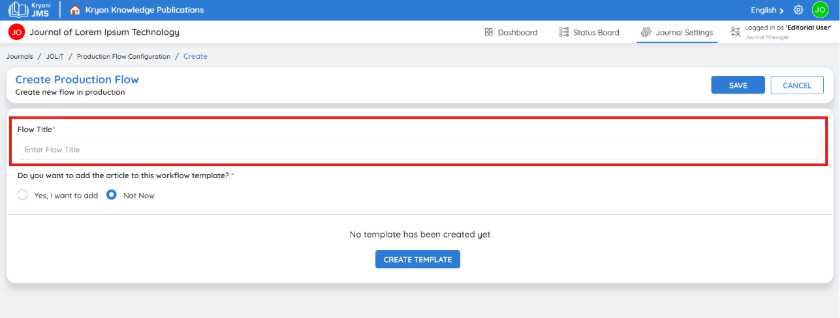
- In the Flow Title field, enter a descriptive title for your workflow.
Example: "Editorial Production Workflow" or "Case Study Article Workflow".
This title will help users and editors quickly identify the purpose of this workflow later.
Associate Workflow with Article Types
"Do you want to add the article to this workflow template?"
You have two options:
- Yes, I want to add
Select this option if you want to automatically assign this workflow to specific article types—such as Editorial, Research Article, or Case Study.
Choosing Yes allows you to automate production job creation. Once an article of the selected type is accepted after peer review, the corresponding production job is automatically generated and assigned based on the workflow settings.
- Not Now
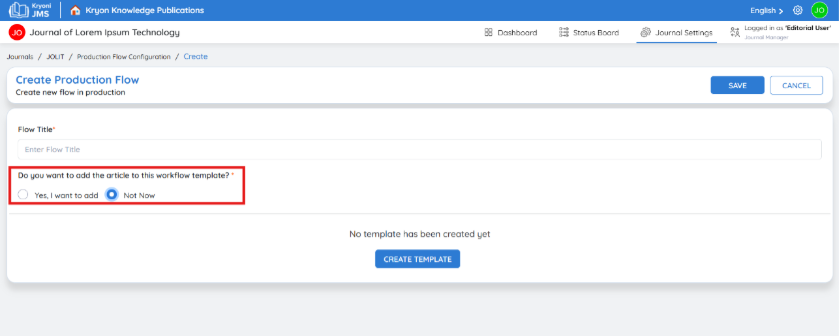
Choose this option if you prefer to manually assign the workflow later, or if you're creating a generic workflow that can be reused for multiple article types.
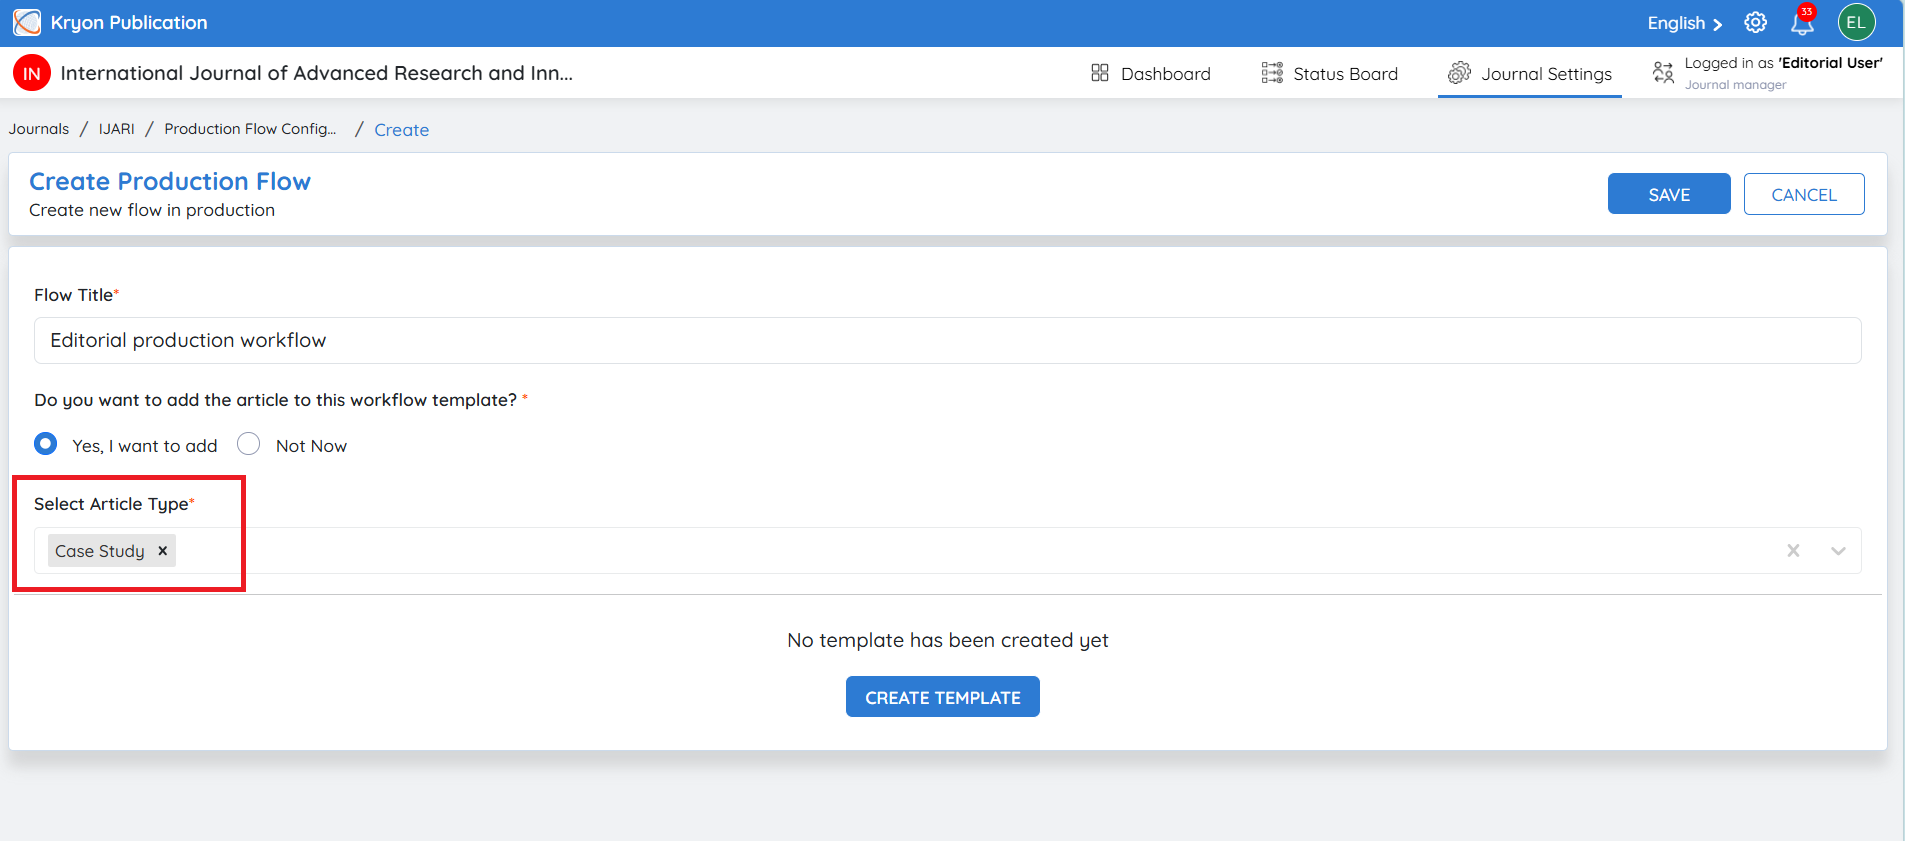
Select Article Type
If you selected Yes, the system will prompt you to choose the article types this workflow should be associated with.
These article types must already be defined in your Journal Configuration.
Common examples may include:
-
Editorial
-
Case Study
-
Research Article
-
Review Article
Associating your workflow with specific article types ensures that the right production process is automatically applied once a submission is accepted.
✅ Example Use Case
Consider a scenario where a production workflow is configured for the article types of Editorial and Case Study.
When authors submit manuscripts under these categories, the submissions will first undergo the standard peer review process. Upon successful completion of the review and acceptance of the manuscript, the assigned production workflow is triggered automatically by the system.
At this stage, the system initiates all predefined production tasks—such as copyediting, typesetting, and approvals—as configured in the workflow template.
This automation eliminates the need for manual intervention and ensures that each accepted manuscript proceeds through a consistent, well-structured production process. As a result, efficiency is improved, quality control is maintained, and production timelines become more predictable.
Understanding Task Types
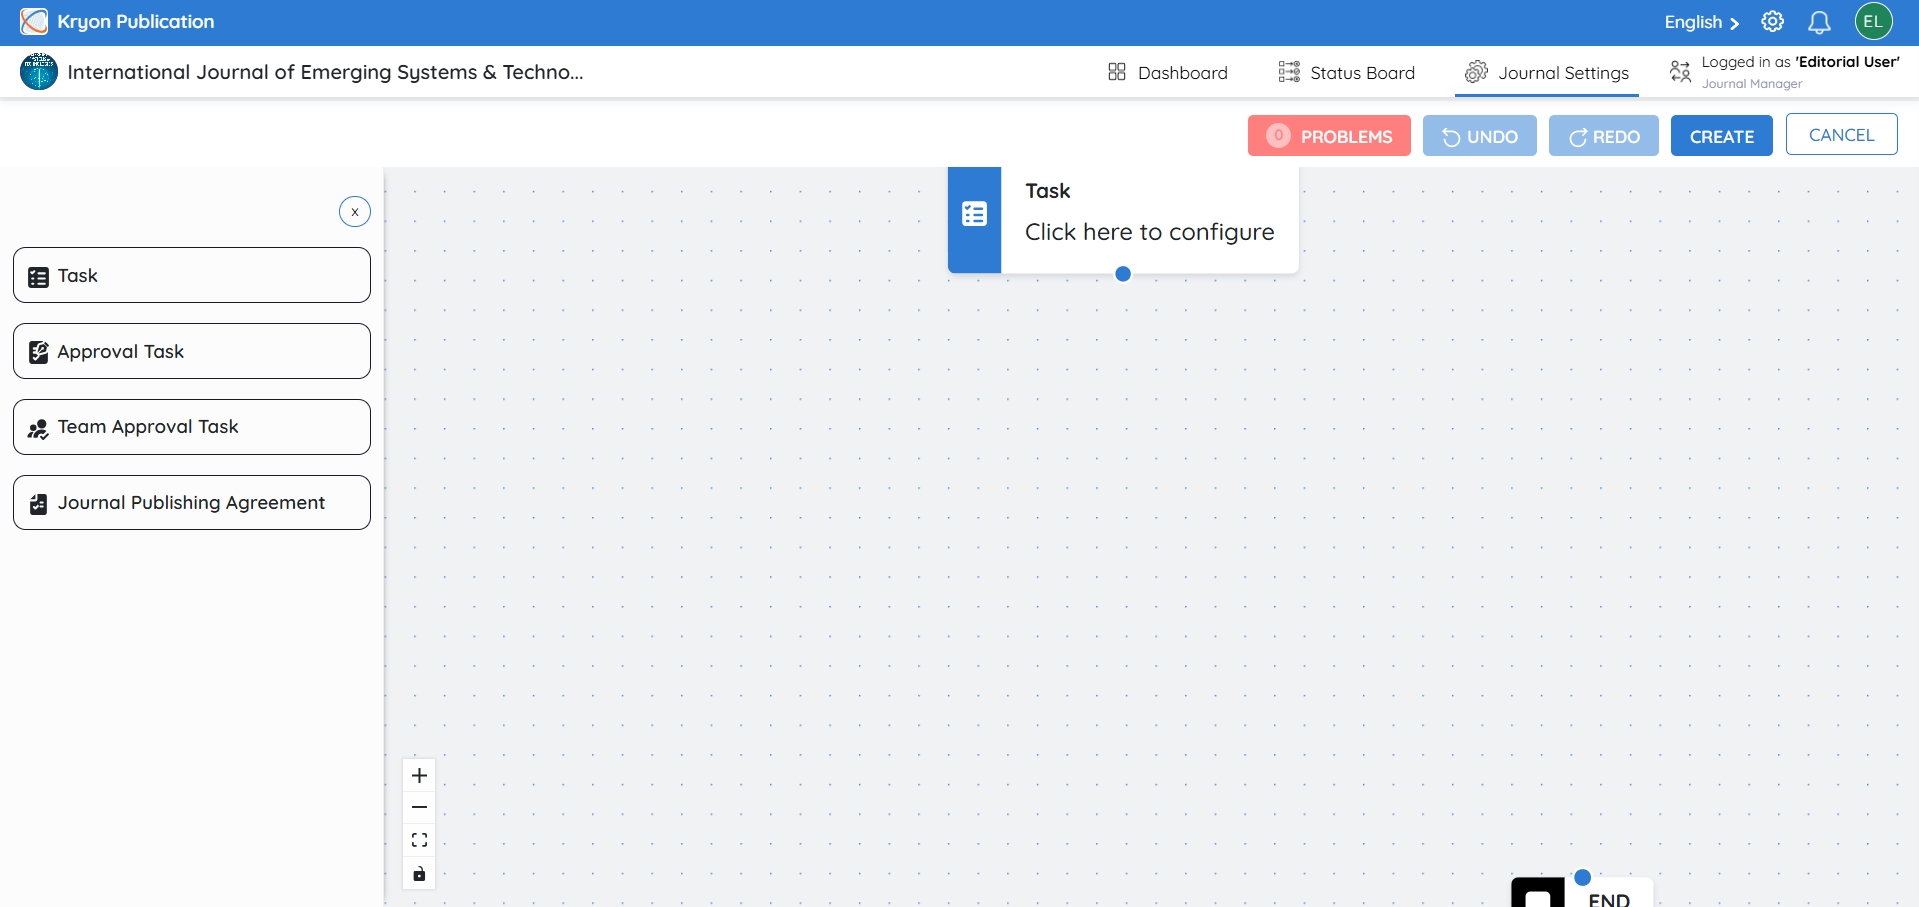
Before configuring a production workflow in Kryoni JMS, it is important to understand the three available Task Types. Each task type serves a different purpose and determines how the workflow progresses based on user actions.
Task Types in Kryoni JMS
-
Task
-
Approval Task
-
Team Approval Task
-
Journal Publishing Agreement
Task
Purpose:
A Task is a predefined activity or job assigned to one or more users within a designated role in the workflow.
Unlike Approval or Team Approval Tasks, a standard Task focuses solely on completion—no approval or rejection is required for the workflow to progress.
Key Highlights
-
Role-Based Assignment: Tasks can be assigned to a specific role, with one or multiple users designated to complete the action.
-
Single-Action Execution: Once any assigned user initiates the task, all remaining invitations are automatically cancelled.
-
Workflow Dependency: The workflow will not proceed to the next stage until the task is marked as completed.
-
No Approval Logic: This task type does not involve any approval or rejection process—it is based solely on action completion.
How to Use:
-
Enter the name of the task
-
Assign the task to the appropriate user(s).
-
The assigned user must:
-
Upload the completed file.
-
Add a mandatory comment.
-
Mark the task as complete.
-
Once the task is completed, the workflow automatically advances to the next step.
✅ Example Use Case
A task is assigned to the Copyediting Team for manuscript formatting. Once a team member initiates the task, all other pending invitations are automatically withdrawn. After completing the formatting, the user uploads the revised file, adds the required comment, and marks the task as complete.
This action triggers the workflow to advance to the next defined stage, ensuring a smooth and coordinated progression through the production process.
2. Team Approval Task
The Team Approval Task is designed for scenarios that require collaborative decision-making. It allows multiple users potentially across different roles to collectively review and approve a task.
Key Features
- Everyone Must Respond All assigned team members must review the task and take action. The task will not move forward until every participant has responded.
- Approved Only if All Approve The task is considered approved only when every team member gives their approval.
- Workflow Follows Group Decision The workflow path is determined by the team’s collective response:
✅ If all members approve → the workflow proceeds to the approved path.
❌ If even one member rejects → the task is marked as rejected, and the workflow moves to the rejection path, which may include a loop for revisions.
✅ Example Use Case
A typeset PDF is assigned to the Design Team for layout approval. Five team members are added to the Team Approval Task.
-
✅ If all five members approve, the workflow proceeds to the next step—final proofreading.
-
❌ If even one member rejects the layout due to an error, the task is marked as rejected, and the workflow loops back to the correction stage for updates.
Setup Options
To configure a Team Approval Task, complete the following settings:
-
Select Role Choose the role responsible for participating in the task (e.g., Journal Manager, Editor, Designer). This determines the user group from which participants will be selected.
-
Select Participant Choose specific users assigned to the selected role. These users will be required to act on the task as part of the approval group.
-
Select Decision Type Define the type of input required from each participant:
-
Comment Only – Participants are required to submit a comment; no file upload is needed.
-
File and Comment Needed – Participants must upload a file and provide comments as part of their response.
-
3. Approval Task
Purpose:
The Approval Task is used when formal approval is required from a specific individual, typically someone in a key decision-making role such as the Editor-in-Chief, Journal Manager.
This task type is ideal for final approvals or any point in the workflow where a single authoritative decision is necessary.
Key Features
-
Role-Based Assignment The task can be assigned to a specific role with one or more participants. However, only one user is allowed to take action on the task.
-
First Action Locks the Task Once a user accepts the task, all other pending invitations are automatically cancelled.
-
Approval or Rejection Required The assigned user must review the task details and either approve or reject the task.
-
Workflow Follows Decision Outcome
-
✅ Approved → The workflow proceeds to the next defined stage.
-
❌ ** Rejected** → The task is marked as rejected, and the workflow moves to the rejection path or loops back for revision, depending on the configuration.
-
✅ Example Use Case
Before final publication, a manuscript requires approval from the Editor-in-Chief.
An Approval Task is assigned to the role Editor-in-Chief, which includes two users. The system sends the task invitation to both users.
-
One of the editors accepts the task first.
-
As soon as they accept, all other invitations are automatically cancelled.
-
The assigned editor reviews the final manuscript and approves it.
-
The workflow then moves to the publication stage.
If the editor had rejected the task instead, the workflow would have returned to the typesetting stage for further revisions.
4. Journal Publishing Agreement
Purpose:
The Journal Publishing Agreement task is used when a formal publishing agreement must be accepted and/or digitally signed by a participant as part of the production workflow.
It allows the journal to include the publishing agreement directly within the workflow and ensures that the required agreement is completed before the manuscript proceeds to the next configured step.
Creating a Simple Production Workflow Template
This section explains how to create a simple, task-based production workflow in Kryoni JMS. It walks through each step of the setup process using a standard linear workflow involving multiple roles.
Step 1: Create a New Template
-
Navigate to Production Configuration
-
Create Flow – Link above
-
Click Create Template
Workflow Sequence Example
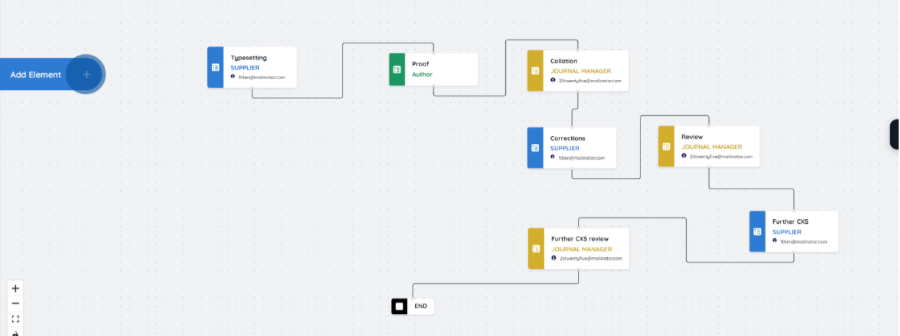
The following sequence represents a standard linear flow involving multiple roles:
Task Nodes
Each box in the diagram represents a task block. The color indicates the role type, and the label provides quick context.
✅ Task Examples in Your Workflow
| Task Name | Role | Description |
|---|---|---|
Typesetting | Supplier | The supplier performs layout and formatting. |
Proof | Author | The author reviews and confirms the layout. |
Collation | Journal Manager | Content is reviewed and collated by editorial staff. |
Corrections | Supplier | Corrections based on author/journal input. |
Review | Journal Manager | Final review of corrected manuscript. |
Further CXS | Supplier | Last round of corrections or adjustments. |
Further CXS Review | Journal Manager | Final QA check before completion. |
End | System Node | Marks the completion of the workflow. |
Functional Highlights
-
Lines/Connections: Each line shows the logical flow of tasks—from start to finish. The system follows the path once a task is completed and moves on to the next.
-
Role-Based Color Coding:
-
🟦 Blue = Supplier
-
🟩 Green = Author
-
🟨 Gold = Journal Manager
-
⚫ Black (End) = Workflow endpoint
-
-
Assigned User Details: Each task block displays the assigned email or role label to indicate who will perform the task.
Top Right Call to Actions:
🔴 PROBLEMS Displays any validation issues within the current workflow—such as unconnected tasks, missing fields, or improperly configured nodes.
🔵 Save Commits all configured tasks and updates to the workflow template. Use this when finalizing or updating your workflow.
⚪ CANCEL Discards all unsaved changes and exits the workflow editor.
Step 2: Add Workflow Elements
-
Click + Add Element
-
Select Task (this is a task-driven process)
Configuring Each Task
To configure a task:
- Click on the Task Block → Click Settings A configuration panel opens in a new tab or sidebar.
- Enter Task Details
| Field | Description |
|---|---|
Task Name | Enter a clear name for the task (e.g., Typesetting, Proof Review) |
Role | Select the role responsible for this task (e.g., SUPPLIER, AUTHOR, JOURNAL MANAGER) |
Supplier House (if applicable) | Choose the appropriate vendor or supplier |
Add Participant | Select the user(s) who will perform the task |
No. of Days to Respond | Set the maximum time allowed to acknowledge the task |
No. of Days to Complete | Set the deadline for completing the task |
Adding the Next Task
-
Click + Add Element
-
Select Task
-
Click on the new task block → Click Settings
Example: Proof Review
| Field | Description |
|---|---|
Task Name | Proof Review |
Role | Author |
If the Author role is selected, you won't be able to assign the participants during configuration. Kryoni JMS will automatically assign the correct author based on the submission once the production job is triggered.
This ensures easy, automated task routing.
🔹 No. of Days to Respond
Specify the number of calendar days within which the assigned user must acknowledge or start the task after receiving the assignment.
🔹 No. of Days to Complete
Define how many days the participant has to complete the task once it's been initiated.
🔹 Work Description
Provide detailed instructions or information about the task.
Click the Save button to confirm and store the task configuration.
Continue Configuring the Workflow
Repeat the same configuration process for all remaining tasks in your workflow, using the provided sequence as a reference. Assign appropriate roles for each stage such as:
-
Collation → Journal Manager
-
Corrections → Supplier
-
Review → Journal Manager
-
Further Corrections → Supplier
-
Final Review → Journal Manager
Once all tasks are added, connect the final task node to the End node to complete the workflow structure.
Final Steps
-
Click Create to generate the workflow.
-
Click Save to store it in the system.
Your simple production workflow is now successfully created and ready to be triggered automatically based on your journal's configuration.
Creating a Simple Production Workflow with a Journal Publishing Agreement
This guide walks through the creation of a simple Production Workflow in Kryoni JMS that includes a Journal Publishing Agreement (JPA). In this example, the workflow will contain three steps:
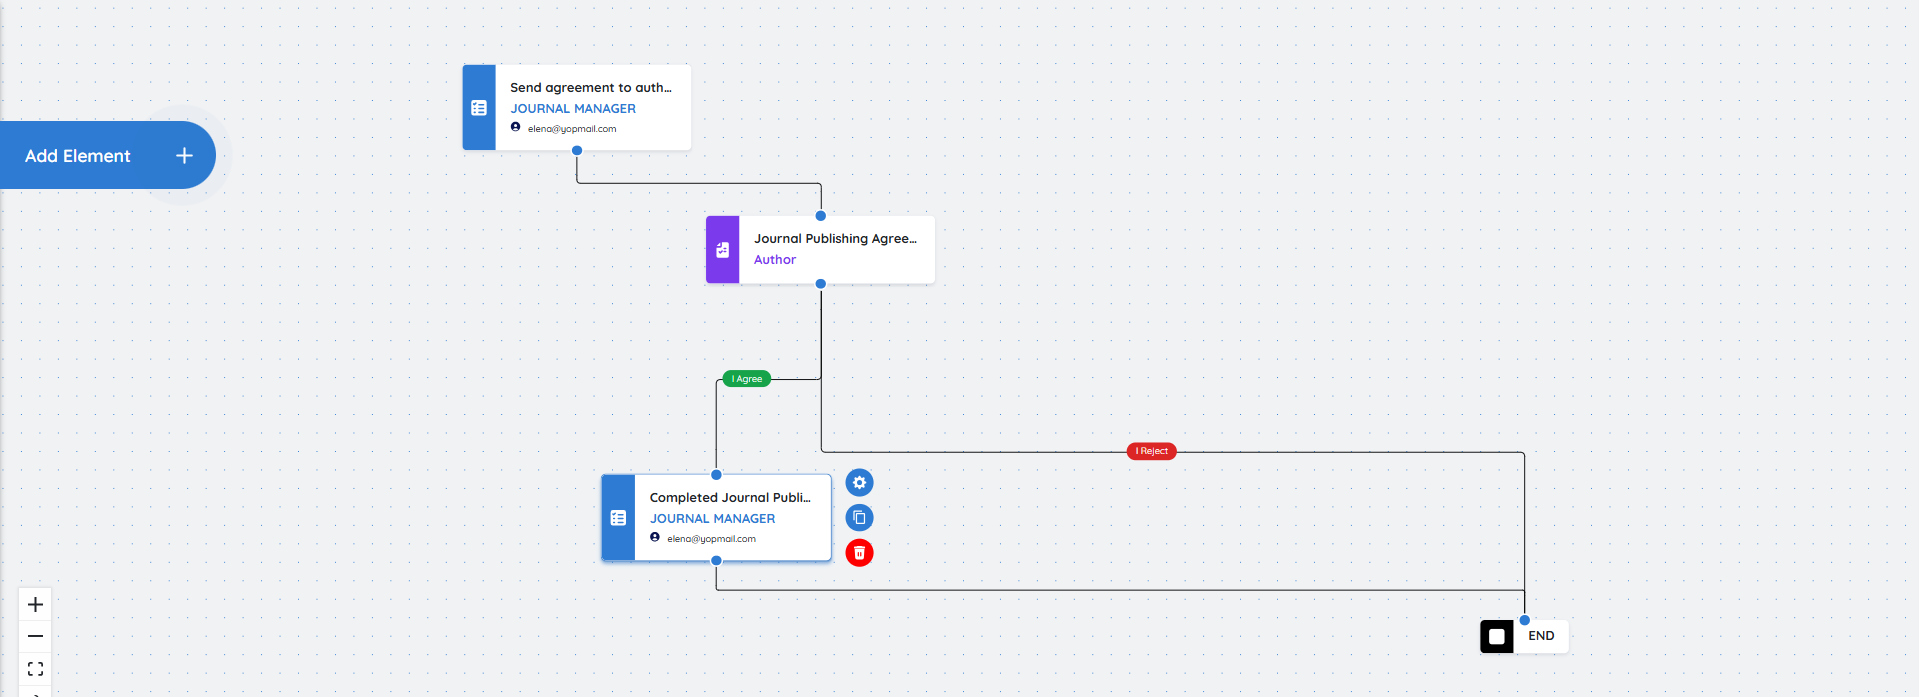
Send Agreement to Author → Journal Publishing Agreement → Completed Journal Publishing Agreement
The workflow will also define what should happen when the author agrees or rejects the publishing agreement.
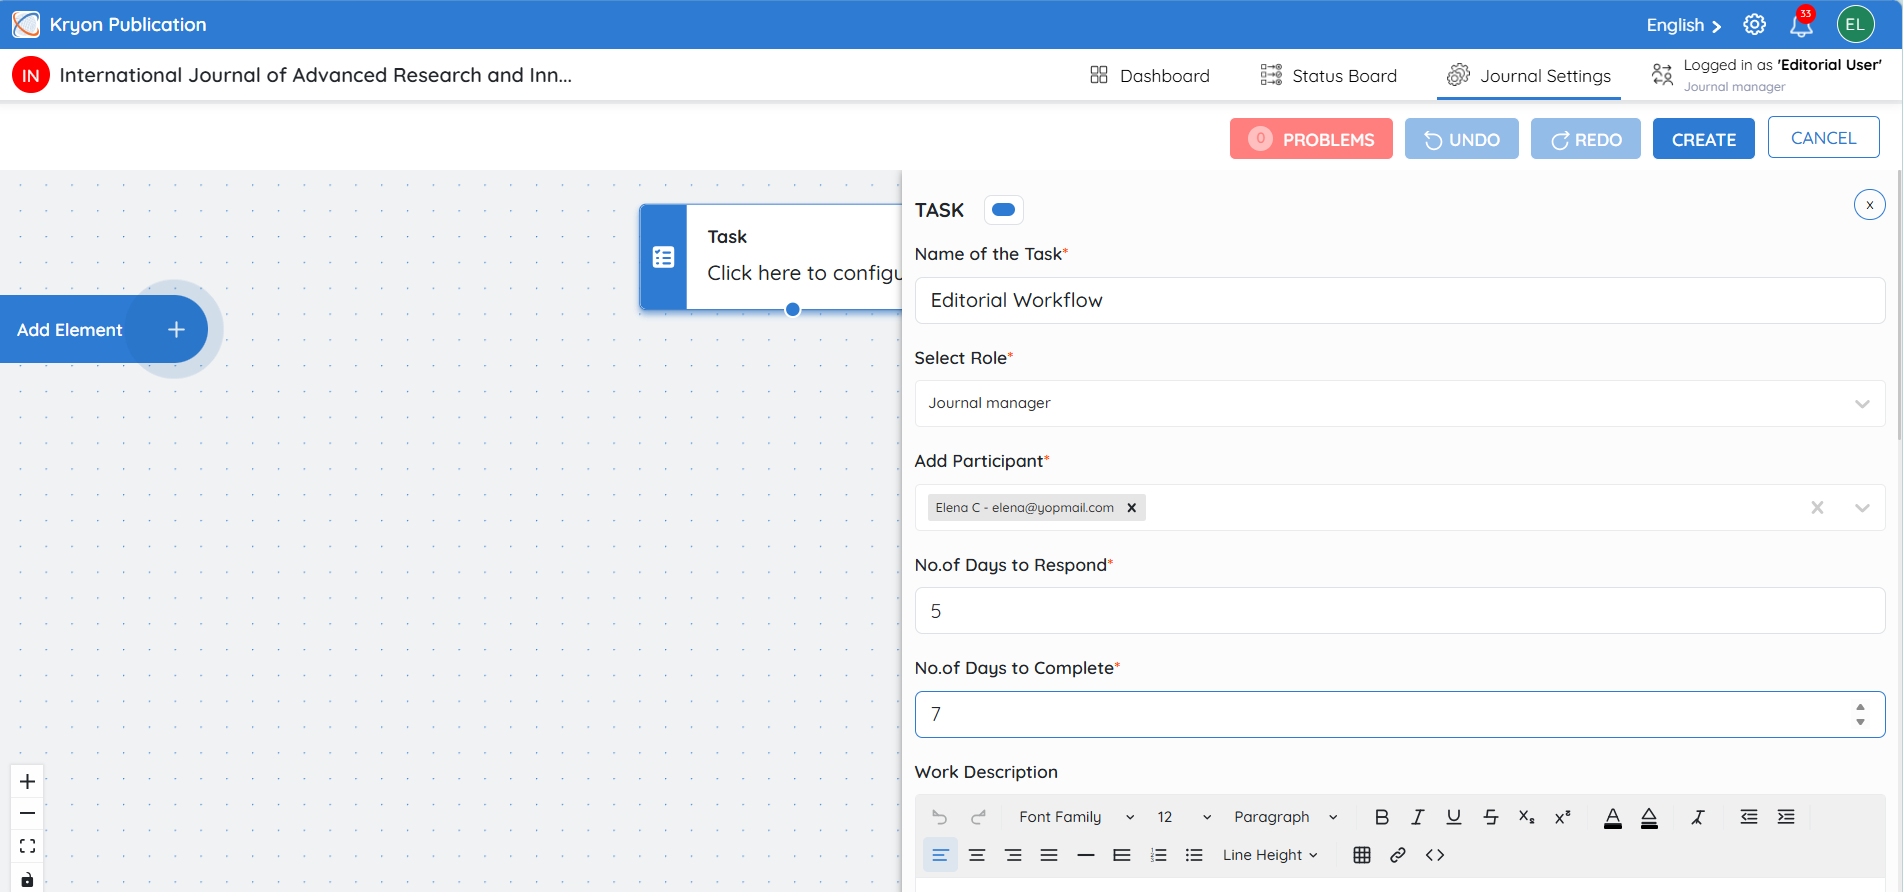
Step 1: Add a Task – Send Agreement to Author
Add a Task to the workflow and configure it for the user responsible for initiating the publishing agreement process.
Enter the Name of the Task, for example, Send Agreement to Author. Select the appropriate Role, such as Journal Manager, and choose the required participant.
Configure the No. of Days to Respond and No. of Days to Complete based on the journal's production timeline. A Work Description can also be added to provide instructions to the assigned participant.
Step 2: Configure the Email Template
Each task contains configurable Email Templates used to notify the participant about the production activity. Open the required email template to view or modify the Subject and Body.
The template can include the available system variables, such as:
-
[[ARTICLE_NAME]]
-
[[ARTICLE_ID]]
-
[[JOURNAL_NAME]]
-
[[MAIL_TO_USER_NAME]]
-
[[JOB_TITLE]]
-
[[JOB_URL]]
These variables will automatically be replaced with the corresponding manuscript, journal, job, and participant information when the email is sent.
Modify the email content if required and click Save.
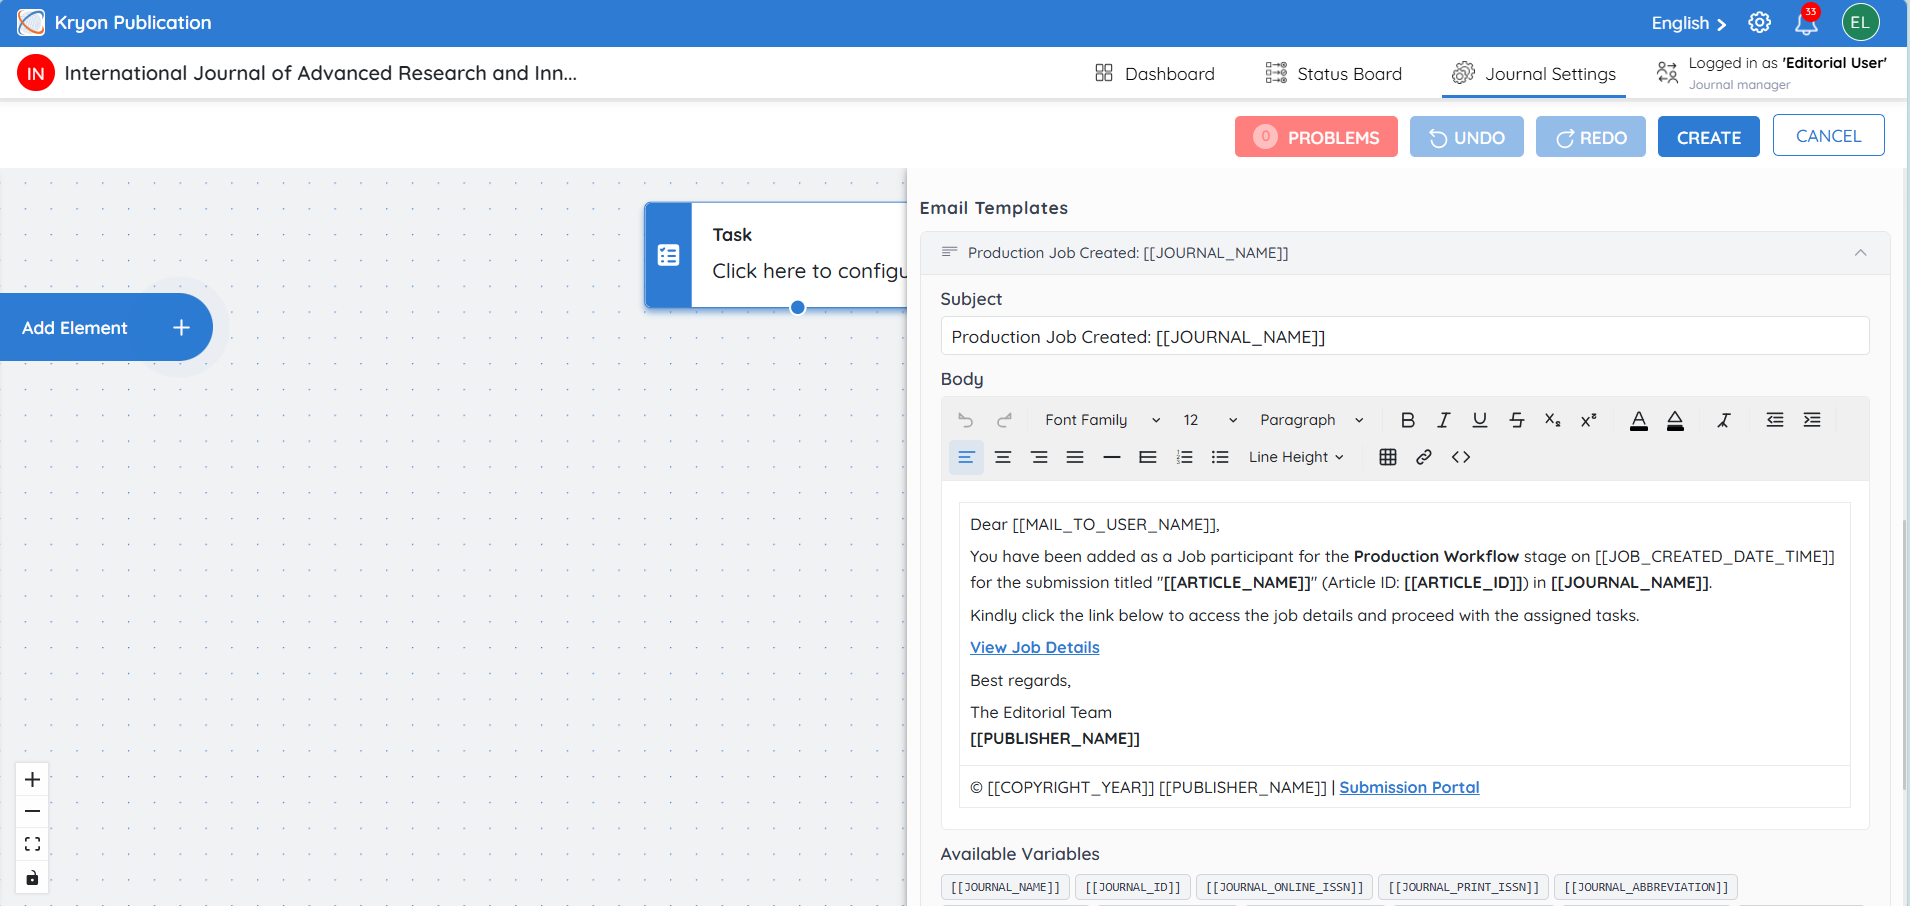
Step 3: Add the Journal Publishing Agreement
Add a Journal Publishing Agreement task after the first task.
Enter a task name, for example, JPA.
The JPA provides two possible outcomes:
I Agree – The participant accepts the publishing agreement.
I Reject – The participant rejects the publishing agreement.
These outcomes can be connected to different paths in the production workflow.
Step 4: Select the Agreement Type
Under Agreement Type, select how the participant must provide their agreement.
Yes/No Confirmation (Checkbox) – The participant confirms acceptance using a checkbox.
Digitally Signed Agreement – The participant must provide a signed agreement.
Both (Checkbox + Digital Signature) – The participant must confirm the agreement and provide a digital signature.
If a digital signature is required, configure the Signature Method:
-
Digital Signature (draw on canvas)
-
File Upload (participant uploads signed document)
-
Both Required
If an Agreement Checklist is configured, the participant must complete all required checklist items before completing the agreement task.
Step 5: Select the Publishing Agreement Document
The configured Journal Publishing Agreement Document is displayed in the task.
The journal's default agreement can be used, or click Upload different file when a different agreement document is required for this workflow.
Select the appropriate role, such as Author, who will receive and complete the agreement.
Then configure the No. of Days to Respond and No. of Days to Complete.
Step 6: Configure Journal Publishing Agreement Email Notifications
The Journal Publishing Agreement provides email templates for different events, such as:
-
Action Required: Journal Publishing Agreement
-
Publishing Agreement Accepted
-
Publishing Agreement Rejected – Workflow Terminated
-
Production Job Submitted
Open any template to review or edit its Subject and Body.
For example, the Action Required email can inform the author that the publishing agreement is ready for review and provide the link to access it.
Available variables can be inserted into the email so that article, journal, author, and publisher information is populated automatically.
Click Save after making the required changes.
Step 7: Add the Completion Task
For the I Agree path, add another standard Task, for example, Completed Journal Publishing Agreement.
Assign this task to the responsible role, such as the Journal Manager, and select the participant.
Configure the response and completion days and modify the email template if required.
This task can be used for any final action required after the author has successfully completed the publishing agreement.
Step 8: Connect the Workflow
Connect the tasks in the required sequence:
Send Agreement to Author → Journal Publishing Agreement
From the Journal Publishing Agreement, configure the two outcome paths:
I Agree → Completed Journal Publishing Agreement → End
I Reject → End
This means that when the author accepts and completes the Journal Publishing Agreement, the workflow proceeds to the Completed Journal Publishing Agreement task. If the author rejects the agreement, the workflow follows the I Reject path and ends.
Once all tasks, participants, email templates, agreement settings, and workflow connections have been configured, review the workflow for any Problems and click Create to save the Production Workflow.
Creating an Approval-Based Production Workflow Template in Kryoni JMS
This guide walks you through building a production workflow using Approval Tasks, along with standard Tasks, in Kryoni JMS. Approval Tasks are used when manuscripts require formal approval before proceeding to the next production stage.
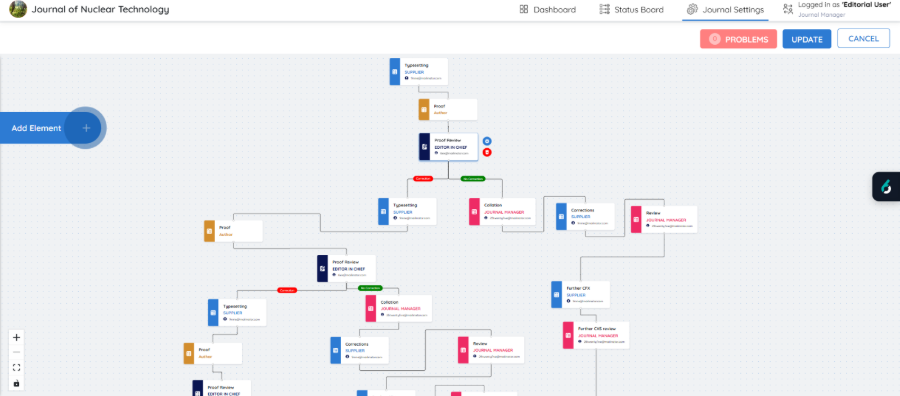
Workflow Sequence Example
This workflow ensures that each manuscript stage is reviewed and formally approved before moving forward. Below is a breakdown of the tasks based on your diagram:
| Task Name | Task Type | Role | Description |
|---|---|---|---|
Typesetting | Task | Supplier | Initial manuscript layout and formatting |
Proof | Task | Author | The author reviews the typeset version |
Proof Review | Approval Task | Editor-in-Chief | Approval check by the EIC before entering production |
Collation | Task | Journal Manager | Content preparation and metadata collation |
Corrections | Task | Supplier | Corrections based on editorial review or rejection |
Review | Task | Journal Manager | Review of post-correction manuscript |
Further CXS | Task | Supplier | Final production polishing if needed |
Further Review | Task | Journal Manager | Final review before closure |
End | System Node | — | Marks completion of production |
Approval Decision Paths
-
✅ Approved: The workflow moves forward to the next production task.
-
❌ Rejected: The workflow returns to a correction point (e.g., Typesetting or Collation) and loops back after updates.
These paths are visibly indicated in the workflow with:
-
Green label = No Correction (Approved path)
-
Red label = Correction Needed (Rejected path)
How to Configure the Approval Task
To set up the Proof Review (Approval Task):
-
Click + Add Element → Select Approval Task
-
Click the task block → Click Settings
-
Enter the following:
| Field | Value/Description |
|---|---|
Task Name | Proof Review |
Select Role | Editor-in-Chief |
Add Participant | Choose the one or more user responsible for approval |
Outcomes | No Correction (Green), Correction (Red) You can also edit these labels by clicking on the outcome field. |
No. of Days to Respond | 3 |
No. of Days to Complete | 3 |
Important: Although multiple users can be assigned, only the first user to accept the task can act. Once accepted, all other invitations are automatically cancelled.
Click Save to confirm the task configuration.
Final Steps
Follow these connection steps to ensure your approval-based workflow is correctly structured:
-
Connect the “Correction” outcome from the Proof Review task back to Typesetting. This loop allows for revisions if the Editor-in-Chief rejects the proof.
-
Connect the “No Correction” outcome from the Proof Review task to Collation. This path continues the workflow if the proof is approved.
-
Continue connecting the remaining tasks in the following order:
a. Collation → Corrections (Handled by Supplier to address any content-level changes)
b. Corrections → Review (Journal Manager reviews the updated file)
c. Review → Further CXS (Optional technical cleanup by Supplier if required)
d. Further CXS → Further Review (Final quality check by Journal Manager)
-
Connect the final task (Further Review) to the End node. This signifies successful completion of the production workflow.
Finally:
-
Click Create to generate the workflow template.
-
Click Save to store and activate the workflow in Kryoni JMS.
Your approval-based production workflow is now fully configured and ready for automated execution as manuscripts progress through the post-acceptance stage.
Creating a Team Approval-Based Production Workflow Template in Kryoni JMS
Team Approval Tasks are used in editorial workflows when multiple stakeholders must review and approve a manuscript collaboratively before allowing it to proceed to the next production phase. In Kryoni JMS, you can configure these workflows to enforce high editorial standards through structured, multi-user approvals.
Workflow Sequence Example
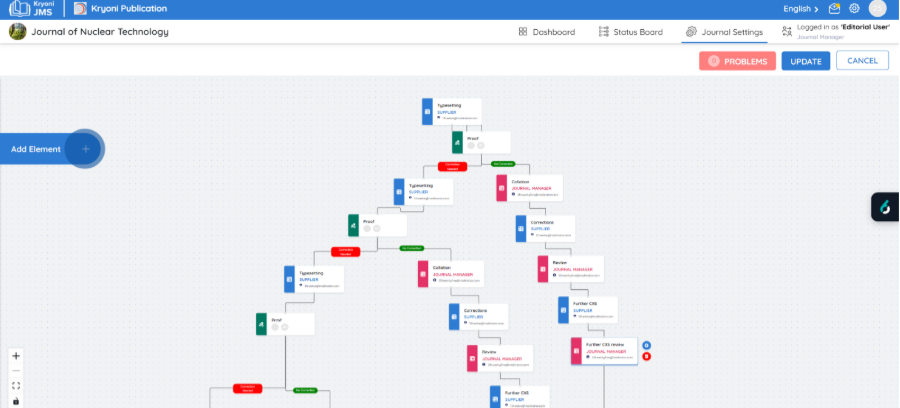
| Task Name | Task Type | Role | Description |
|---|---|---|---|
Typesetting | Task | Supplier | Initial layout and formatting of the manuscript. |
Proof | Team Approval | Author, Supplier, JM | A team of users reviews the proof together and collectively approves or rejects. |
Collation | Task | Journal Manager | Collates comments and prepares metadata. |
Corrections | Task | Supplier | Applies all necessary changes as per the team’s review. |
Review | Task | Journal Manager | Reviews post-correction version for consistency. |
Further CXS | Task | Supplier | Final polish if required. |
Further CXS Review | Task | Journal Manager | Last quality review before publication. |
End | System Node | — | Marks the workflow as complete. |
How Team Approval Works
In the Proof stage, a Team Approval Task is configured.
-
All team members must review and act on the task.
-
The task is:
-
✅ Approved → Workflow continues to Collation
-
❌ Rejected → Workflow loops back to Typesetting for corrections
-
Example
If 3 members are assigned to the Proof Team:
-
If all approve, the task proceeds.
-
If even 1 rejects, the task is rejected and returns for corrections.
Configure the Team Approval Task
• Click + Add Element.
• Select Team Approval Task.
• A task block will appear on the canvas.
1. Open Task Settings
-
Click on the task block.
-
Click Settings
-
A new panel will open on the right.
2. Fill in Task Details
| Field | Value/Description |
|---|---|
Name of the Task | Enter a meaningful task name (e.g., Proof). This will help users quickly identify the task. |
Outcomes | Select from predefined outcomes: ✅ Approved and ❌ Rejected. You can click on the label to rename if needed. |
No. of Days to Respond | Enter the maximum number of calendar days the assigned user must accept or respond to the task (e.g., 2). |
No. of Days to Complete | Enter the number of days the user must complete the task once accepted (e.g., 3). |
3. Create the Team
-
Click Create Team.
-
A popup will appear where you can define the members of the approval group.
In the Team Popup:
-
Comment Only – Only comments required
-
File and Comment Needed – Upload and comment both required
| Field | Description |
|---|---|
Select Role | Choose the user role (e.g., Author, Supplier, Journal Manager) |
Participant | Select the specific user (email shown if applicable) |
Decision Type | Choose one of the following: |
-
Click ADD + to add the user to the team.
-
Repeat for each role.
-
Once done, click YES to confirm.
Your team might look like this:
| Role Name | Decision Type | |
|---|---|---|
Author | (Auto-selected) | Comment Only |
Supplier | [email protected] | Comment Only |
Journal Manager | [email protected] | File and Comment Needed |
4. Save the Task
-
Once team is configured and task details filled:
- Click Save to confirm the task setup.
Decision Workflow
-
Approved → Workflow proceeds to Collation.
-
Rejected → Workflow loops back to Typesetting for revision.
Every team member must act. The task is only approved if all approve.
Final Step
- Make sure the outcomes are connected to the appropriate next steps:
-
✅ Approved → Next production task
-
❌ Rejected → Returns to correction stage
-
Then:
-
Click Create or Update at the top right.
-
Click Save to finalize your workflow.
Your Team Approval Workflow is now successfully configured.
Production Jobs
The Production Jobs tab manages both automated and manual tasks that form part of the production workflow. Once a manuscript is moved to production, the jobs configured in the workflow are automatically triggered according to the setup defined by the journal manager.
1. Automatic Job Triggering
- Once the production workflow has been pre-configured with a set of tasks, the system automatically triggers these jobs in the Production Jobs tab based on the Article type and the configured roles.
- This automation ensures that essential production tasks—such as typesetting, copyediting, metadata validation, or galley generation—begin without manual intervention.
- Each job is directly linked to the Article Type (e.g., Case Study, Research Paper), ensuring that the appropriate workflow is consistently applied to the correct manuscript.
Automation reduces delays and helps maintain a consistent production process, while still allowing editorial staff to create or cancel jobs manually if needed.
2. Manual Job Creation
If additional jobs are needed, you can also create them manually:
-
Click Create Job in the Production Jobs tab.
-
The system redirects you to the Production Configuration Page.
-
From here, you can define and link a new job to the workflow. - LINK
-
Save the configuration, and the new job will appear in the Production Jobs list.
3. Actions
From the Actions menu (three-dot icon) next to each job, you can:
- Cancel Job – Stop a job that is no longer required.
This ensures that the workflow remains flexible and can adapt to specific manuscript or production requirements.
Example: Task-Based Production Workflow
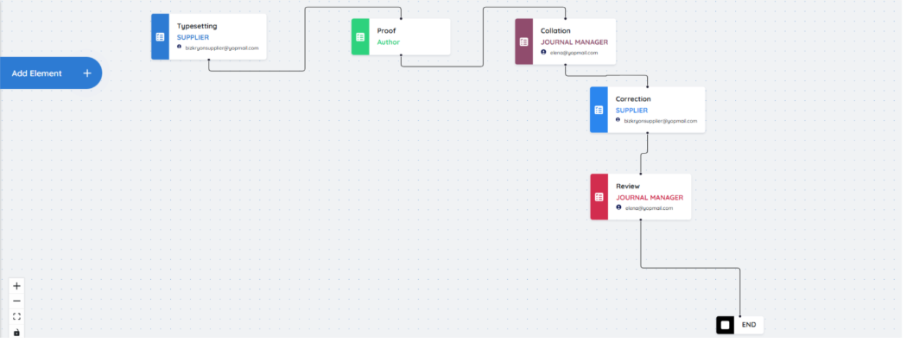
The Production Workflow defines the sequence of actions required to transform an accepted manuscript into a final publish-ready file. The workflow ensures each role (Supplier, Author, and Journal Manager) performs their assigned task in the correct order, maintaining efficiency and accountability throughout production.

In this example, a simple task-based workflow is configured for articles categorized as Case Study or Editorial.
When a manuscript under these article types enters the Production stage, the system automatically initiates the configured workflow shown below.
Flow Example
The configured flow includes the following sequence of tasks:
- Typesetting – Supplier
a. The production supplier receives the manuscript first.
b. The supplier performs typesetting, formatting, and layout design as per journal standards.
- Proof – Author
a. Once typesetting is complete, the proof version is sent to the author for review.
b. The author can review and suggest corrections or approve the layout.
- Collation – Journal Manager
a. The journal manager reviews the author’s corrections and collates all necessary changes.
b. Any inconsistencies or missing elements are verified before forwarding for correction.
- Correction – Supplier
a. The supplier receives the collated comments and implements the required corrections.
- Review – Journal Manager
a. The journal manager performs a final review of the corrected file.
b. Once approved, the process moves to completion and the file is marked as production-ready.
- End – Workflow Completed
a. The final, verified file proceeds to the Production Completed Files section for DOI assignment and publication release.
Supplier Workflow
Once a production job is created and assigned in the system, the Supplier receives an email notification indicating that a new task has been assigned. The supplier can then log in to Kryoni JMS to view and complete the assigned job.
1. Supplier Login
-
The supplier logs into the platform using their registered credentials.
-
After login, the supplier can navigate to the Jobs section under the specific journal (e.g., International Journal of Emerging Systems & Technologies).
-
All active and pending jobs will be displayed in the Supplier Jobs dashboard.

2. Viewing Assigned Jobs
-
Each assigned job is listed with the following details:
-
Workflow Name (e.g., Production Workflow)
-
Article Type (e.g., Case Study, Editorial)
-
Status (Pending, In Process, Completed)
-
Assigned Date and Last Updated Date
-
-
To open a specific job, click the View (eye icon) under the Action(s) column.
3. Job Workflow Interface
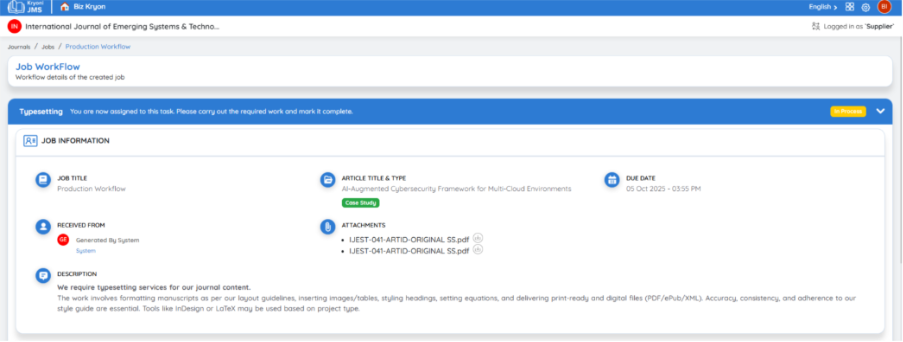
Upon clicking the job, the supplier is redirected to the Job Workflow page.
Here, the following key details are displayed:
-
Job Title – Name of the workflow or task assigned.
-
Article Title & Type – The article to which the job belongs (e.g., AI-Augmented Cybersecurity Framework for Multi-Cloud Environments).
-
Attachments – Files to be downloaded for processing (e.g., manuscripts or proof versions).
-
Description – Detailed instructions about the task (e.g., typesetting, formatting, or corrections required).
-
Due Date – The deadline by which the job must be completed.
4. Uploading Completed Files
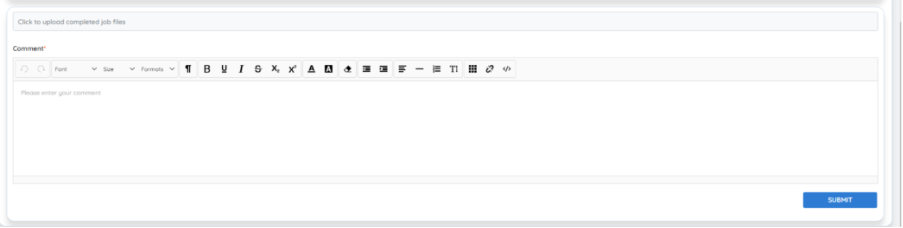
Once the supplier completes the assigned work (e.g., typesetting, proofing, corrections):
-
Click Upload Completed Job Files.
-
Select and upload the finalized output file(s).
-
Enter relevant details in the Comment section — this can include progress updates, notes, or confirmation messages for the editorial team.
-
Click Submit to finalize the job.
The job status will automatically update in the system, and the next step in the workflow (e.g., Author Proof ) will be triggered.

Author Proofing Stage
After the supplier completes the assigned production task (e.g., typesetting), the workflow automatically transitions to the Author Proofing stage. This allows the author to review the formatted version of their manuscript and provide any required corrections or approval before publication.
1. Author Login
-
The Author receives an email notification once their article moves to the Proofing stage.
-
The author logs in to the Kryoni JMS dashboard and navigates to the respective journal.
-
The submission appears under the Submissions tab with the status “Moved to Production.”

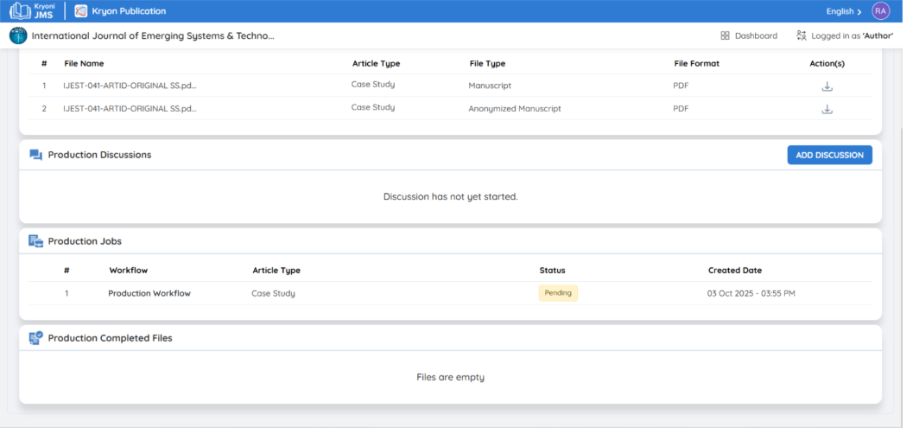
2. Accessing the Proofing Task
-
Under the submission record, open the Production tab.
-
In the Production Jobs section, the current workflow (e.g., Production Workflow) is displayed with status Pending.
-
Click on the production workflow name to view the details of the assigned task.
3. Job Workflow Details
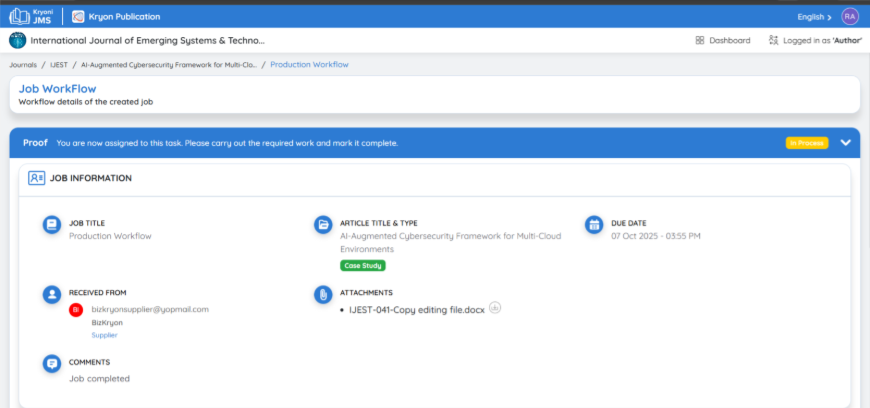
The Job Workflow page provides complete visibility into the proofing task, including:
-
Job Title – The name of the current production workflow.
-
Received From – The role or user who submitted the previous step (e.g., Supplier).
-
Article Title & Type – The manuscript under review (e.g., AI-Augmented Cybersecurity Framework for Multi-Cloud Environments – Case Study).
-
Attachments – Files shared by the previous participant (e.g., formatted manuscript, proofs).
-
Comments – Notes or feedback provided by the previous task owner
-
Due Date – The deadline for author review.
4. Completing the Proofing Task
Once the Author completes the review process, they must upload the finalized or corrected file along with relevant comments.
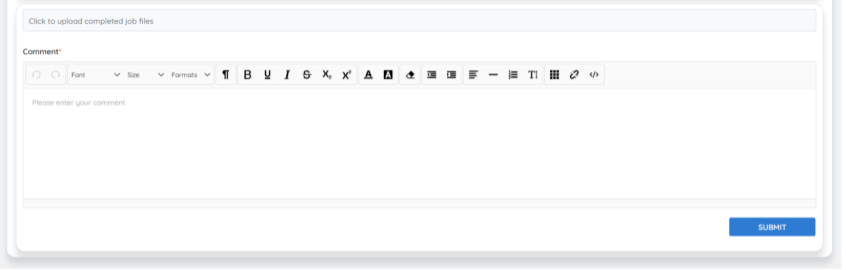
Steps to complete the task:
-
Click Upload Completed Job Files and select the reviewed or corrected manuscript from your system.
-
Add your comments in the Comment box — clearly specify:
a. Whether the proof is approved for publication, or
b. If any minor corrections or adjustments are needed.
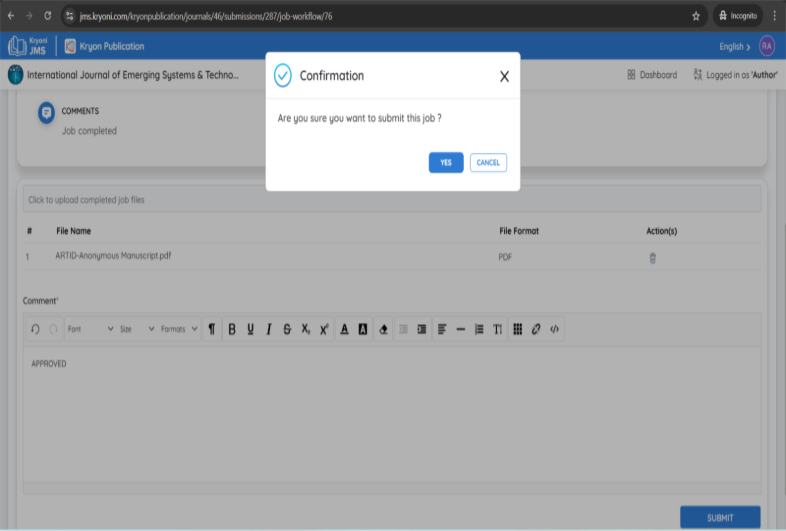
- After verifying the file and comments, click Submit to finalize the proofing stage.
Once submitted, the system automatically marks the task as Completed and triggers the next workflow step (e.g., Collation or Correction) assigned to the respective production participant.
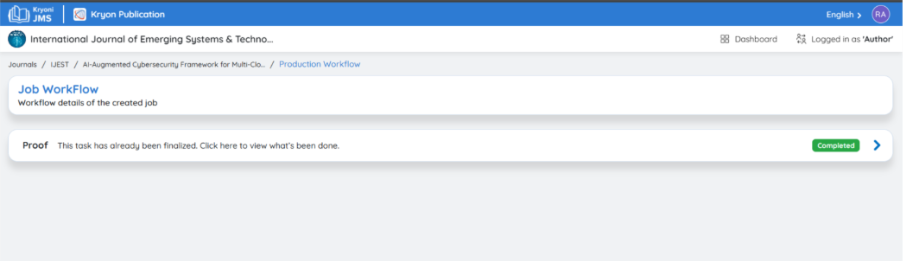
This is how the production workflow continues step-by-step until it reaches the final stage (end). Each task in the workflow is executed in a defined sequence — automatically transferring from one participant to the next based on the configured flow.
Final Stage: Completing the Production Workflow
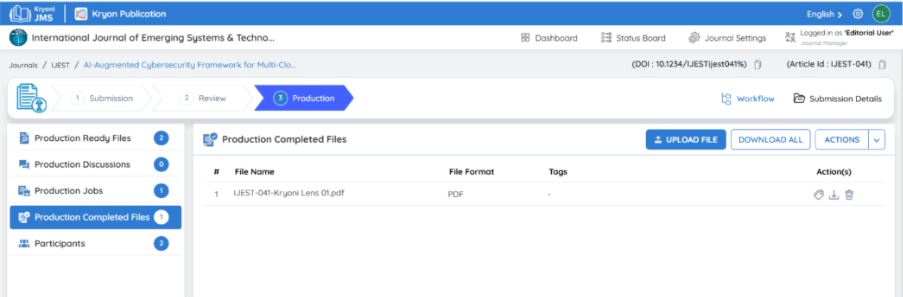
Once all tasks are completed, the final, publish-ready manuscript appears in the Production Completed Files section.
1. Viewing Completed Files
When the last task in the production process is finished, the system automatically moves the finalized files (e.g., the final PDF, XML, or galley file) to the Production Completed Files tab.
Each file is listed with its format and can be managed by the Journal Manager or Editorial User.
2. Adding Tags to Completed Files
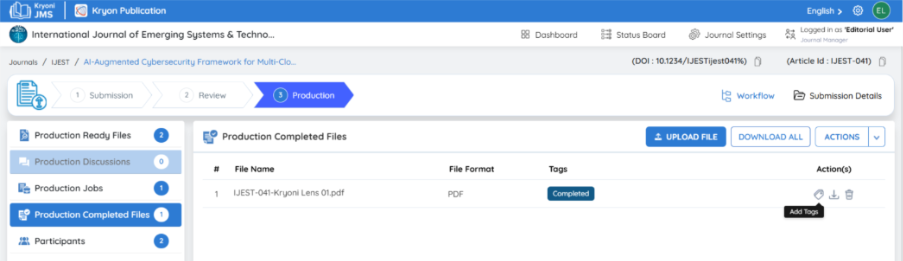
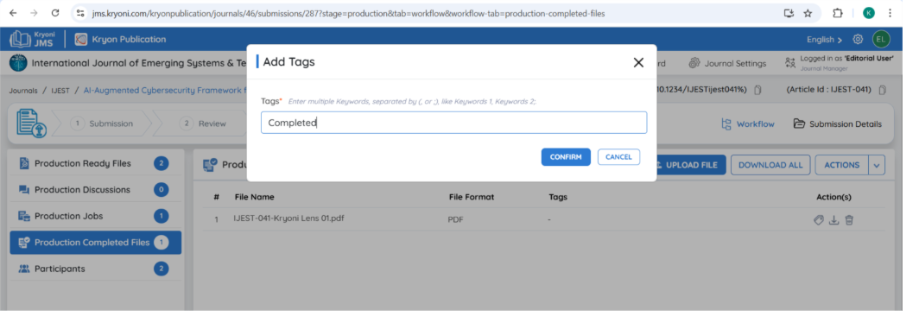
Tags help categorize and identify the final output file. To add a tag:
-
Click the Tag Icon under the Action(s) column.
-
Enter the relevant tag name — for example, “Completed,” “Final PDF,” or “Galley Version.”
-
Click Confirm to save the tag.
a. The added tag appears next to the file name for quick identification.
3. Uploading Additional Files
If any supplementary or updated files need to be attached:
-
Click the Upload File button.
-
Select the required file from your system.
-
Once uploaded, it appears in the same list with the appropriate details.
This option is useful for uploading final corrections, alternate formats, or supplementary materials.
4. Finalizing Production
After all production tasks are verified and completed:
-
Click the Actions menu.
-
Select Mark as Completed.
This marks the entire production workflow as closed and ready for journal publication.

After marking as completed, the article is ready for release on the journal’s platform