Initiating APC
EDITORIAL USER SIDE
Now, let’s see how the APC process works when Article Processing Charges are enabled for the journal.
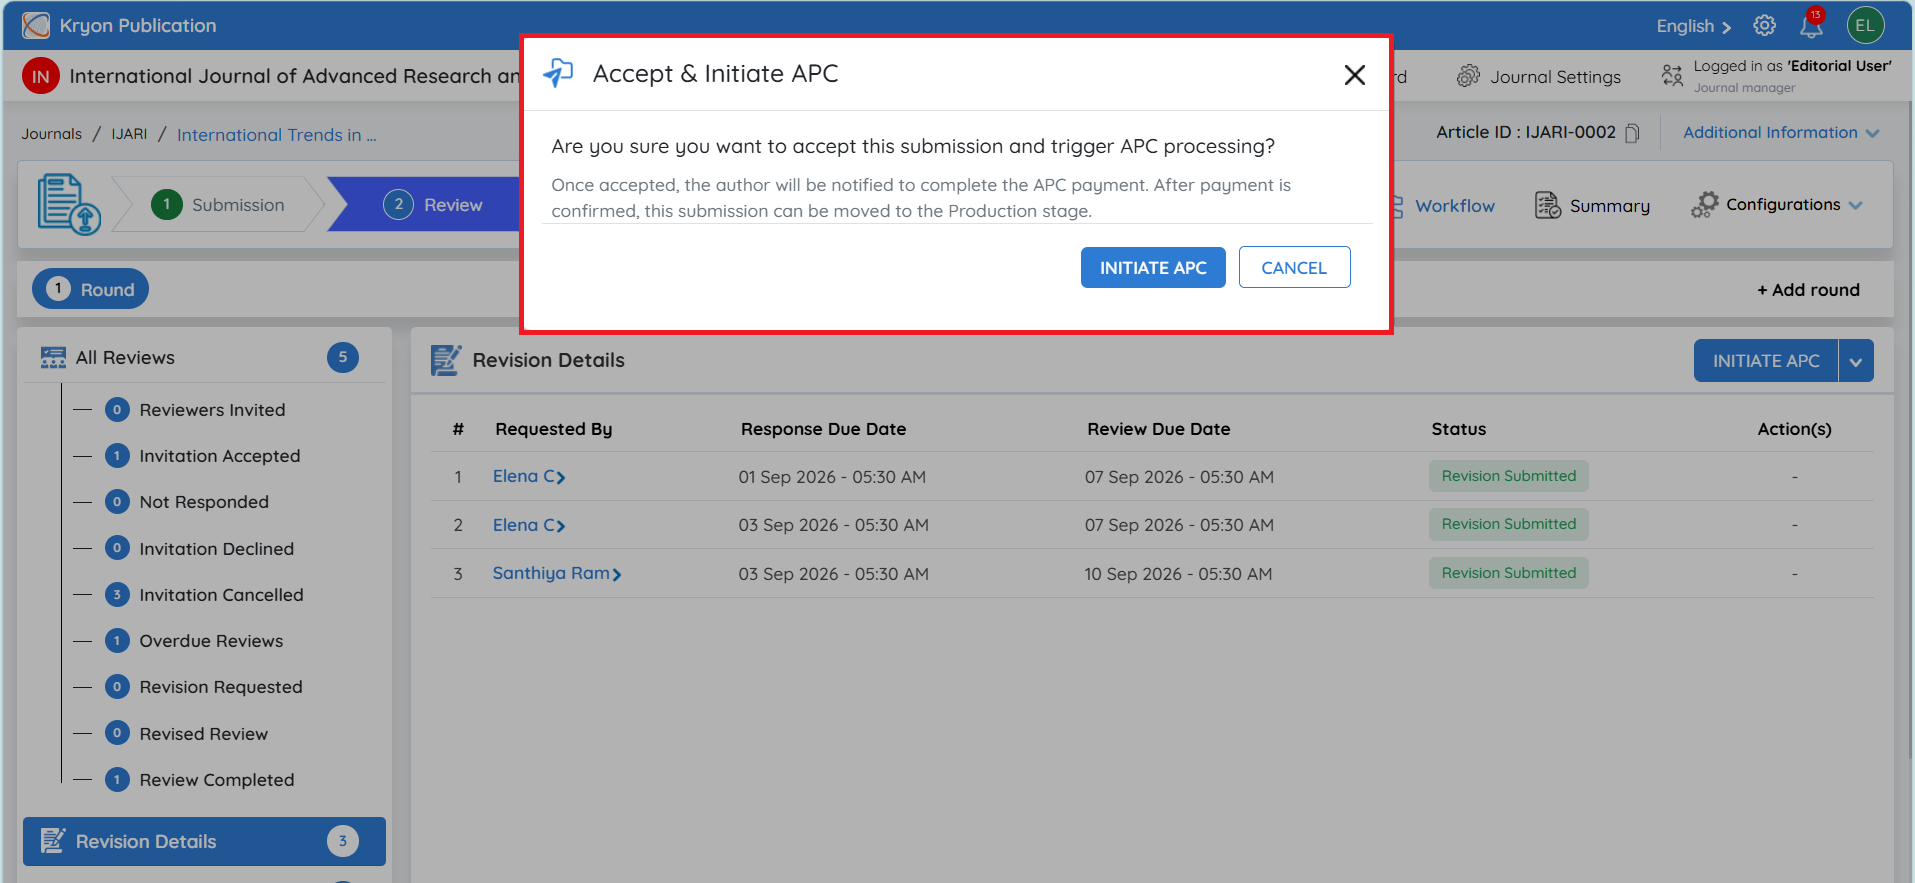
Once the editorial user decides to accept the manuscript, click Initiate APC.
The Accept & Initiate APC confirmation window will open. It confirms that the submission will be accepted and the APC process will begin.
Click Initiate APC to continue.
Once APC is initiated:
-
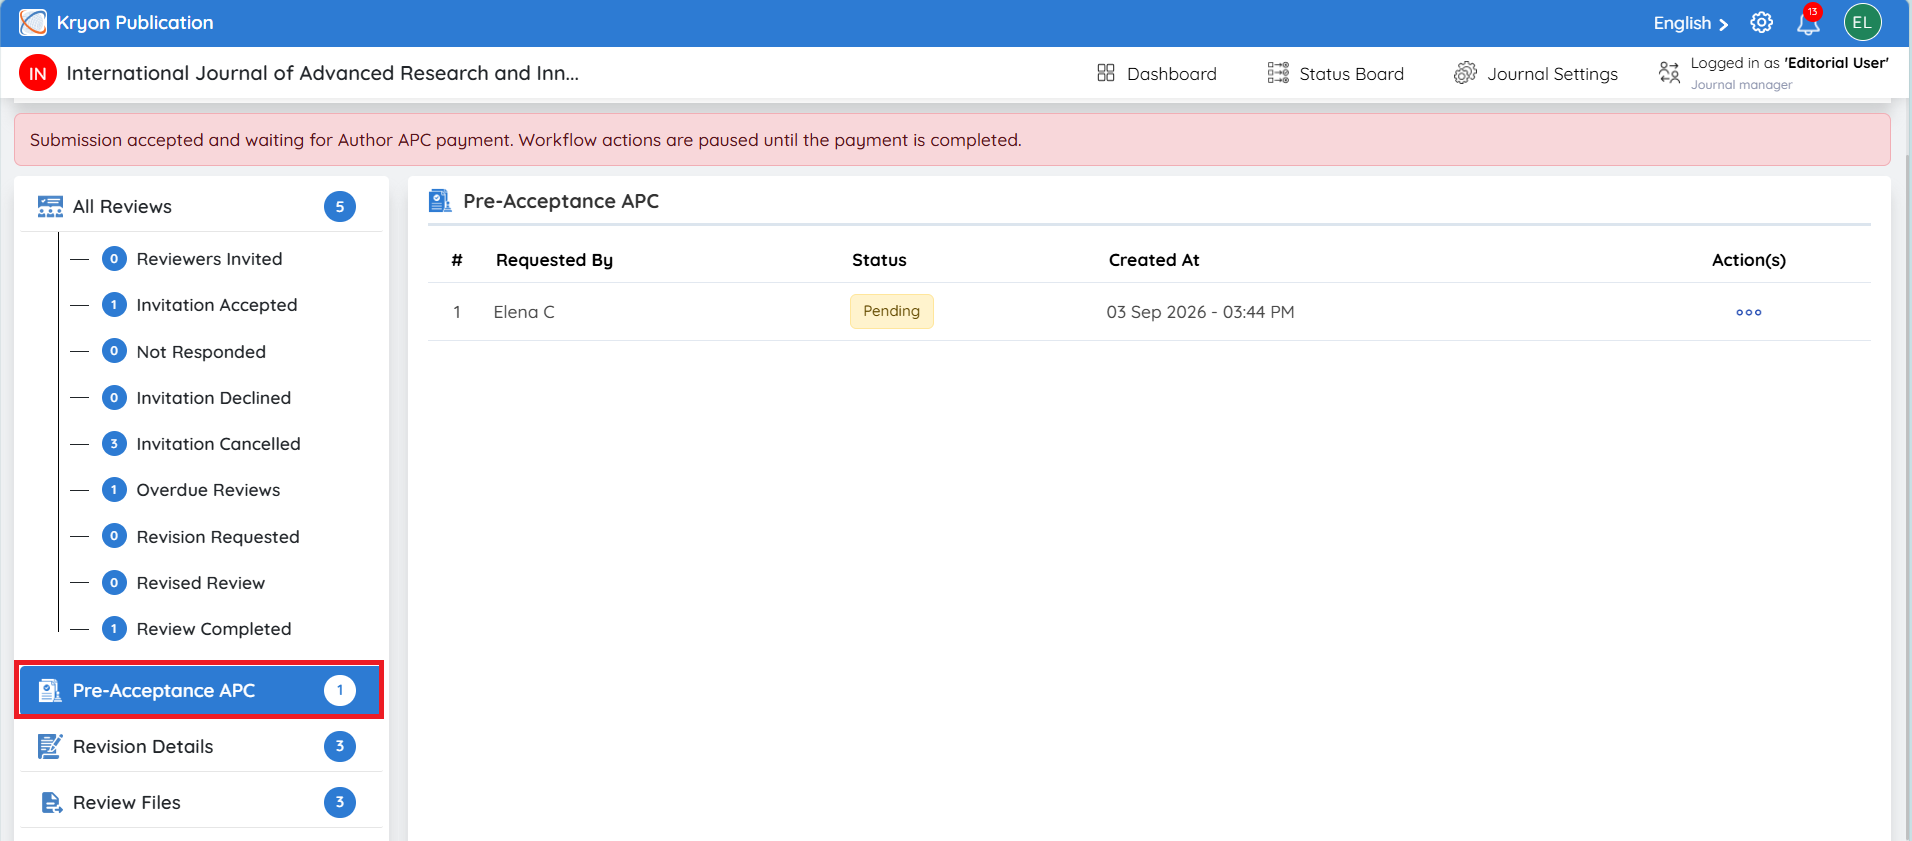
A new Pre-Acceptance APC section appears in the left-side menu.
-
The APC request is created with the status Pending.
-
The author is notified to complete the APC payment.
-
The submission remains in the Review stage while the payment is pending.
-
Other workflow actions are paused until the APC payment process is completed.
The editorial user can track the request under Pre-Acceptance APC.
If the APC request needs to be withdrawn, click the three-dot menu (⋯) under Action(s) and select Cancel APC Request.
Once the APC payment is confirmed, the submission can proceed to the Production stage.
Author Side – Selecting the Publishing Type and APC
Once the editorial user initiates APC, the author receives an email informing them that the APC process has been initiated.
The author can then log in to the submission portal to continue the process.
Selecting the Publishing Type
The options displayed to the author depend on the Journal Type configured for the journal.
For a Hybrid Journal:
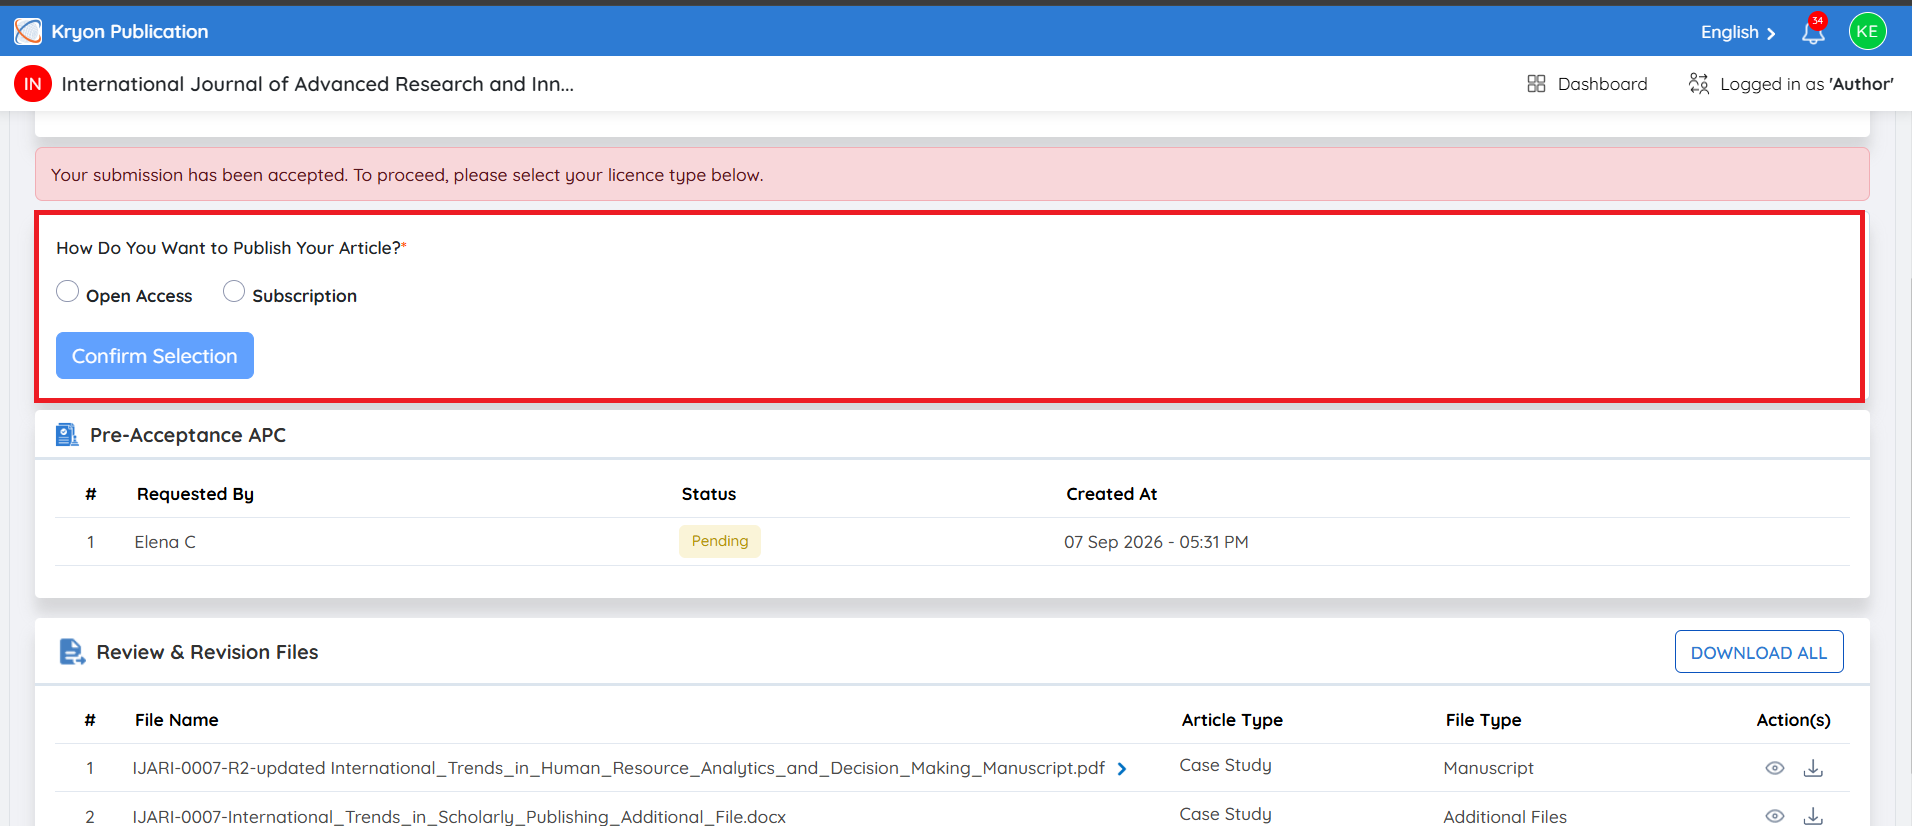
The author can choose how they want the article to be published:
-
Open Access
-
Subscription
For an Open Access Journal:
Only the Open Access option is available. The author can view the applicable licence information and proceed with the configured APC.
For a Subscription Journal:
Only the Subscription option is available, and no APC payment is required.
If the Author Selects Subscription
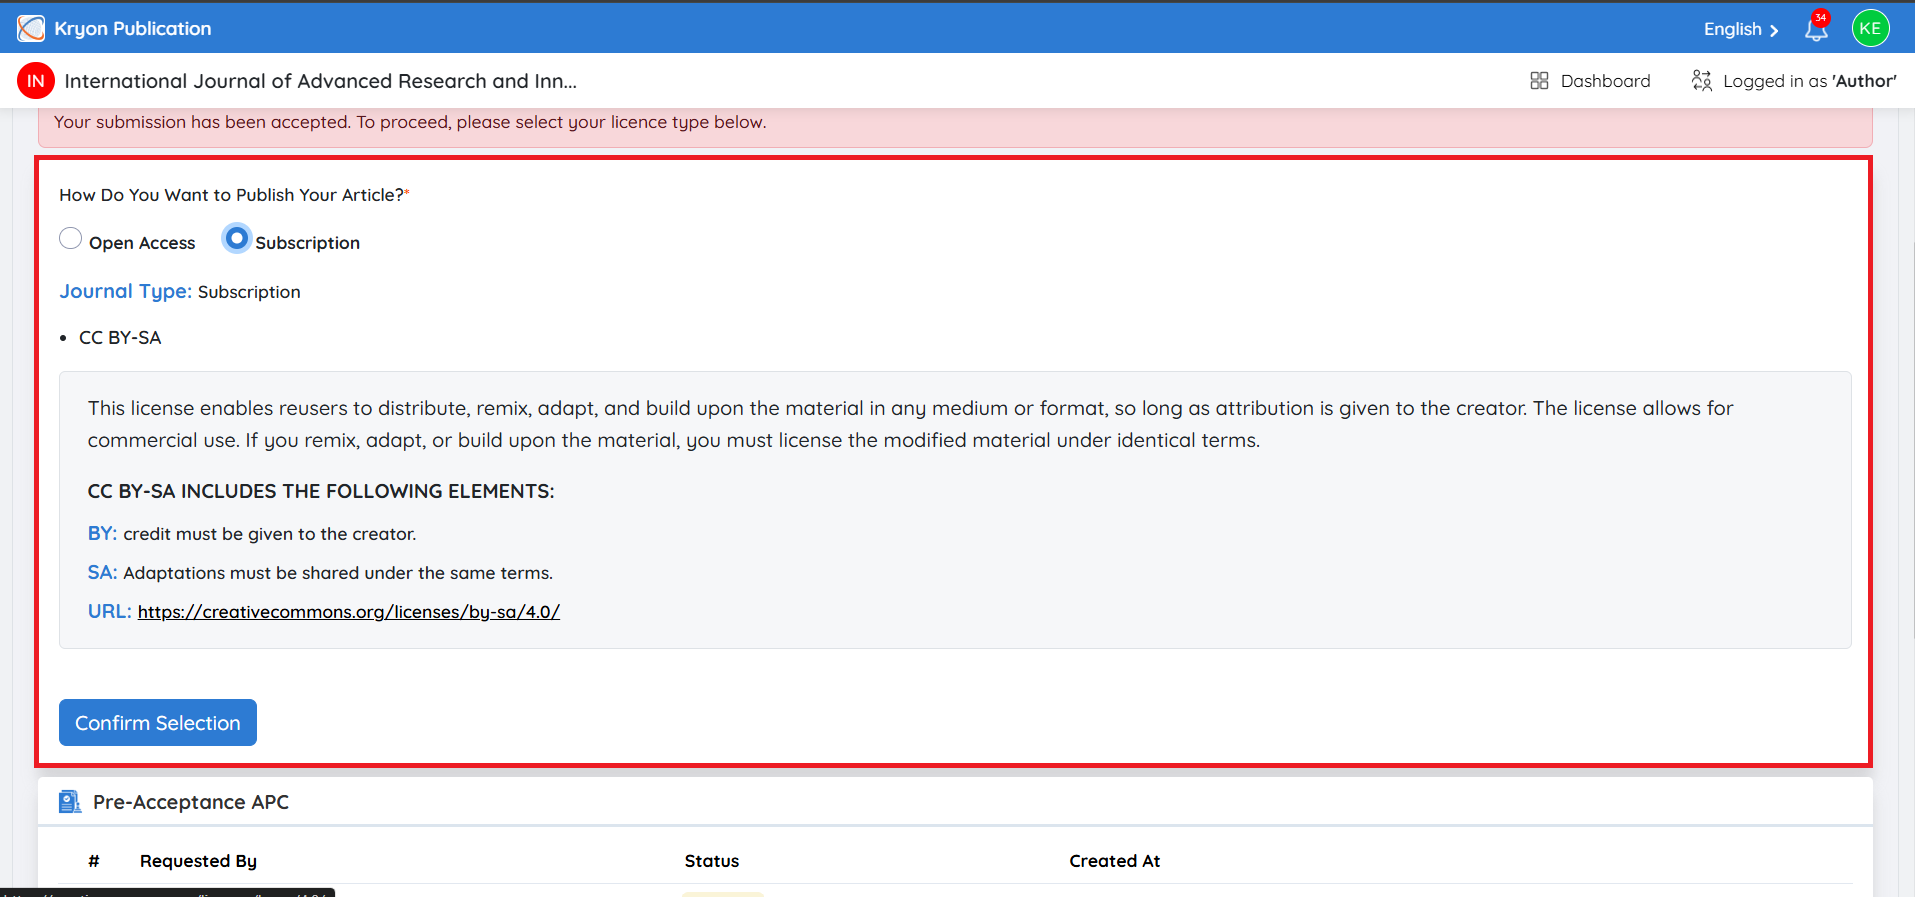
If the author selects Subscription, no APC payment is required.
The applicable licence type and its details will be displayed for the author to review.
-
Select Subscription.
-
Review the displayed licence type and licence information.
-
Click Confirm Selection.
-
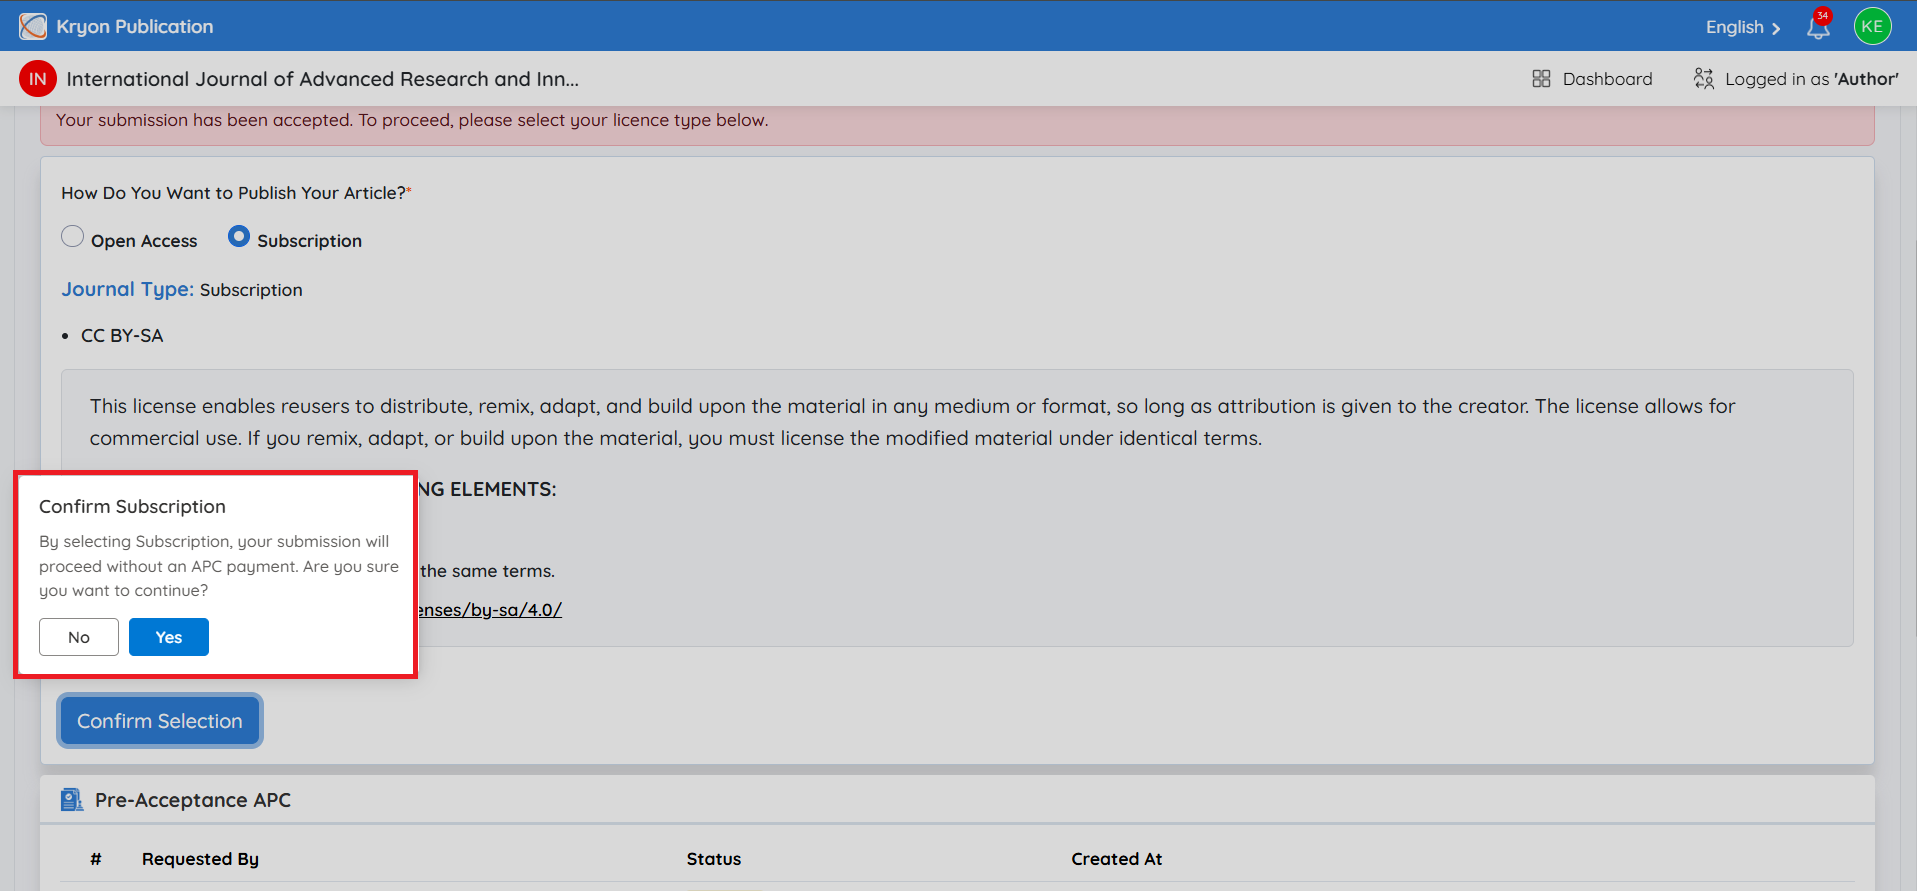
A confirmation message appears stating that the submission will proceed without an APC payment.
-
Click Yes to confirm.
Once confirmed, the APC process is considered complete, and the status under Pre-Acceptance APC changes to Payment Completed.
If the Author Selects Open Access
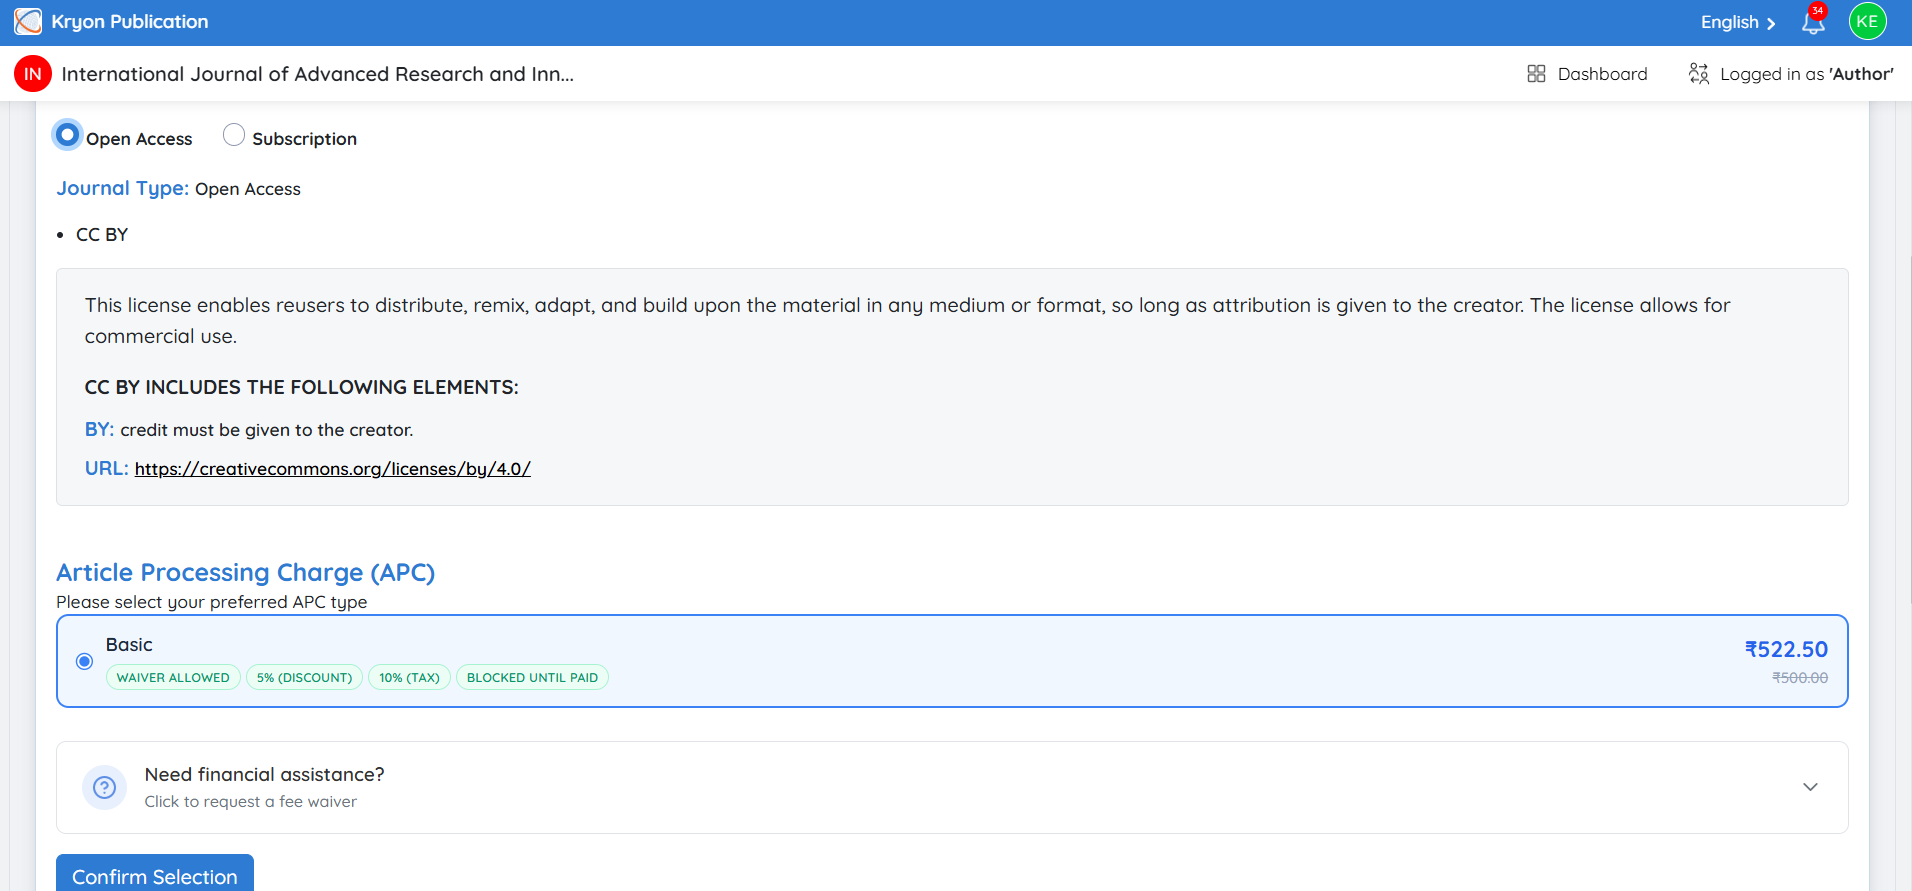
If the author selects Open Access, the system will display the licence information and all APC options configured for the journal. The author can review the available charges, select the appropriate APC type, and request a fee waiver if required.
Selecting the APC Type
-
Select Open Access as the publishing option.
-
The applicable licence type will be displayed along with the licence details.
-
Under Article Processing Charge (APC), all APC types configured for the journal will be displayed.
-
Each APC option will show the applicable APC amount and any additional conditions configured by the journal, such as:
a. Waiver Allowed
b. Discount, if applicable
c. Blocked Until Paid, if the article cannot proceed until payment is completed.
-
Review the available options and select the required APC type.
For example, the journal may provide different APC options such as Fast-Track APC, Gold Open Access, or Standard Article Processing Charge, each with its own applicable fee.
Requesting an APC Waiver
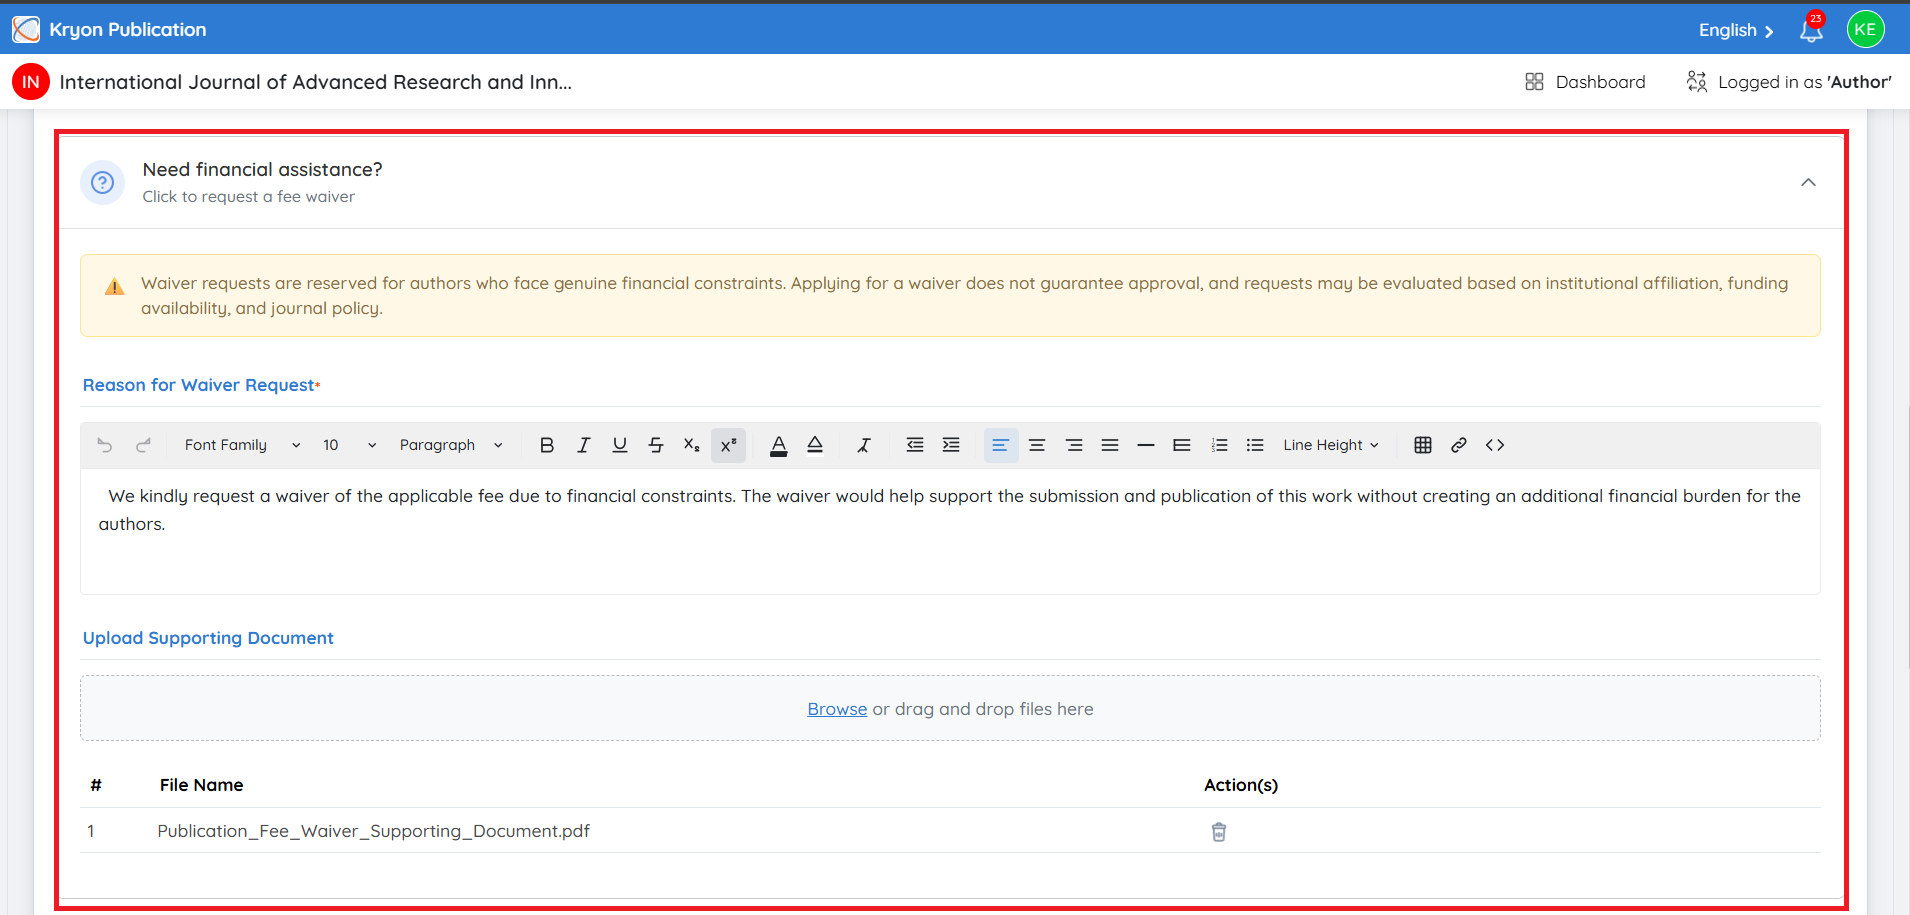
If the selected APC type allows a waiver and the author requires financial assistance, the author can submit a fee waiver request.
-
Expand Need financial assistance? – Click to request a fee waiver.
-
Enter the Reason for Waiver Request. The author should provide a clear explanation of why financial assistance is required, such as financial constraints or unavailable institutional funding.
-
Under Upload Supporting Document, upload any relevant document supporting the waiver request, if available.
-
After completing the required information, click Confirm Selection.
The waiver request will then be submitted for the editorial team to review and take the appropriate action.
A waiver request can be made only when Waiver Allowed is enabled for the selected APC type. Submitting a waiver request does not automatically approve the waiver; approval depends on the journal’s waiver policy and editorial decision.
Waiver Request Submitted
Once the author clicks Confirm Selection, the selected APC type and waiver request are submitted to the editorial team.
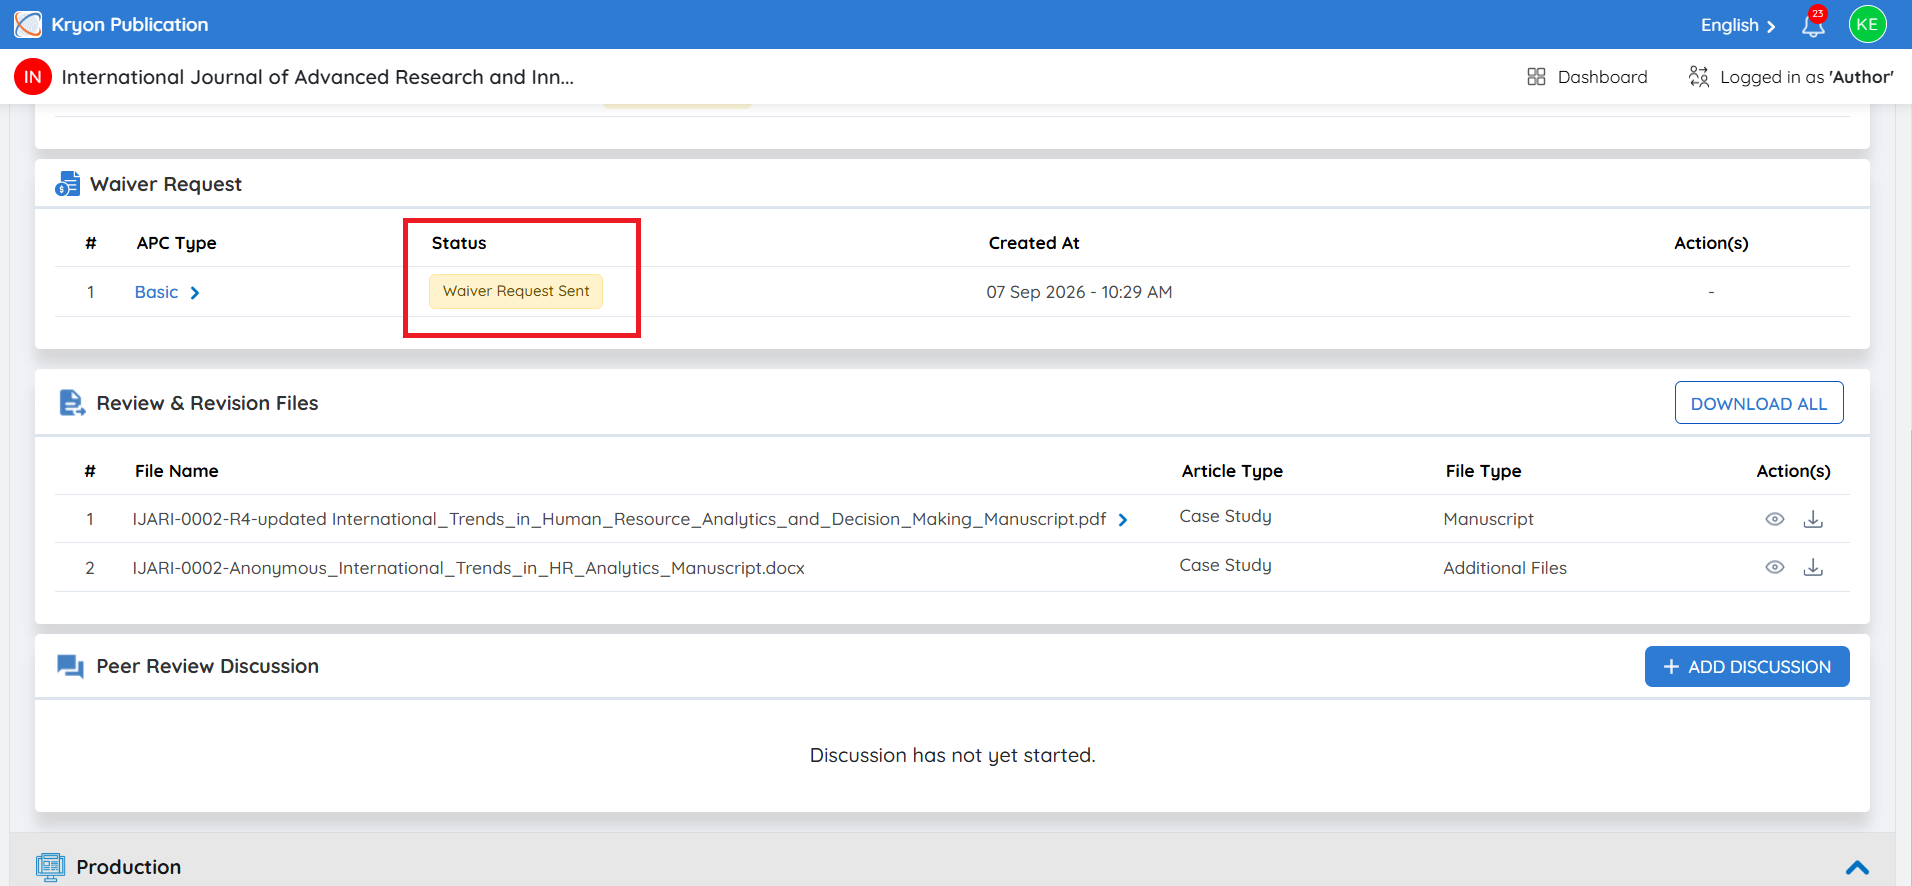
The Waiver Request section will display the selected APC Type, request Status, and Created Date.
The status will appear as Waiver Request Sent, confirming that the request has been successfully submitted and is awaiting review by the editorial team.
The APC payment process will proceed based on the editorial team’s decision on the waiver request.
How to Handle a Waiver Request
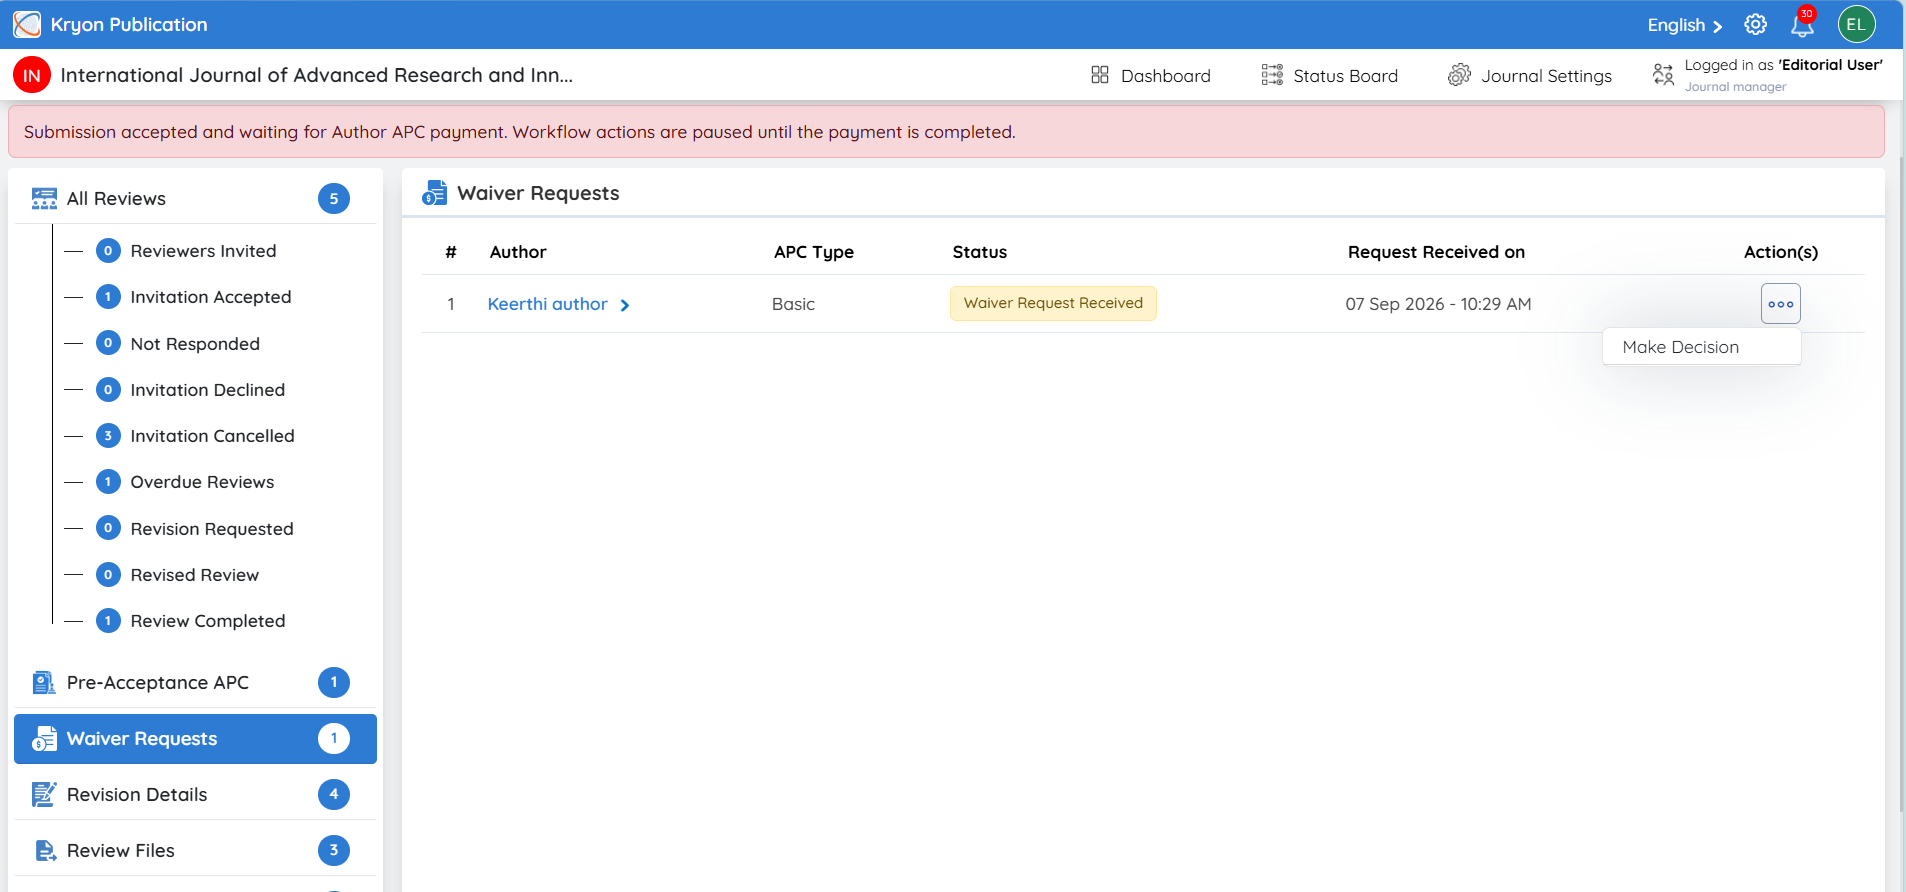
Once the author submits an APC waiver request, a new Waiver Requests tab will appear on the left-hand side of the Review stage.
-
Click Waiver Requests.
-
The submitted request will be displayed with the Author, APC Type, Status, and Request Received Date.
-
Click the Author Name to expand the request and review the details, including:
a. Author email
b. Selected APC type
c. Original APC amount
d. Author’s reason for requesting the waiver
e. Supporting document, if provided
-
The status will show Waiver Request Received until a decision is made.
-
Under Action(s), click the three-dot menu (⋯).
-
Select Make Decision to review and process the author’s waiver request.
Making a Decision on the Waiver Request
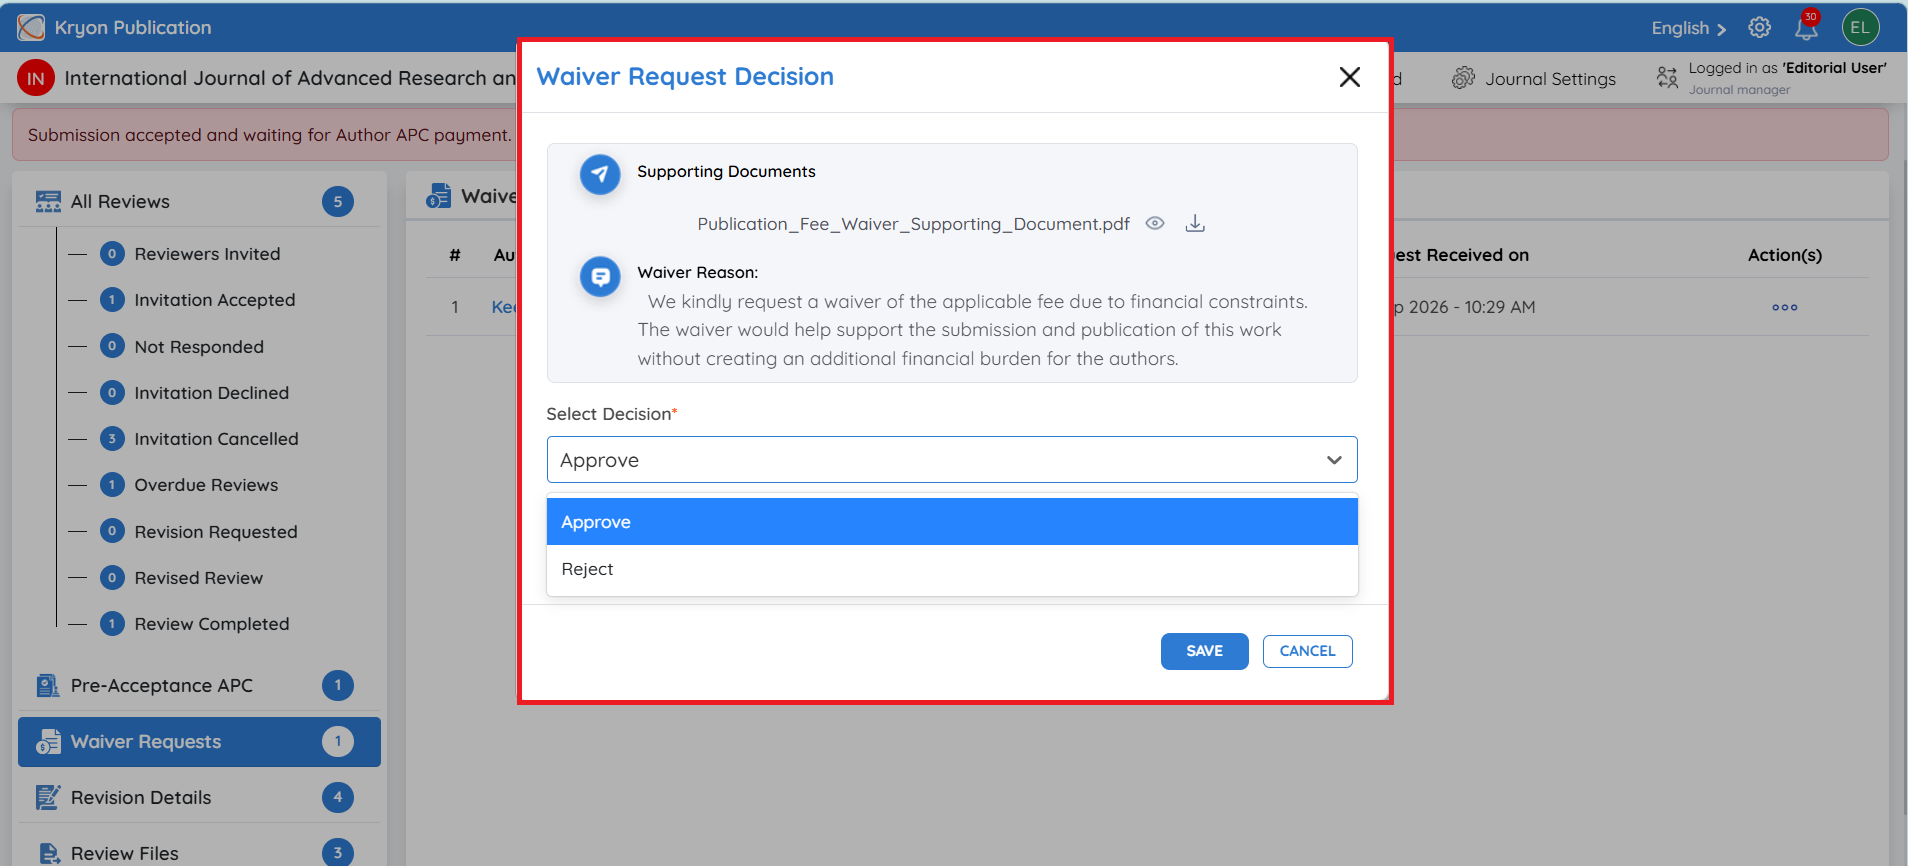
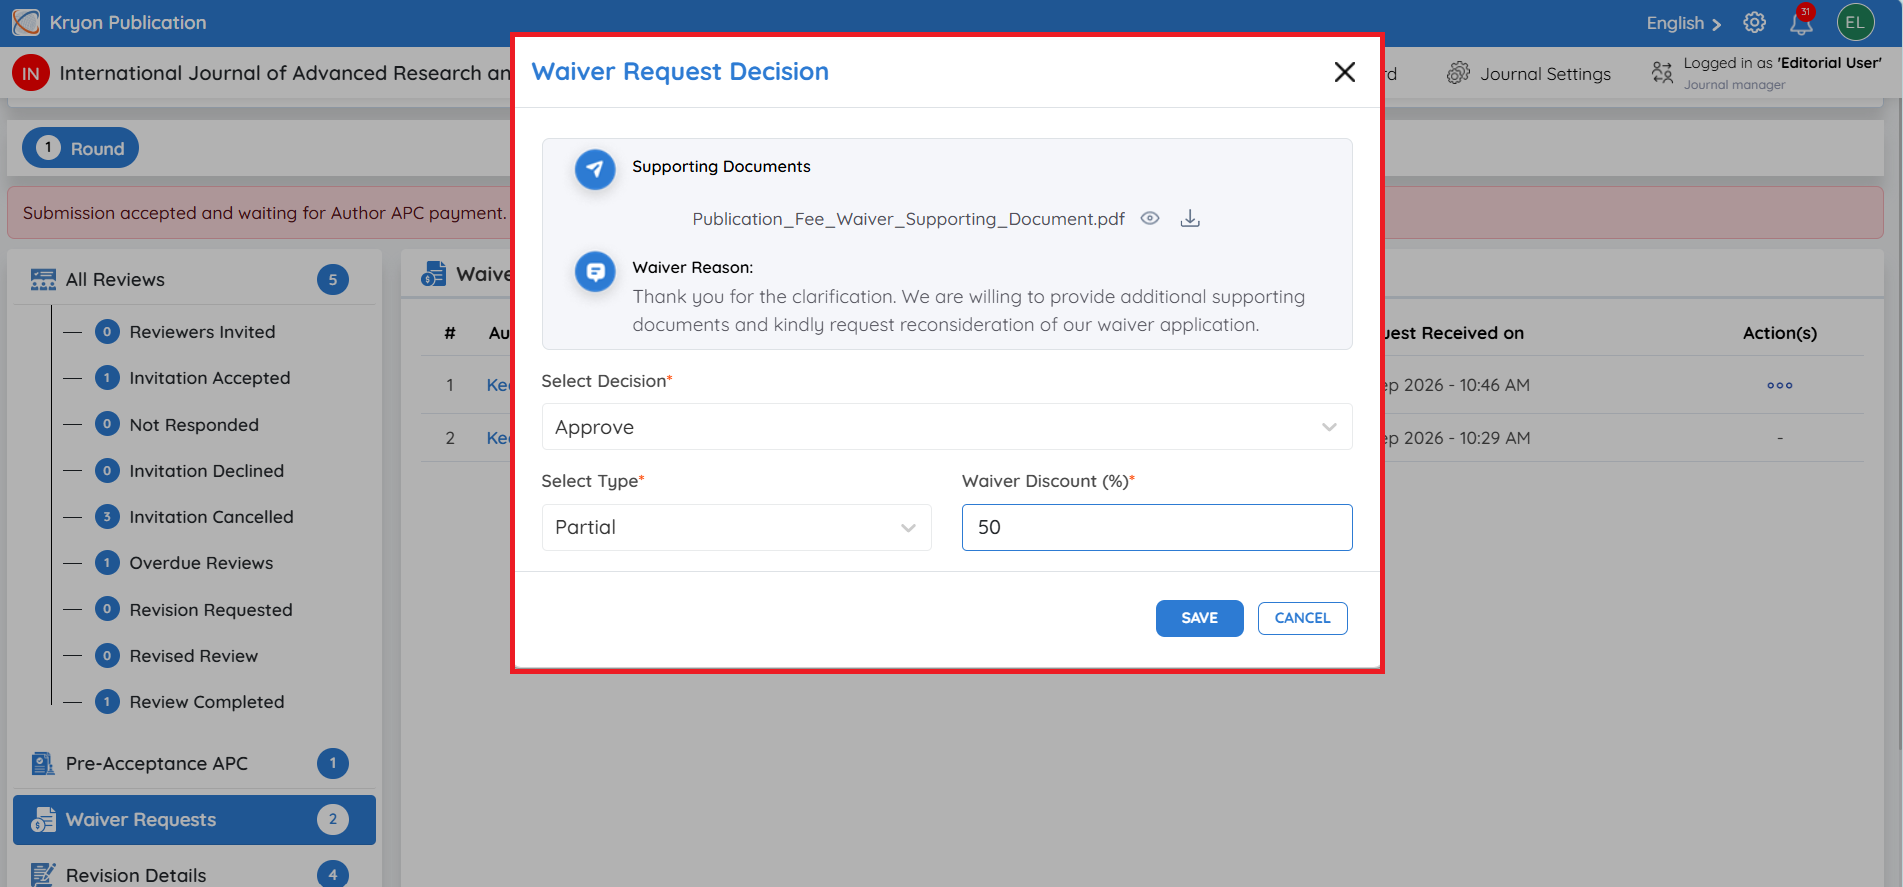
After selecting Make Decision, the Waiver Request Decision window will open. The editorial user can review the author’s Waiver Reason and decide whether to Approve or Reject the request.
Under Select Decision, choose one of the following:
-
Approve – Approves the author’s waiver request. The APC waiver will be applied according to the journal’s configured waiver policy.
-
Reject – Rejects the waiver request. The author can reapply for the waiver with revised information, if required.
Select the appropriate decision and complete the waiver request process.
If the Waiver Request Is Rejected
If the editorial user decides not to approve the waiver request:
-
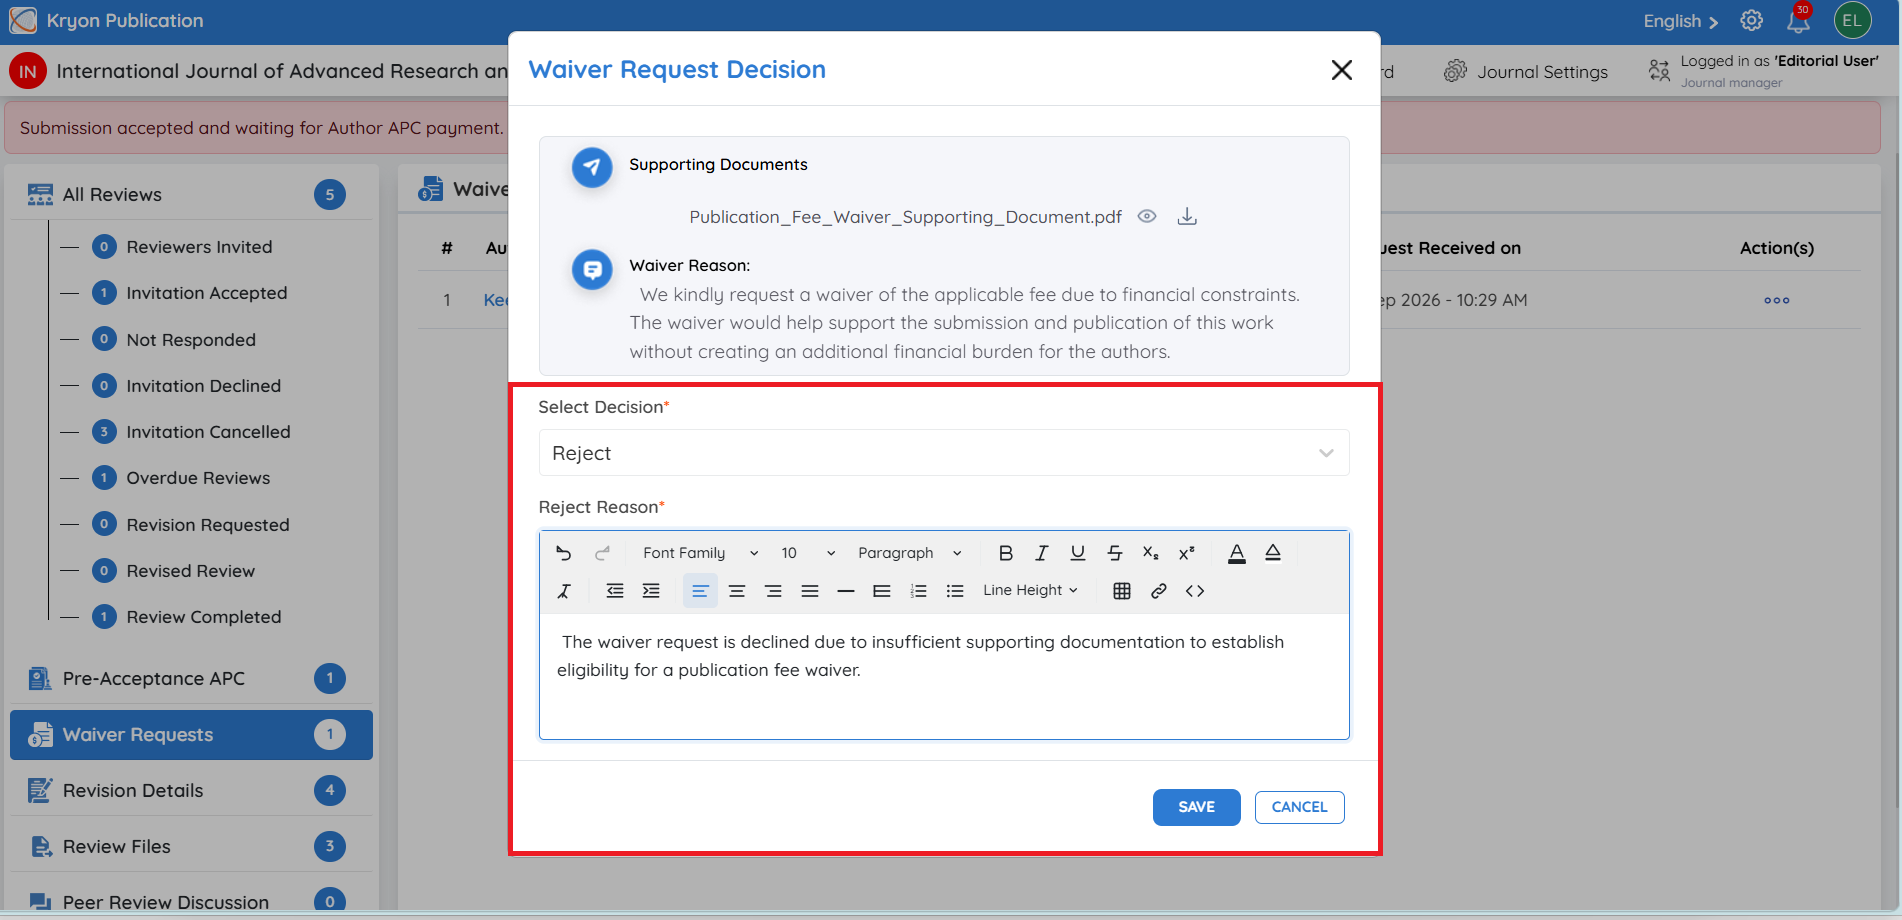
Select Reject under Select Decision.
-
The Reject Reason field will appear.
-
Enter a clear reason for rejecting the author’s waiver request.
-
Click Save to confirm the decision.
Rejecting the waiver request does not require the author to immediately proceed with APC payment. The author may reapply for a waiver or revised discount, subject to the journal’s policy.
Author Side – Reapplying for a Waiver
If the editorial user rejects the waiver request, the status will be updated to APC Payment Rejected on the author side.
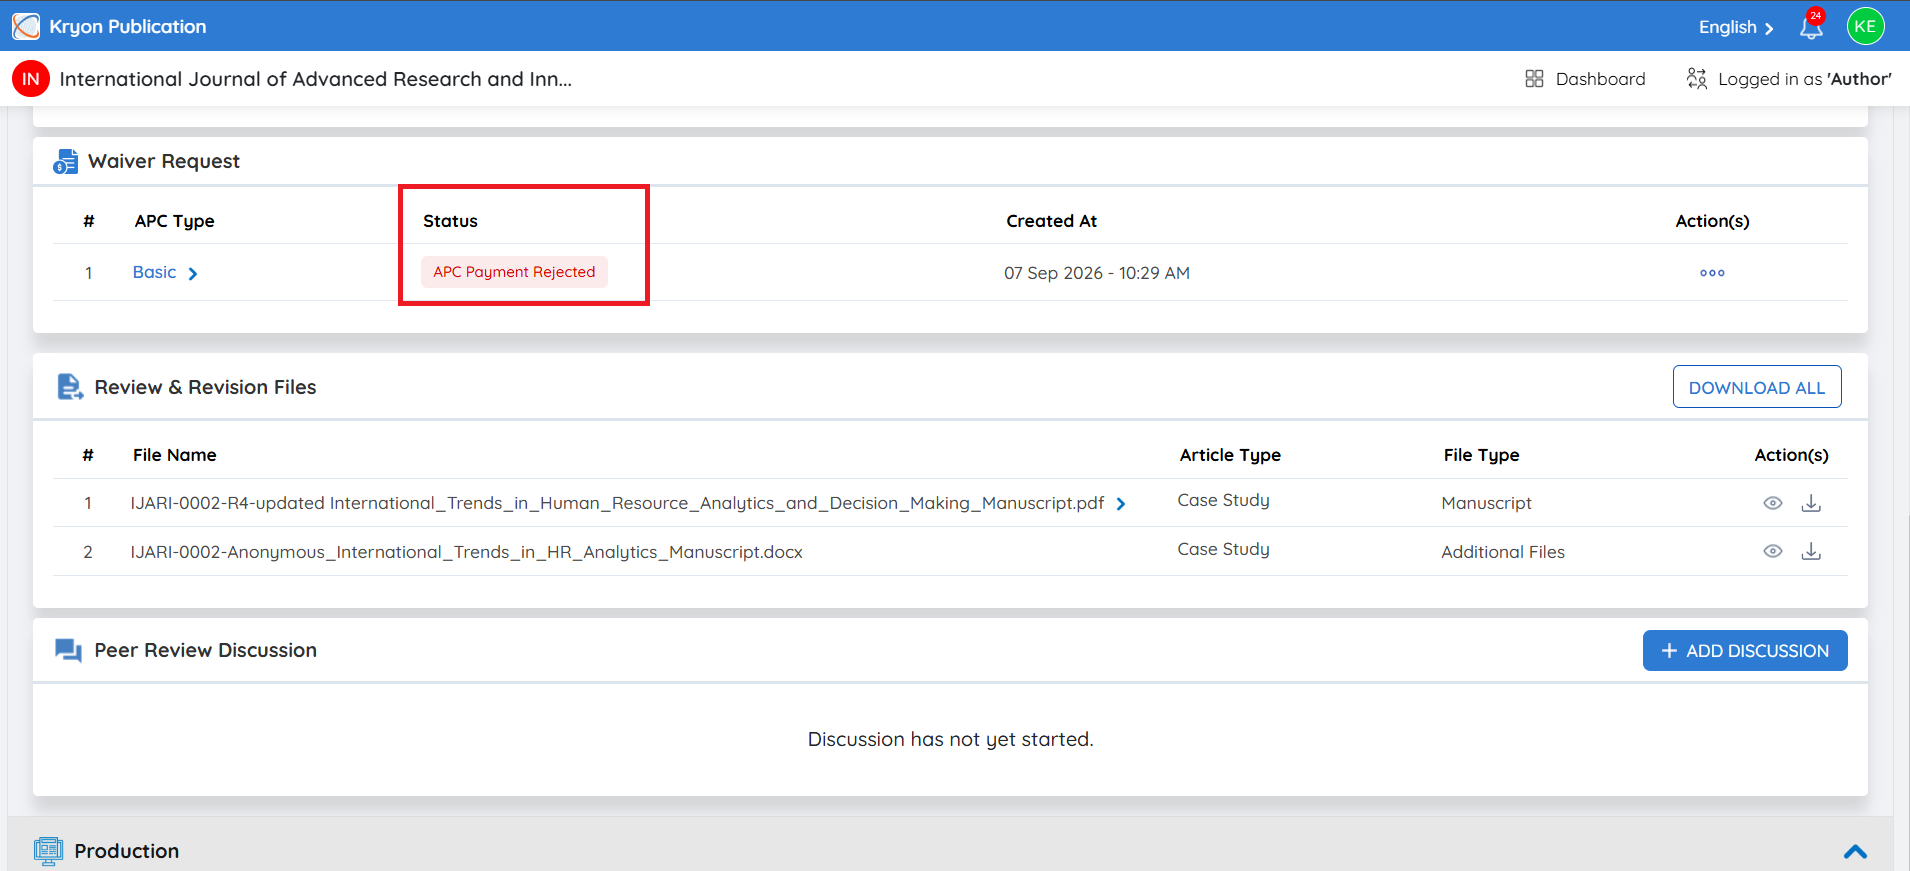
The author can submit a revised waiver request:
-
Click the three-dot menu (⋯) under Action(s).
-
Select Request Revised Discount.
-
The Waiver Request window will open.
-
Enter the Reason for Waiver Request, providing additional or revised information for consideration.
-
Upload a Supporting Document, if applicable.
-
Click Save to resubmit the request.
The revised waiver request will be sent back to the editorial team for further review and decision.
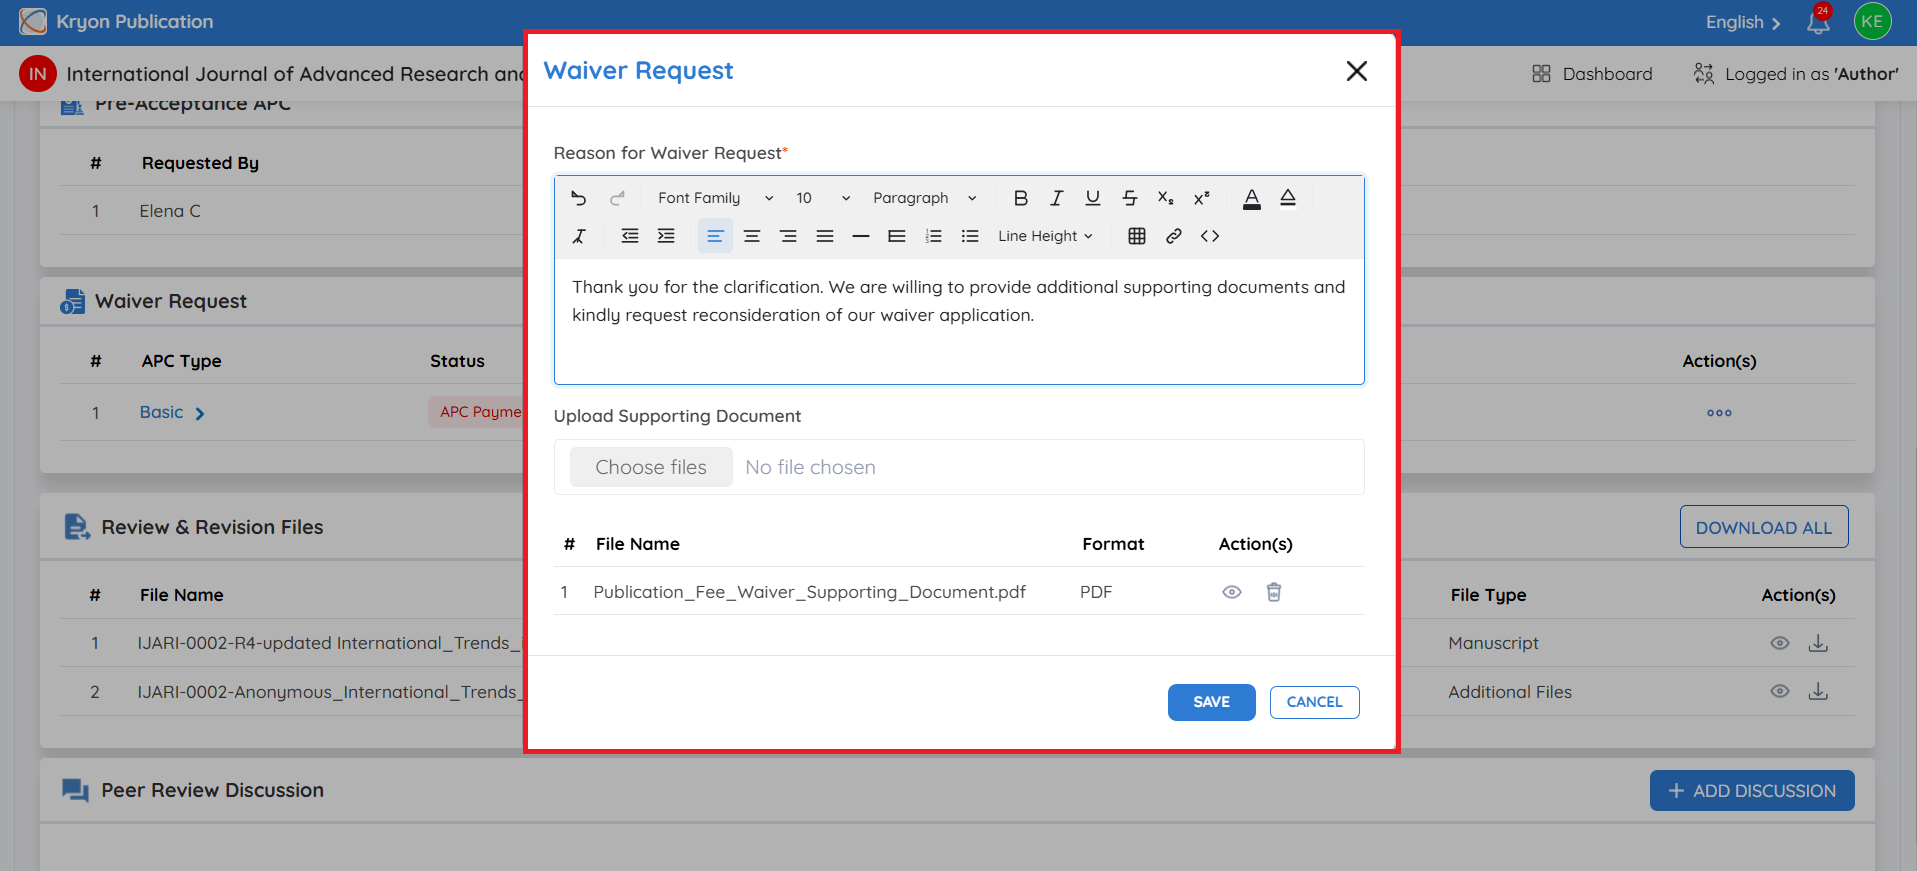
Editorial User Side – Approving a Revised Waiver Request
Once the author submits a revised waiver request, a new request will appear under Waiver Requests with the status Waiver Request Received.
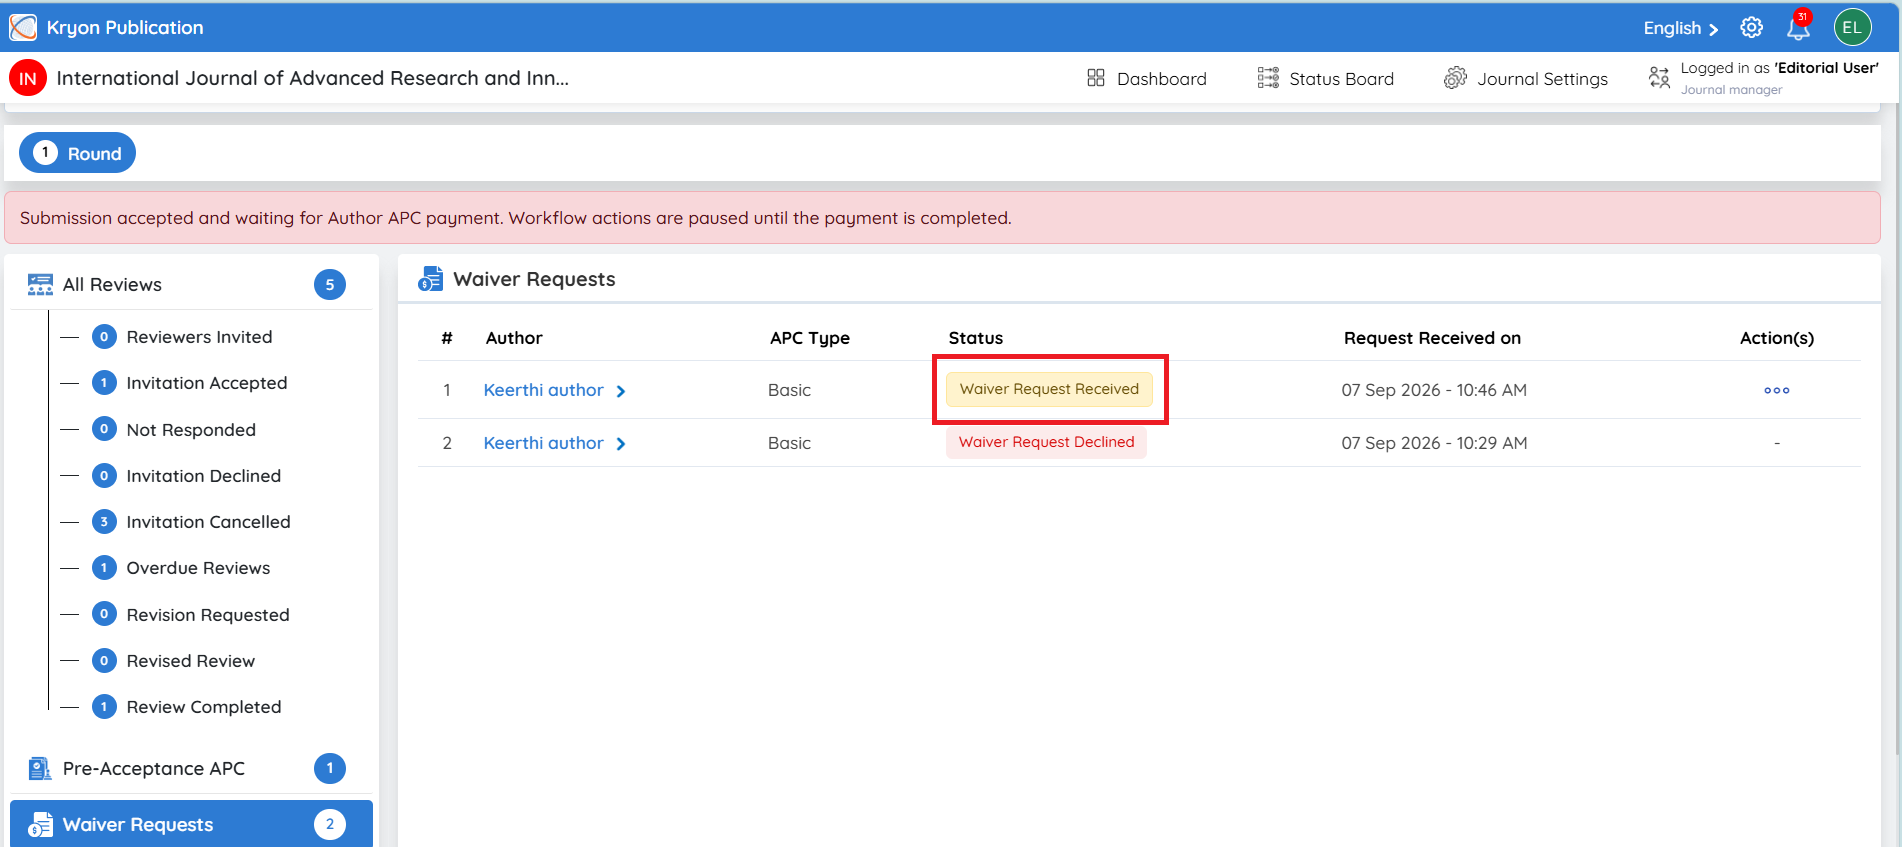
To process the revised request:
-
Click the three-dot menu (⋯) under Action(s).
-
Select Make Decision.
-
Review the author’s revised Waiver Reason.
-
Under Select Decision, choose Approve.
-
Select the type of waiver to be provided:
a. Full Waiver – Provides a 100% waiver, so the author is not required to pay the APC.
b. Partial Waiver – Provides a percentage discount on the APC amount.
-
If Partial is selected, enter the approved percentage in Waiver Discount (%).
Example: Enter 10 to provide a 10% waiver/discount.
- Click Save to confirm the decision.
Once saved, the approved waiver or discount will be applied to the author’s APC accordingly.
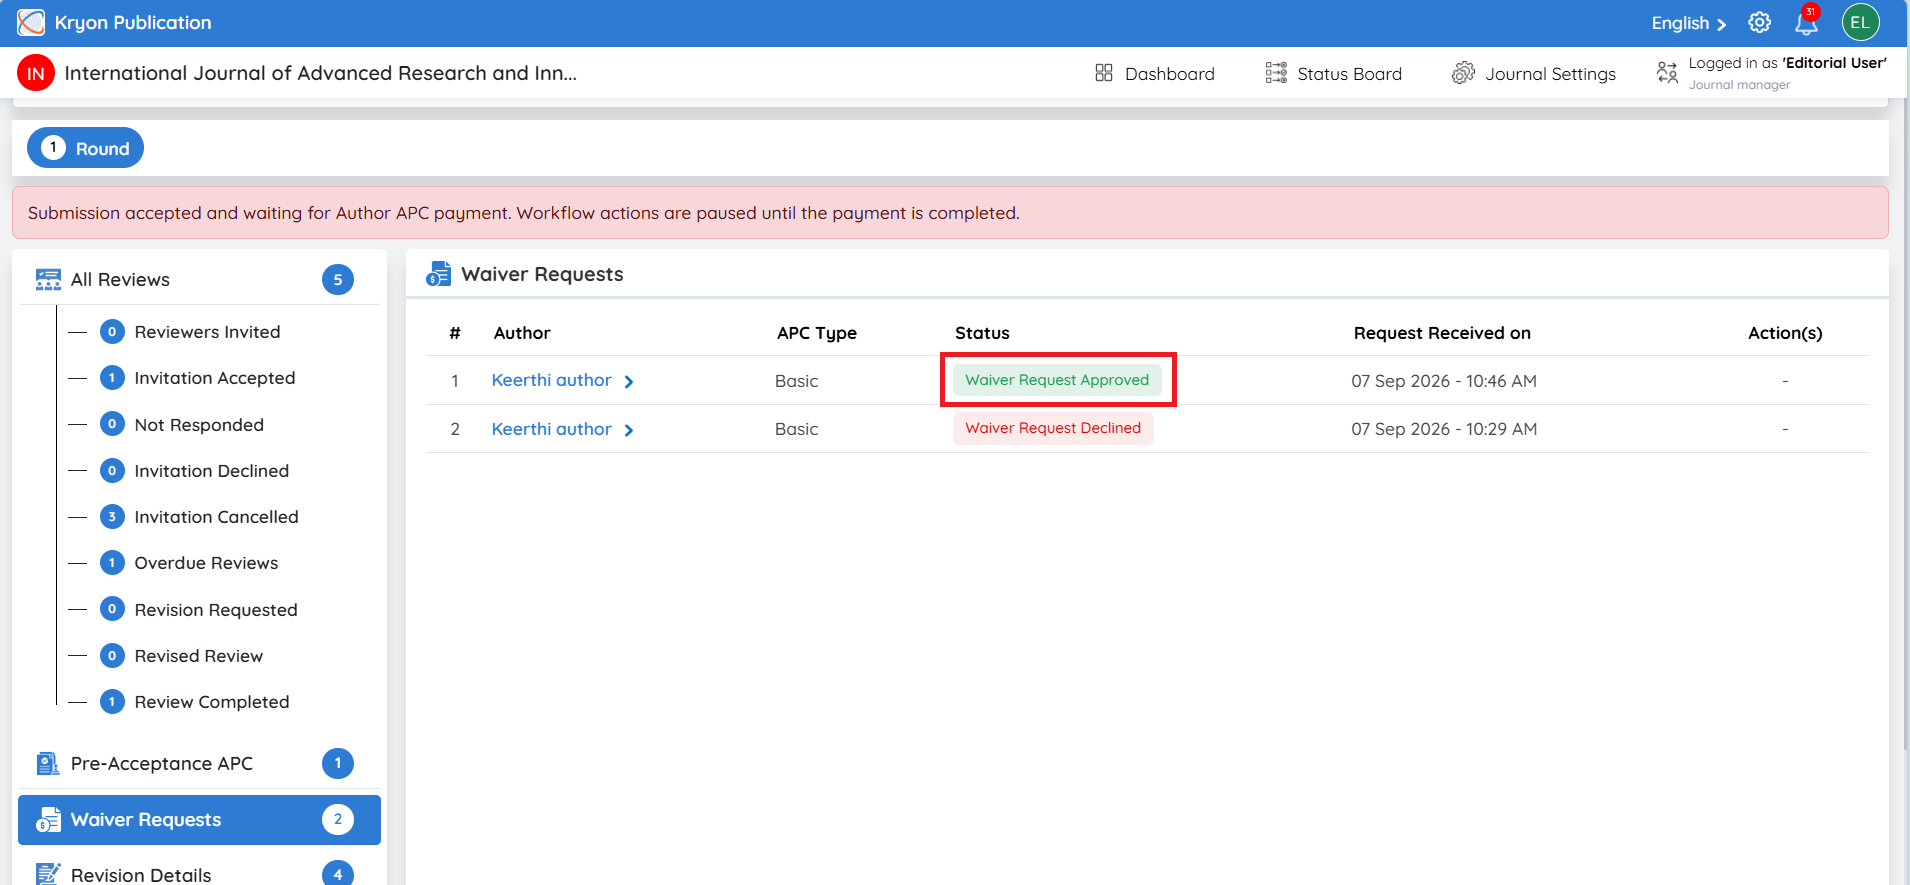
Waiver Request Approved
Once the editorial user approves the waiver, the status will change to Waiver Request Approved.
The approved waiver or discount is then communicated to the author. The author must review and acknowledge the approved waiver before proceeding with the next step in the APC process.
Author Side – Reviewing and Accepting the Approved Waiver
Once the editorial user approves the waiver request, the author will be able to see the approved waiver details in the Waiver Request section.
The status will change to Waiver Request Approved.
The author can expand the waiver request to review the complete details, including the APC Name, Original Amount, Waiver Type, Waiver Percentage, Payable Amount, and the Waiver Request Reason.
For example, if the original APC amount is $1,500 and the editorial user approves a 10% partial waiver, the system will calculate the reduced payable amount as $1,350.
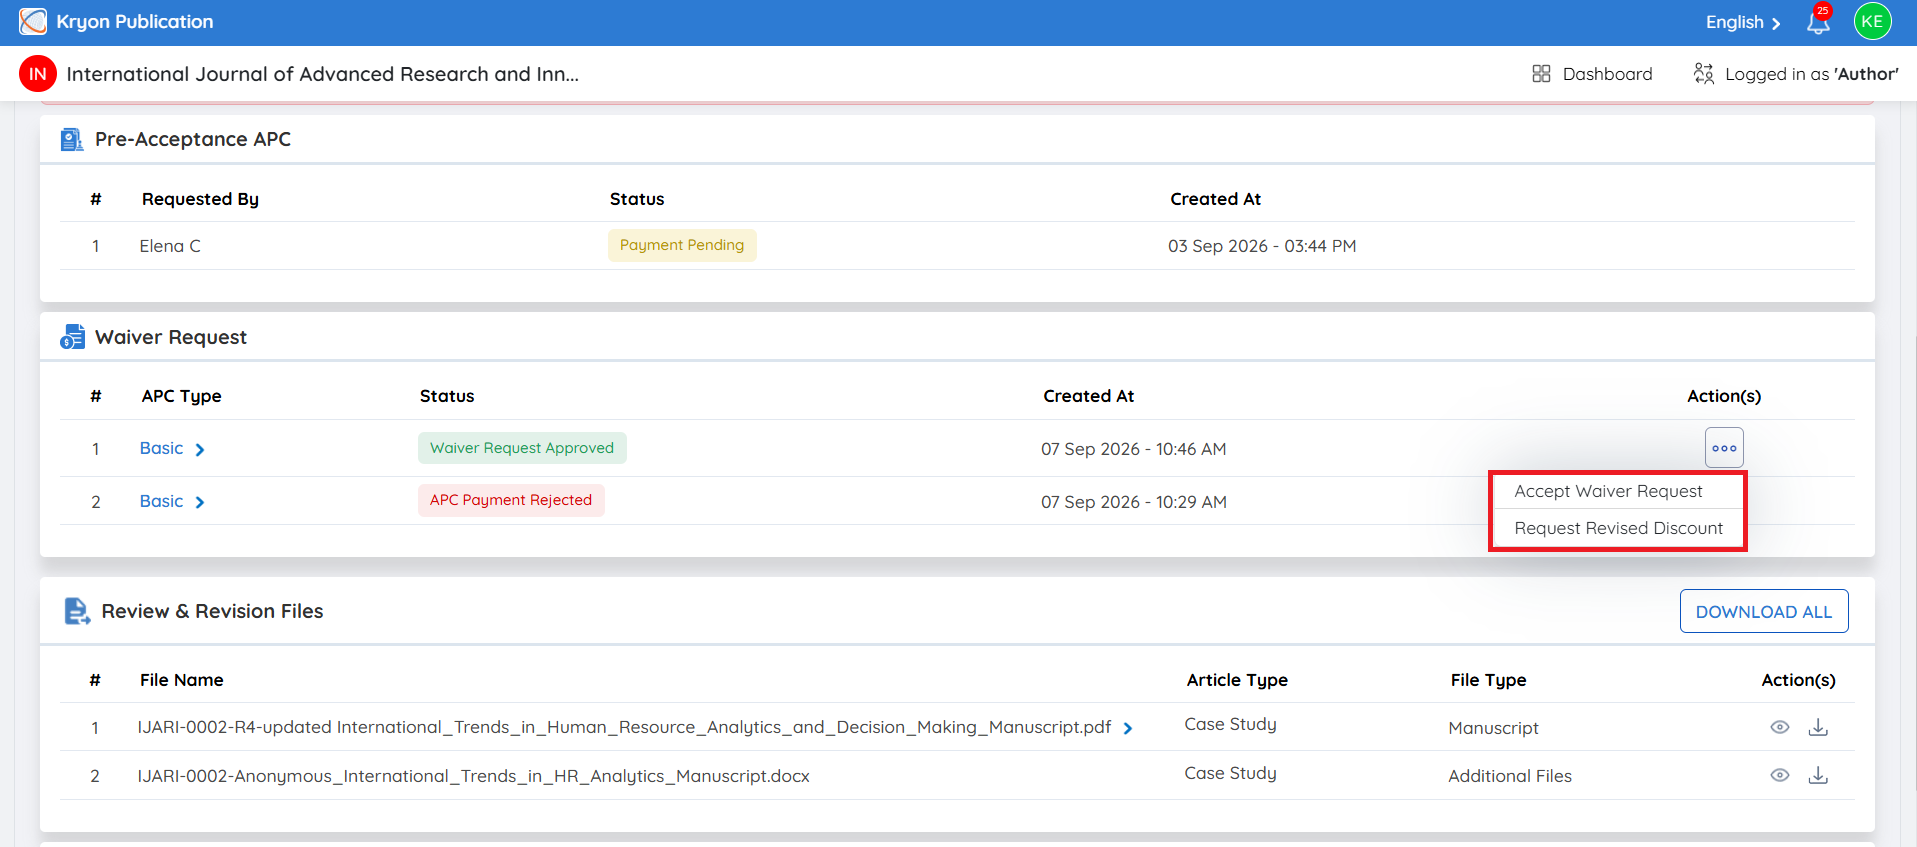
Under Action(s), click the three-dot menu (⋯). The author will see two options:
-
Accept Waiver Request – Accept the waiver or discount approved by the editorial user.
-
Request Revised Discount – Submit another request if the author wants the editorial team to reconsider the approved waiver amount.
Accepting the Approved Waiver
If the author agrees with the approved waiver:
-
Click Accept Waiver Request.
-
A confirmation message will appear asking whether the author wants to accept the waiver request.
-
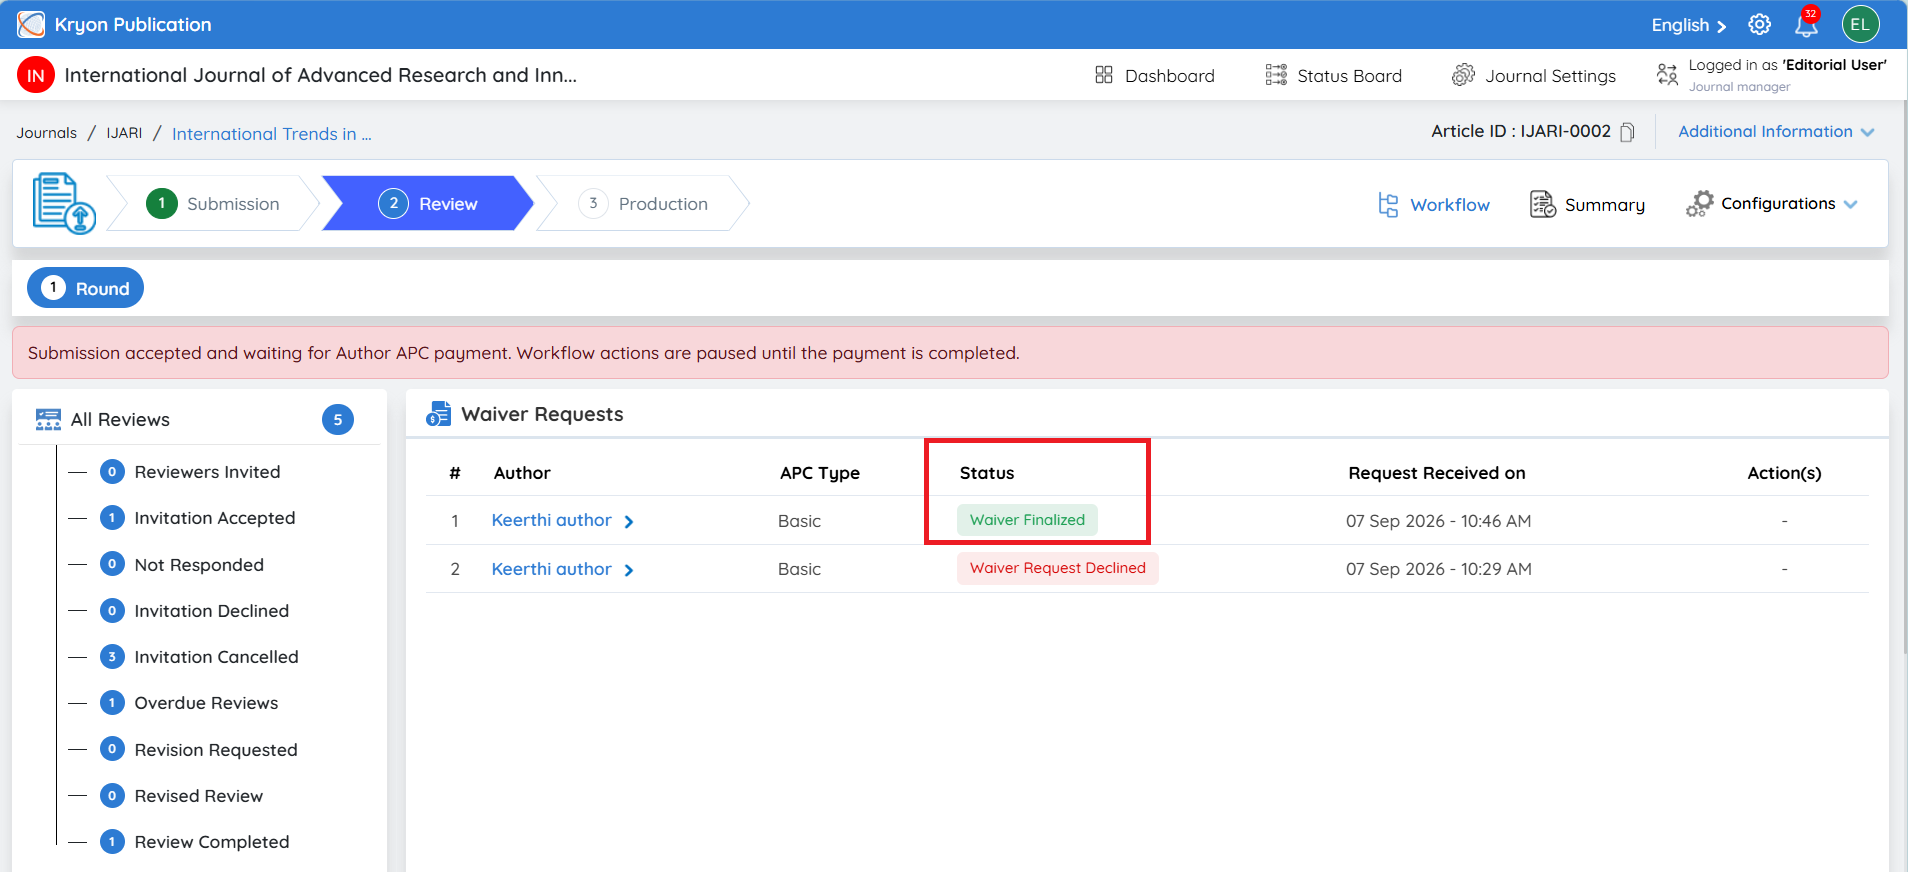
Click Yes to confirm.
-
The status will change to Waiver Finalized.
-
The approved discount will now be applied to the APC amount.
-
The system will display the updated payable amount under APC Payment Status.
For example:
Original APC Amount: $1,500
Approved Waiver: 10%
Final Payable Amount: $1,350
The Waiver Applied message will also confirm that the approved discount has been applied to the submission.
APC Payment – Author Side
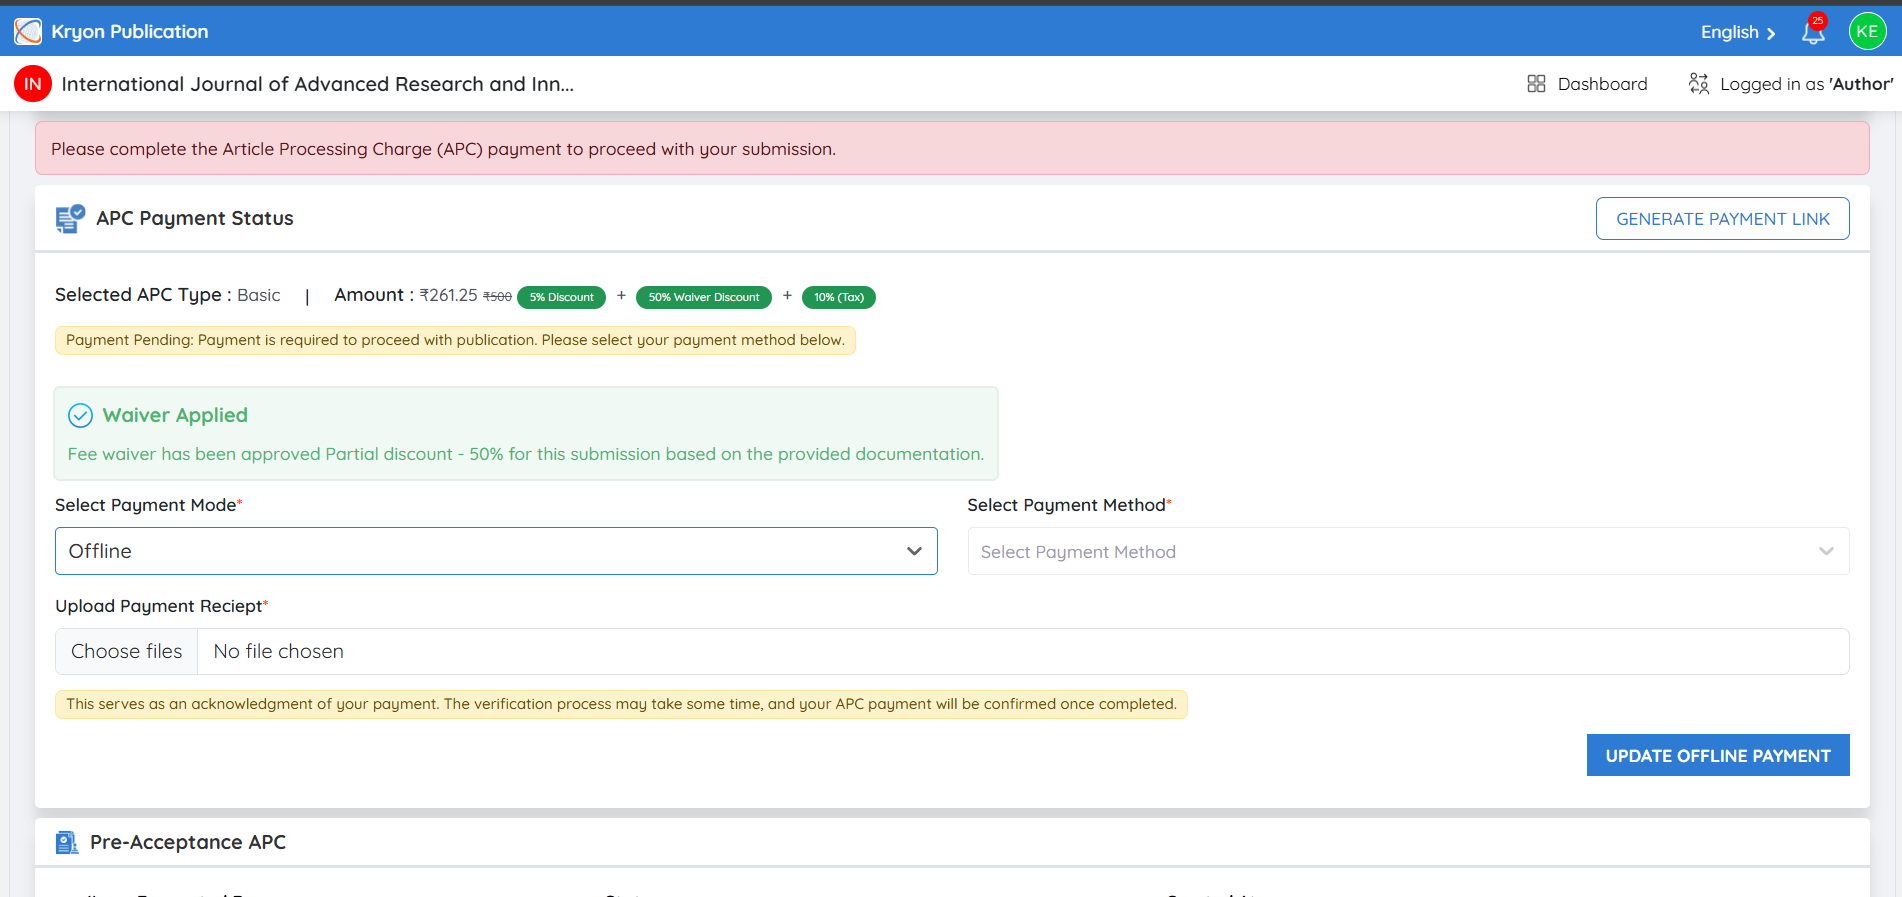
Once the waiver has been accepted by the author and the status changes to Waiver Finalized, the author can proceed with the APC payment.
The APC Payment Status section displays the finalized payment details, including the Selected APC Type, final payable amount, and the waiver discount applied.
For example, if the original APC is $1,500 and a 10% waiver has been finalized, the payable amount will be updated to $1,350.
The status will remain Payment Pending until the required payment is completed.
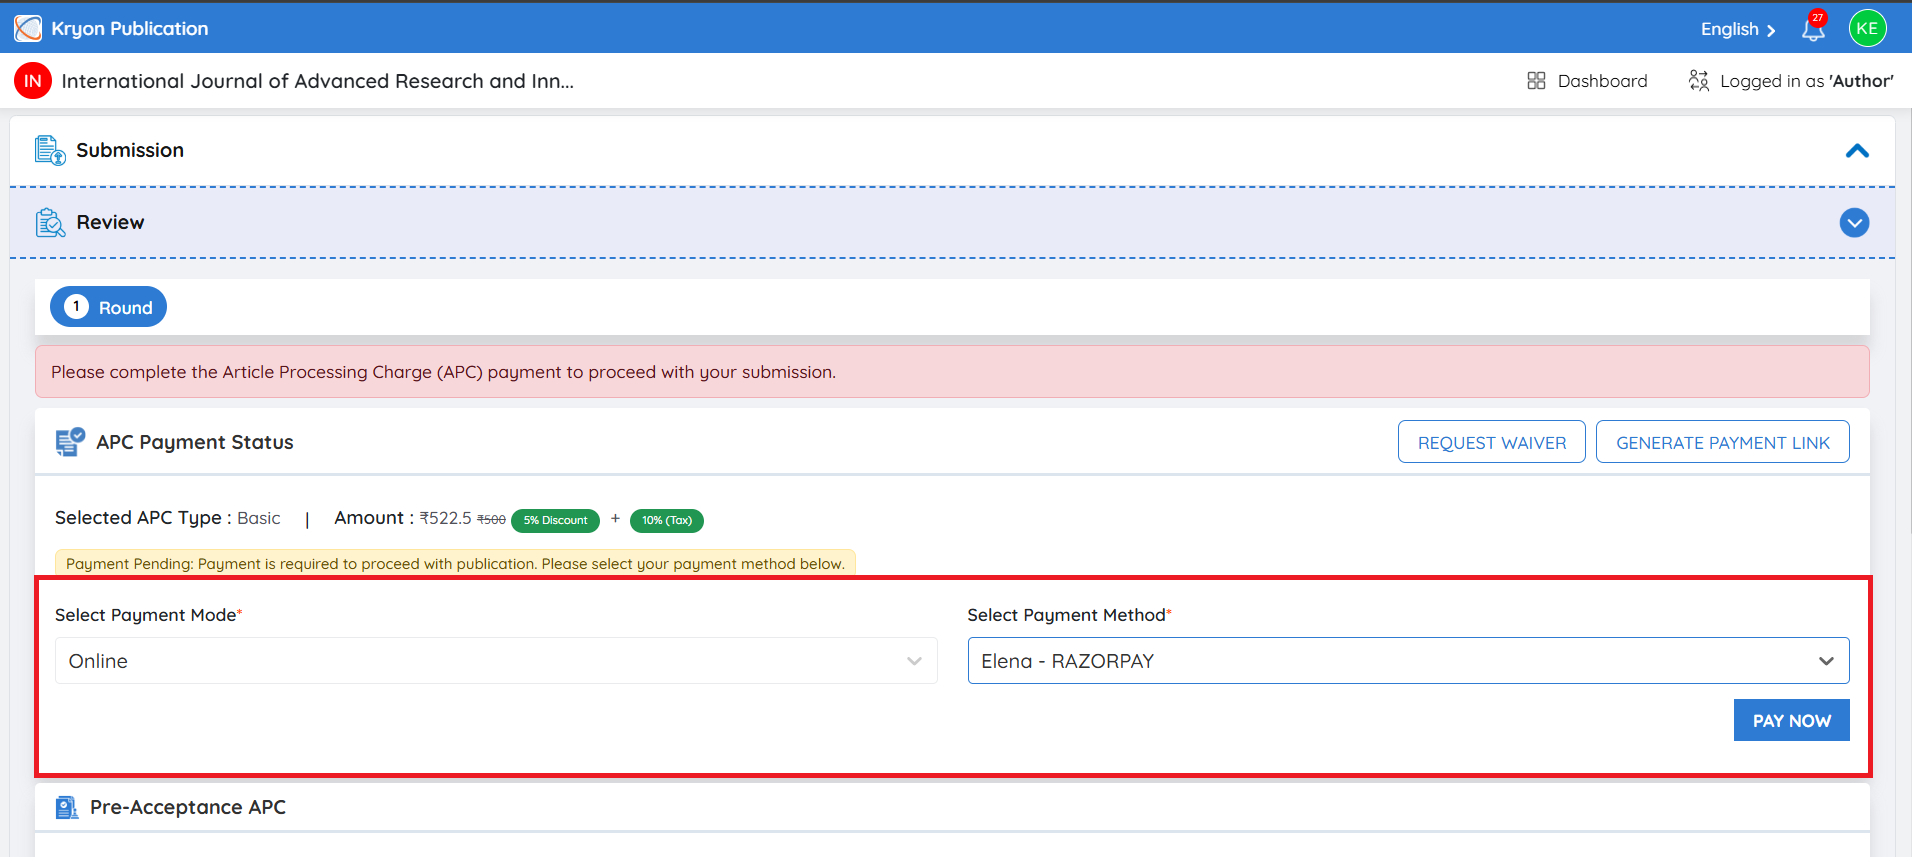
Select Payment Mode
The author can choose one of the available payment modes:
1. Online Payment
Select Online from Select Payment Mode.
The configured online payment methods will be displayed under Select Payment Method. For example, PayPal may be available based on the journal's payment configuration.
The author can:
-
Select Online as the payment mode.
-
Select the available Payment Method, such as PayPal.
-
Continue with the online payment process.
-
Complete the payment for the displayed final APC amount.
2. Offline Payment
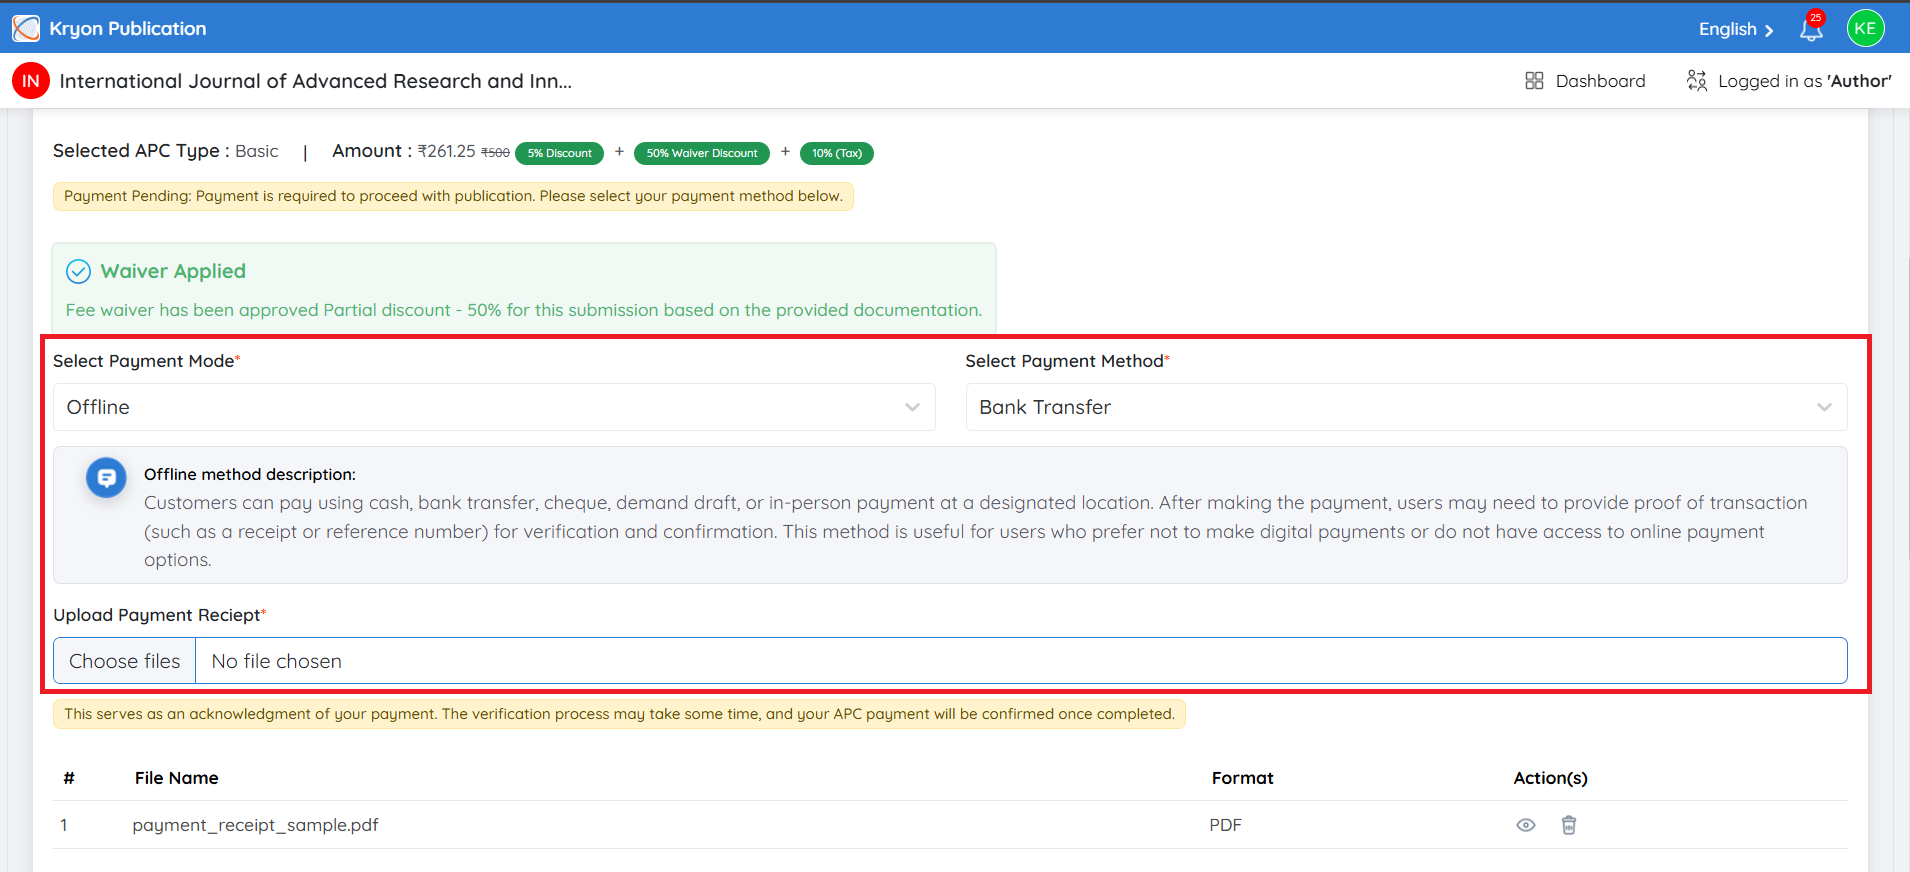
If the author wants to make the payment outside the online payment gateway, select Offline from Select Payment Mode.
The configured offline payment methods will then be displayed. For example:
-
Bank Transfer
-
Pay by Cheque
After making the payment using the selected offline method:
-
Select Offline as the payment mode.
-
Select the applicable Payment Method, such as Bank Transfer or Pay by Cheque.
-
Click Choose files under Upload Payment Receipt.
-
Upload the payment receipt or other proof of payment.
-
Click Update Offline Payment.
The uploaded receipt serves as acknowledgement/proof of the payment made by the author. Since this is an offline payment, it may require verification before the APC payment is confirmed.
For offline payments, uploading the payment receipt does not immediately confirm the APC payment.
-
After the author uploads the payment proof, the status will remain Payment Pending.
-
The editorial user must review the submitted payment proof and select Approve or Reject.
-
If the editorial user approves the payment, the status will change from Payment Pending to Payment Completed.
-
Once the payment is completed, the invoice can be downloaded from the Actions (⋯) menu.
-
If the editorial user rejects the submitted payment proof, the rejection reason will be recorded and displayed to the author, so the author can understand why the payment was not accepted.
Editorial User Side – Verify Offline APC Payment
When the author selects Offline as the payment mode, chooses a payment method such as Bank Transfer or Pay by Cheque, uploads the payment receipt, and submits the payment details, the request will be sent to the editorial user for verification.
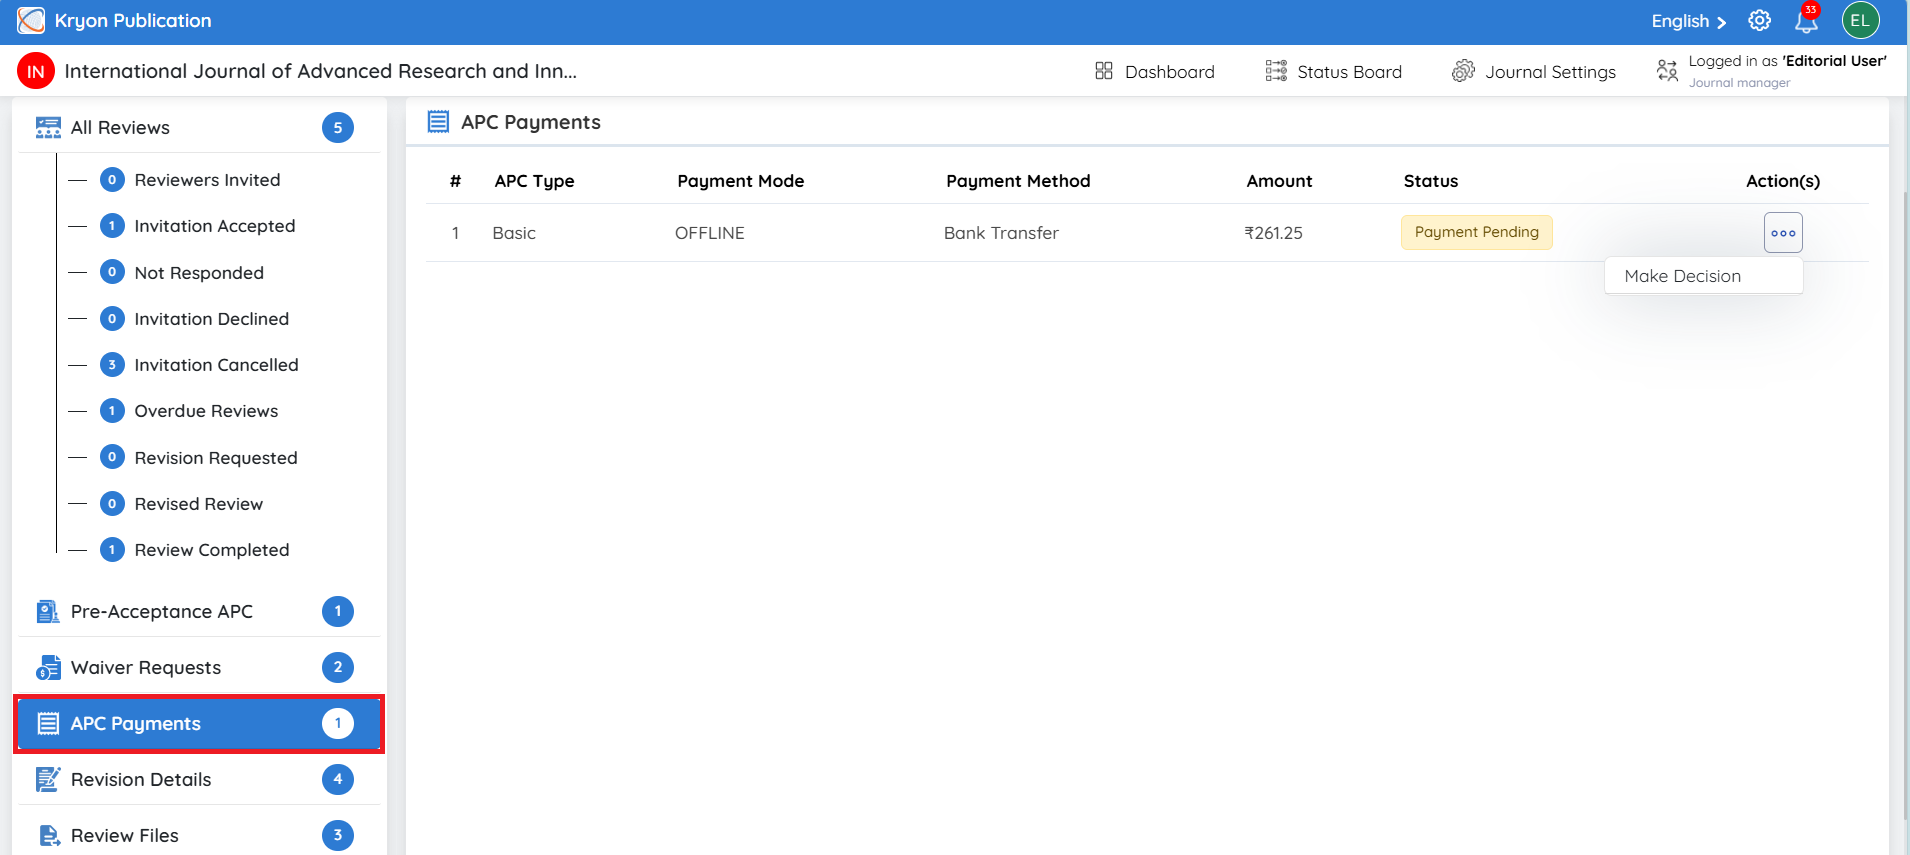
The editorial user can review the submitted payment from the APC Payments section.
The payment record displays the APC Type, Payment Mode, Payment Method, Amount, and Status. Until the offline payment is verified, the status will remain Payment Pending.
Review the Payment Request
-
Open the APC Payments section.
-
Locate the payment with the Payment Pending status.
-
Click the Actions (⋯) menu.
-
Select Make Decision.
-
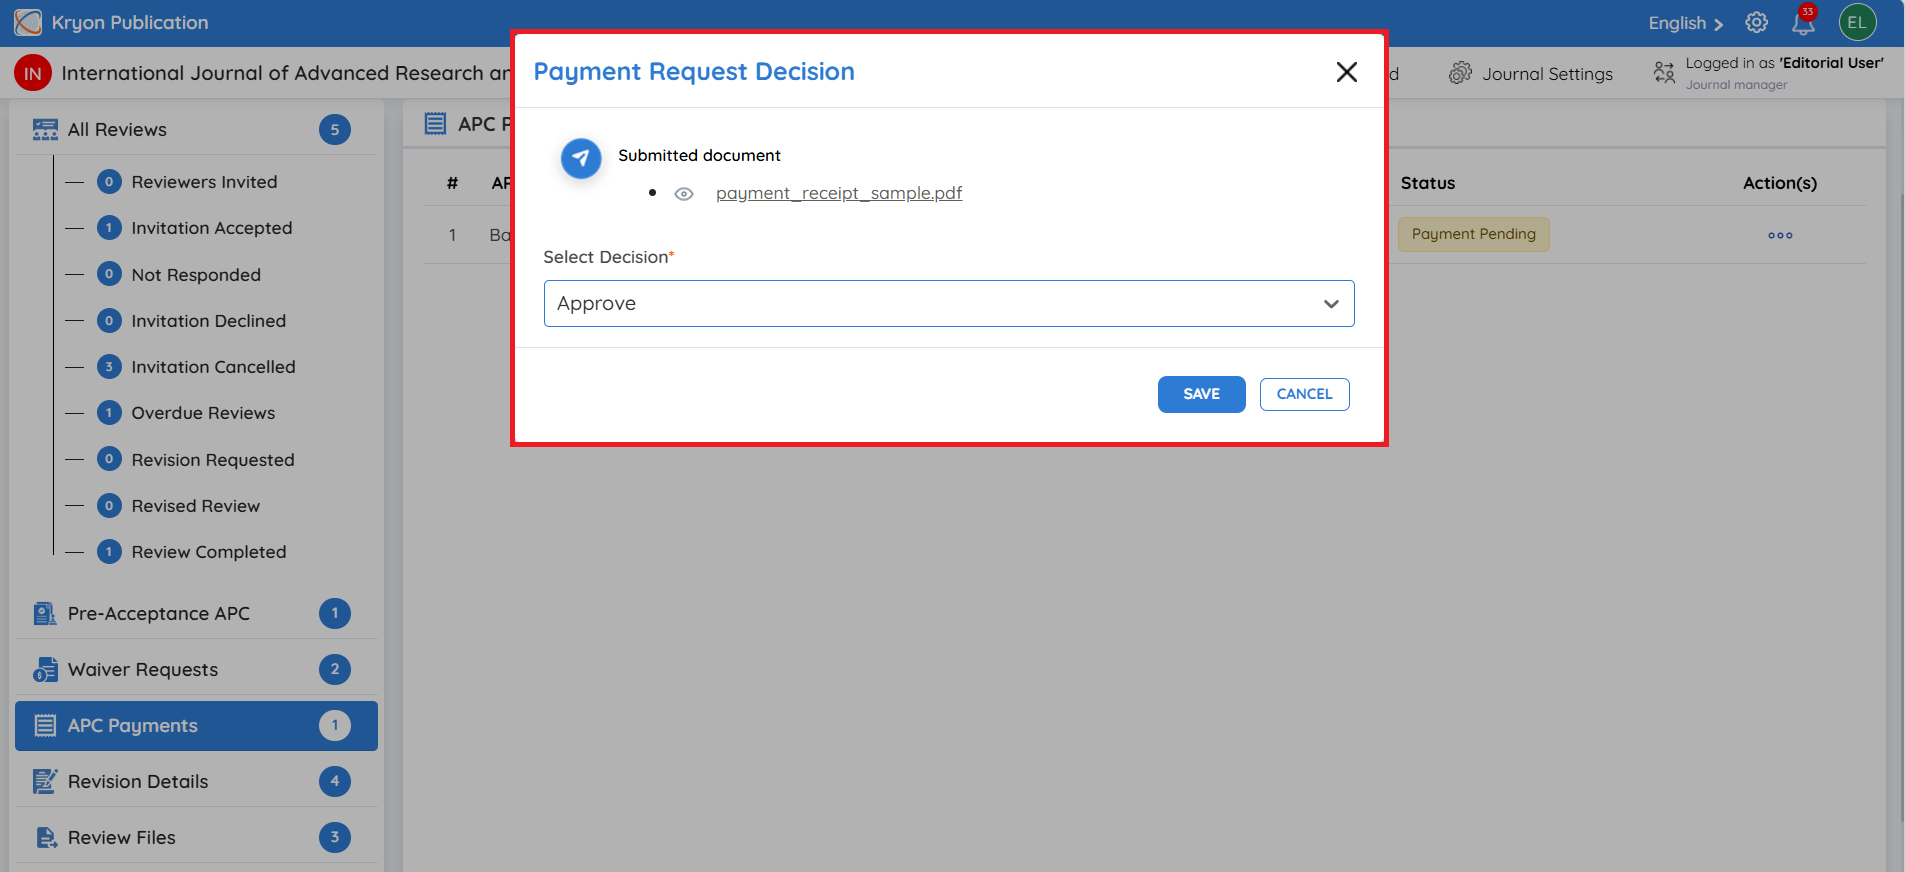
The Payment Request Decision window will open.
-
The payment receipt or supporting document uploaded by the author will be displayed under Submitted Document.
-
Click the document if required to review the submitted payment proof.
-
Under Select Decision, choose either Approve or Reject.
Approve should be selected when the submitted offline payment has been verified successfully. Click Save to confirm the decision. The payment can then be treated as completed, allowing the APC workflow to proceed.
Reject should be selected when the payment cannot be verified, the uploaded document is incorrect or insufficient, or the payment details do not match the required APC payment. Click Save to record the decision. The author will need to address the payment issue before the APC process can be completed.
For offline payments, uploading a receipt does not automatically complete the APC payment. The payment remains Payment Pending until the editorial user reviews the submitted document and makes a decision.
Download Invoice After APC Payment Completion
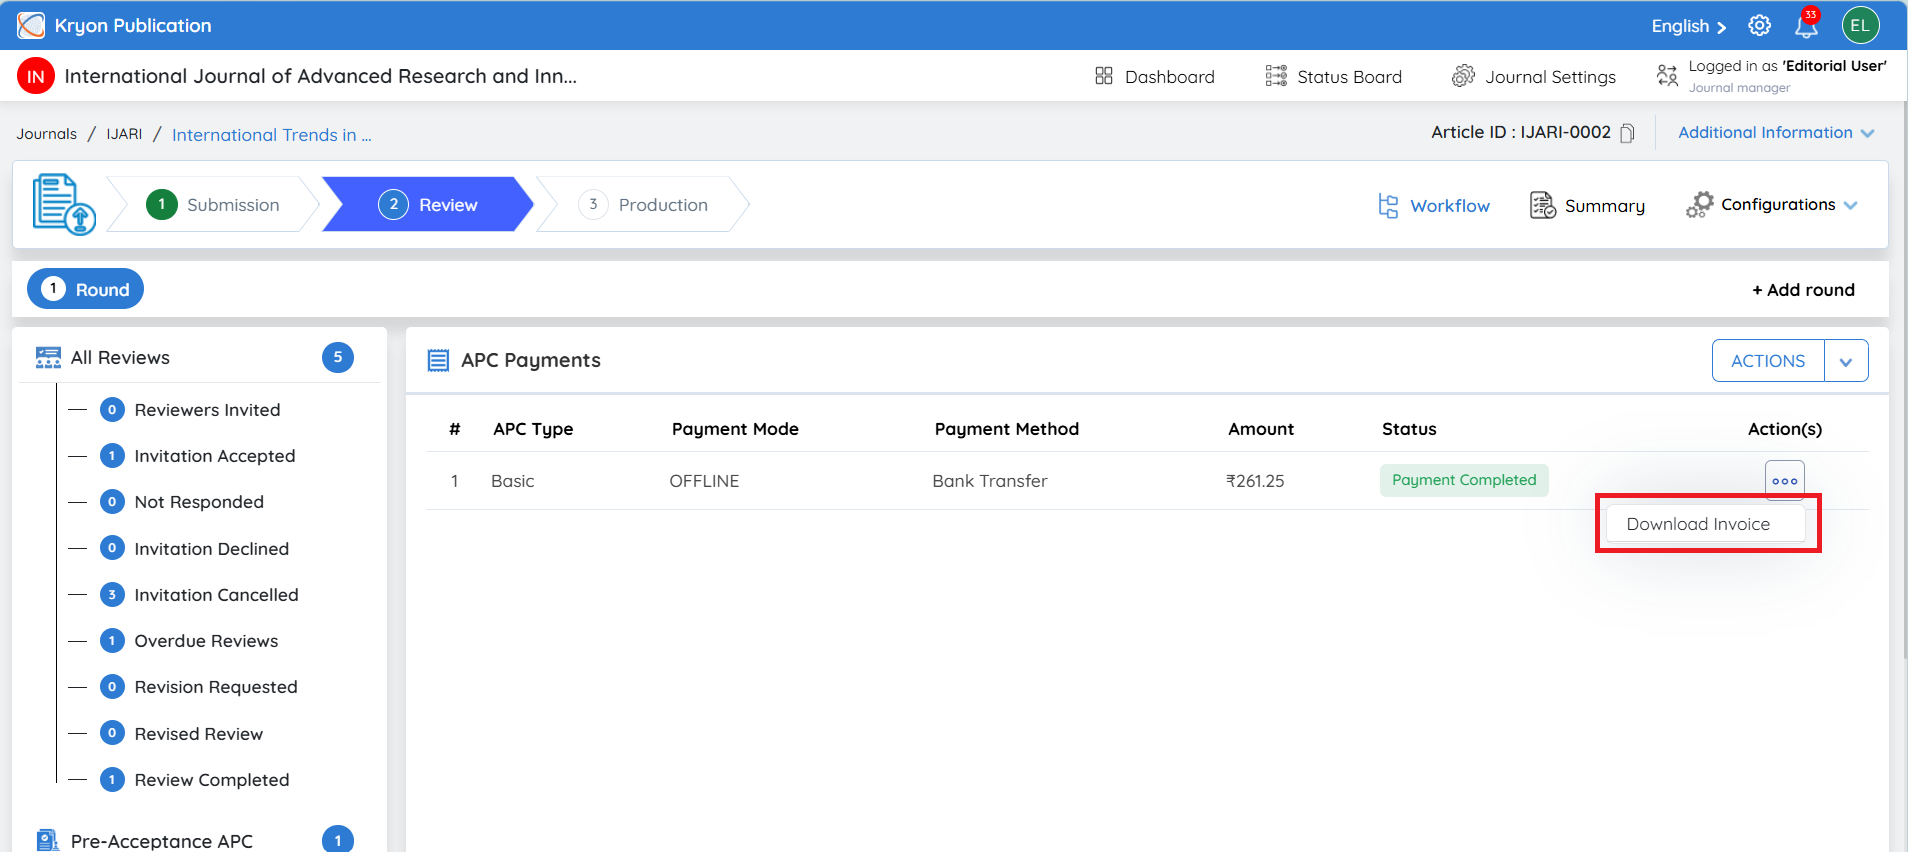
Once the APC payment is completed, the invoice will be available for download.
-
Go to the APC Payments section.
-
Locate the completed APC payment.
-
Click the Actions (⋯) menu.
-
Select Download Invoice.