Create a New Submission
To submit a new manuscript:
- Click Create New Submission.
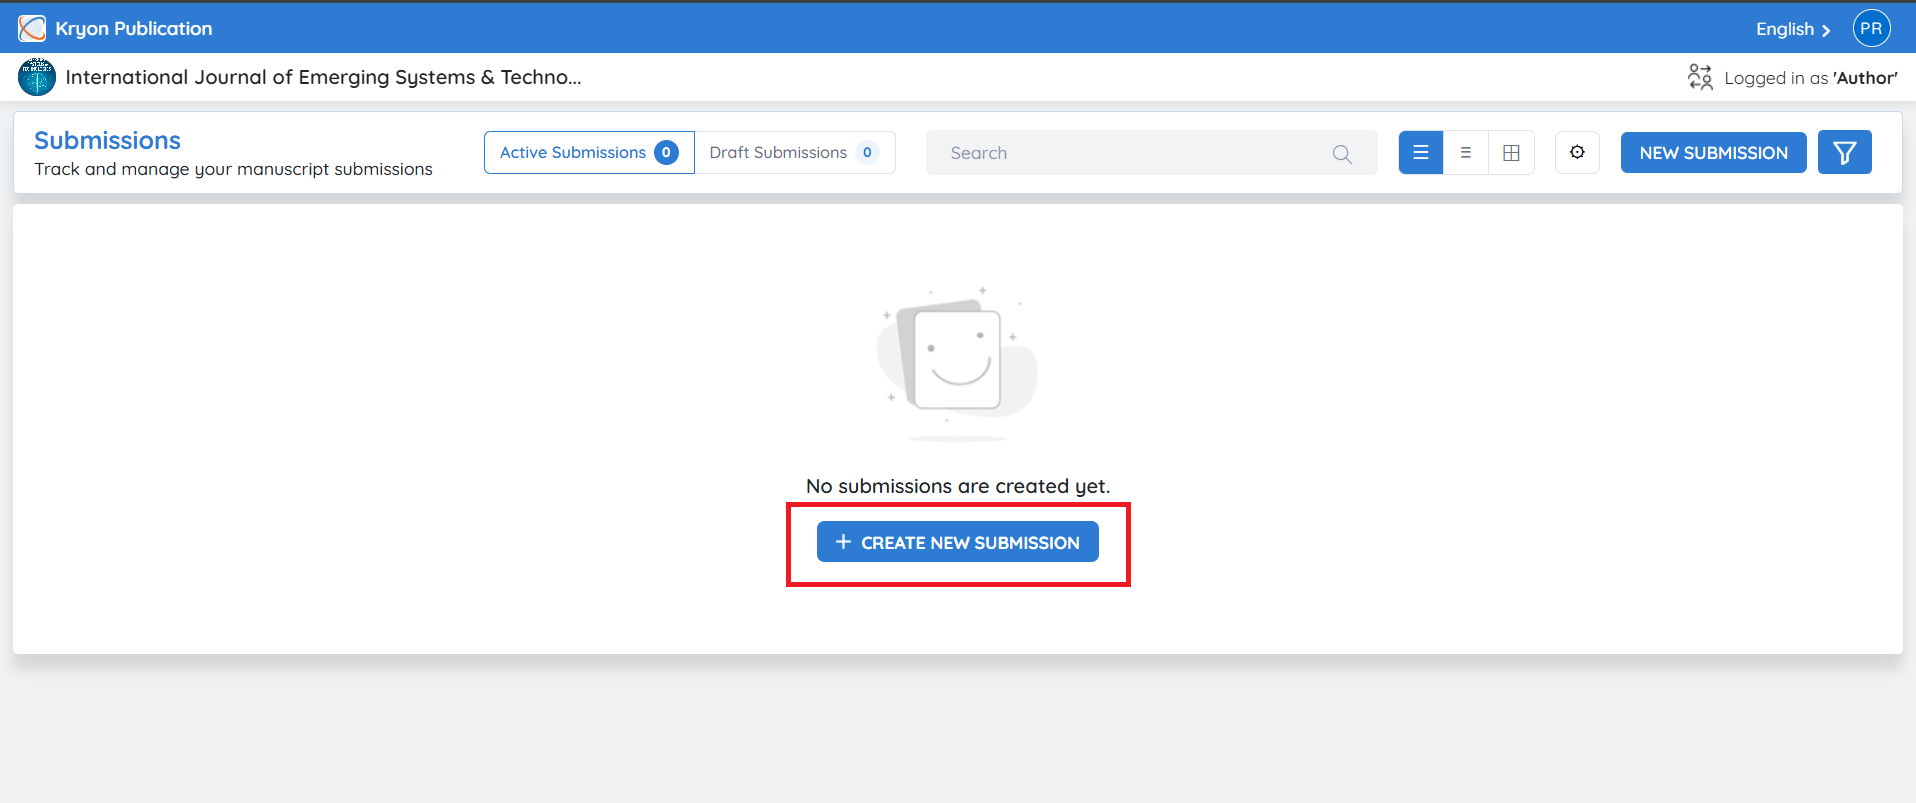
The submission wizard opens and guides the author through each stage of the submission process.
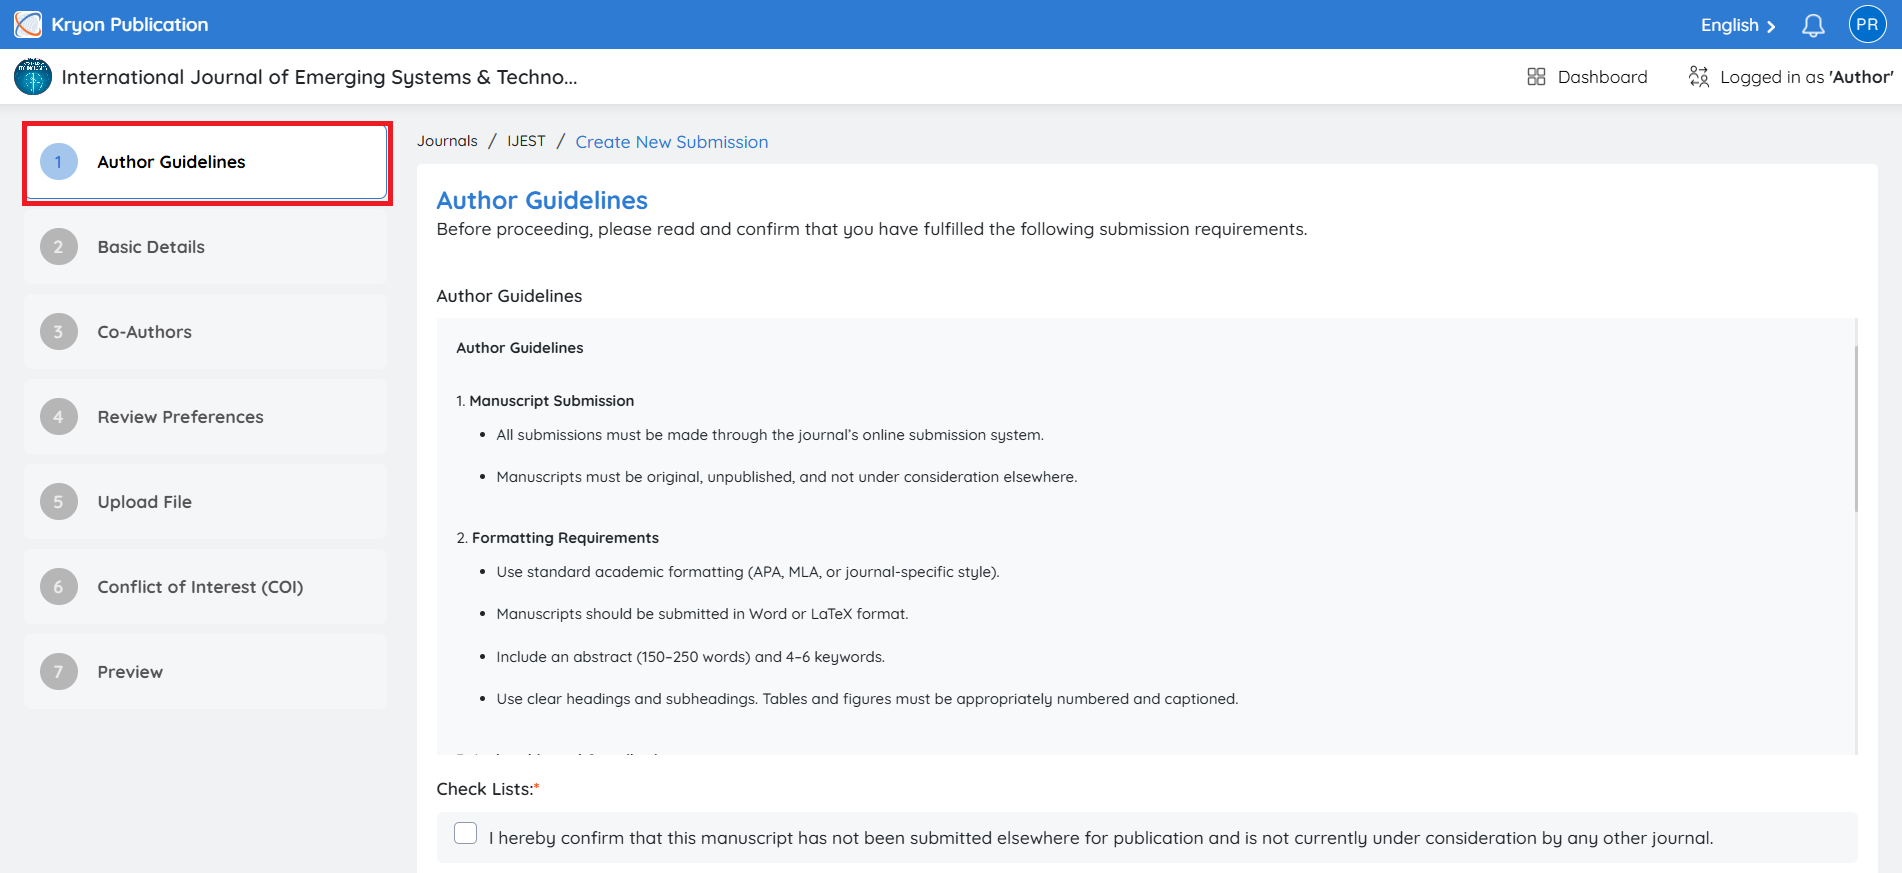
Author Guidelines
Before beginning the submission, authors are presented with the journal's submission requirements.
Authors should carefully review:
-
Author Guidelines
-
Submission Requirements
-
Publication Policies
-
Ethical Requirements
These guidelines help ensure that manuscripts comply with the journal's editorial standards before submission.
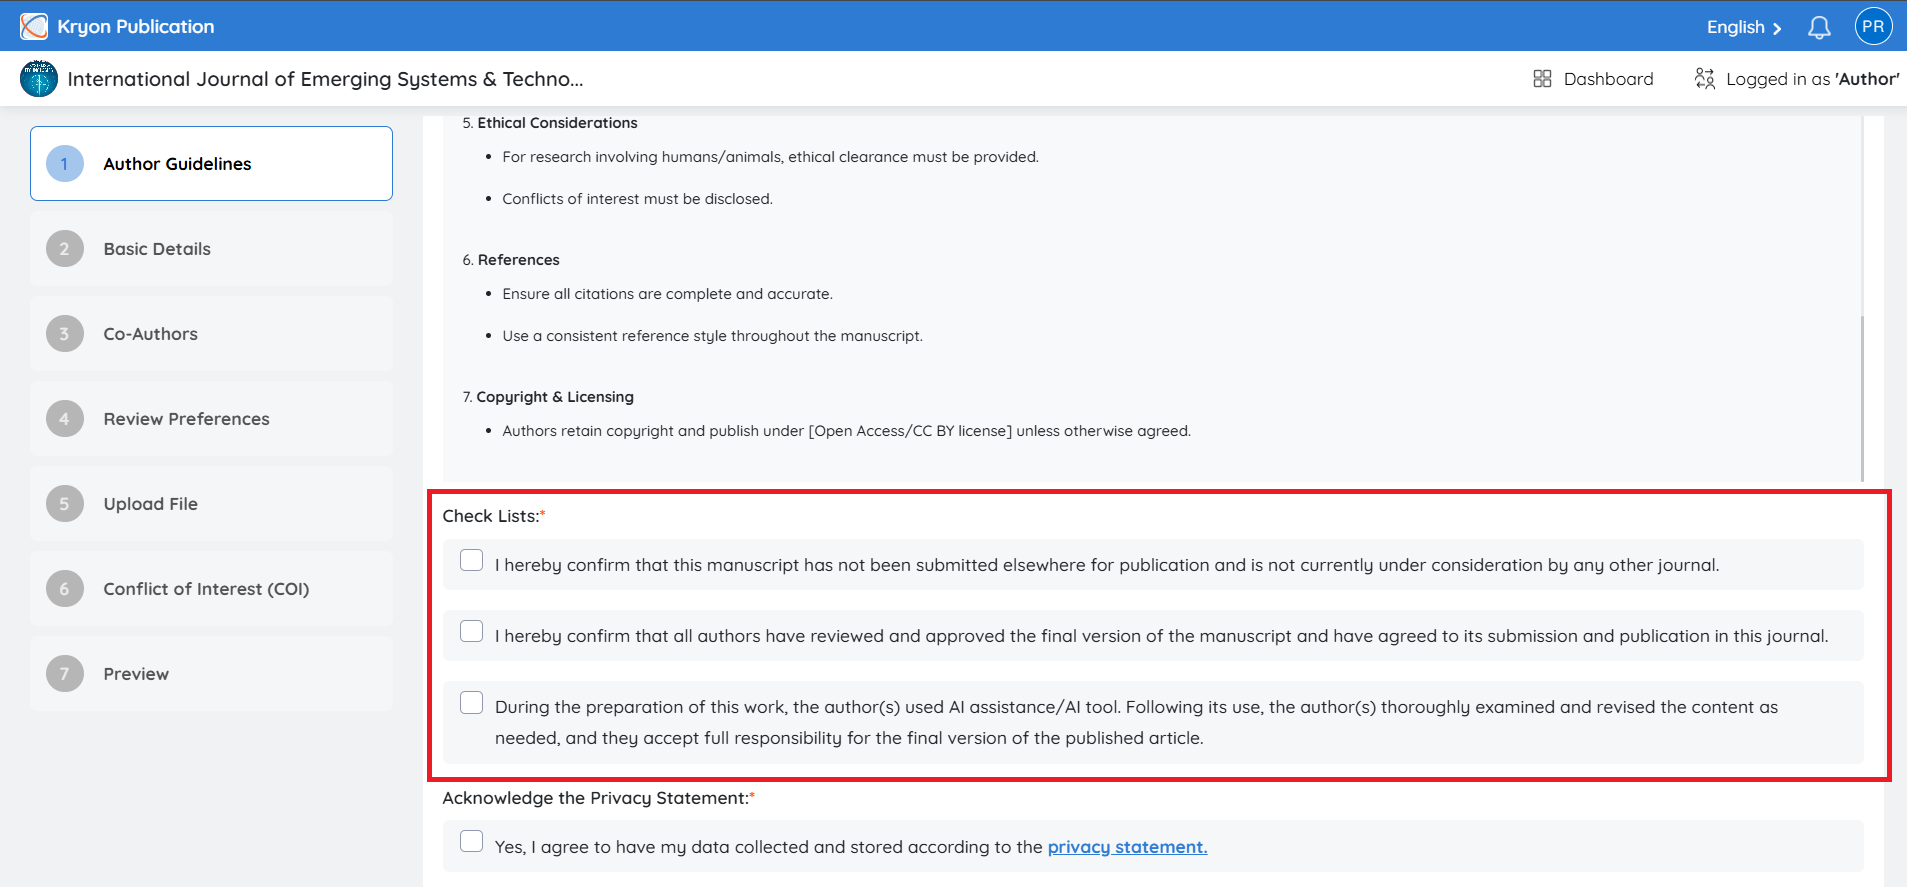
Submission Checklist
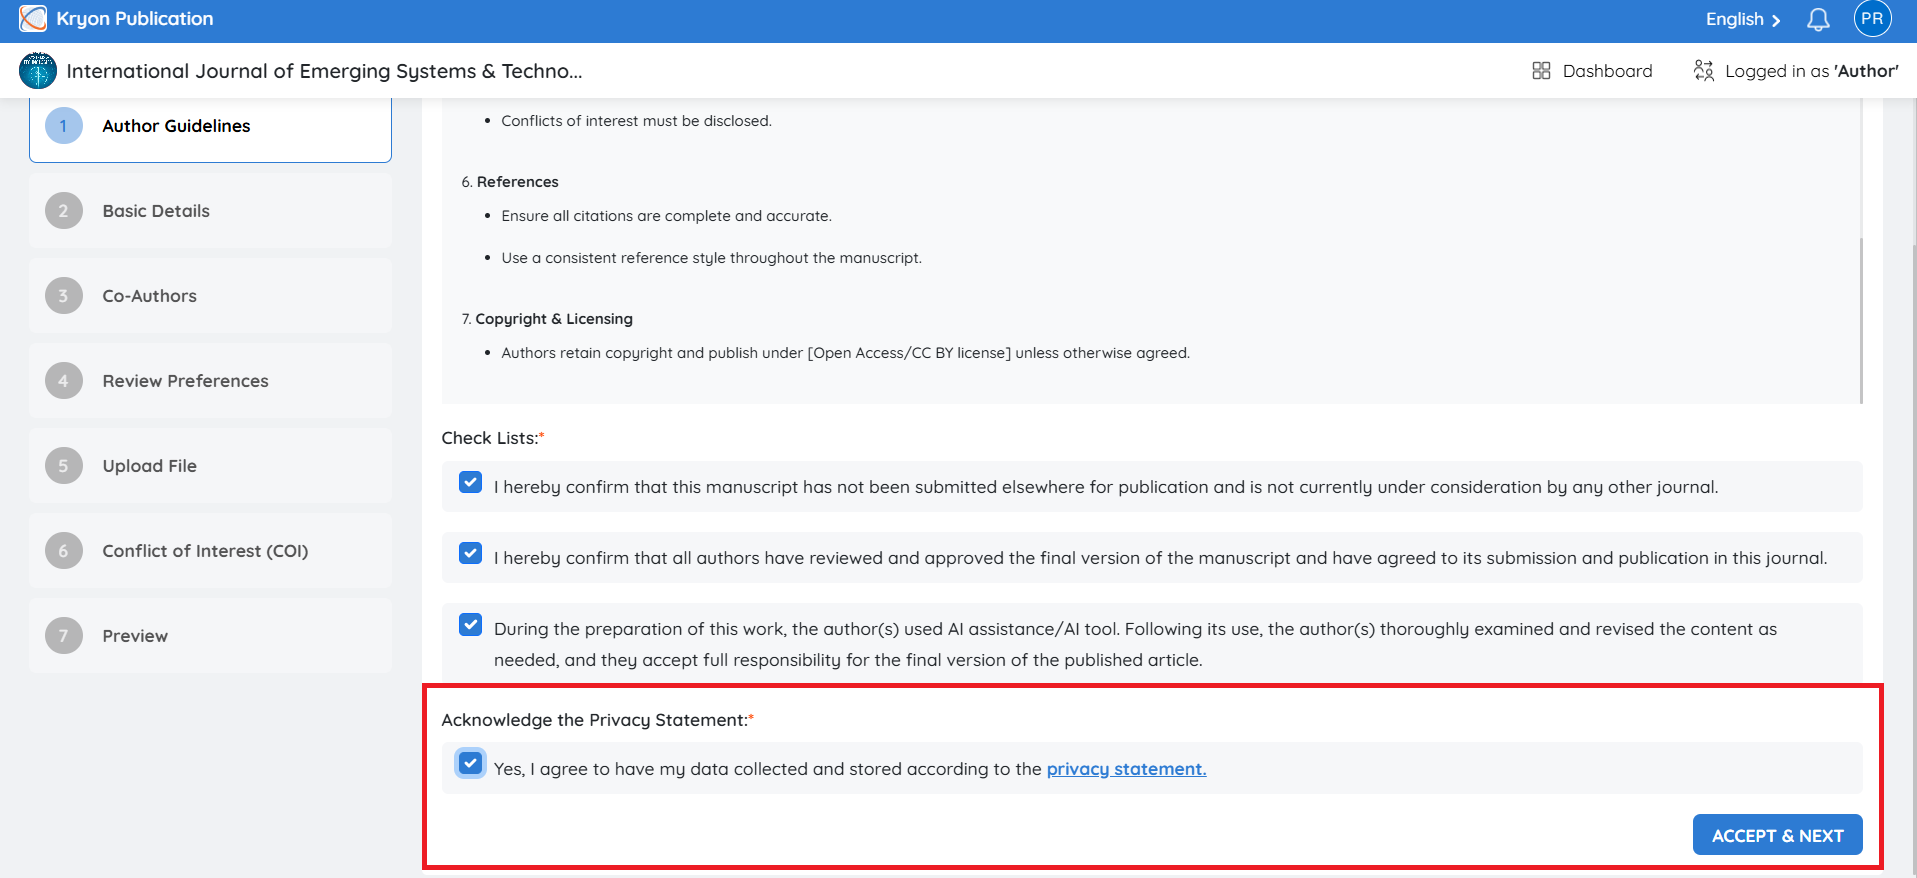
Authors must confirm that their manuscript satisfies all journal requirements.
Each checklist item must be acknowledged before continuing.
Privacy Statement
Authors must acknowledge the journal's Privacy Statement before proceeding.
To continue:
-
Read the Privacy Statement.
-
Select Acknowledge the Privacy Statement.
-
Click Accept & Next.
Only after accepting the Privacy Statement can the author proceed to the manuscript submission form.
Basic Details
Overview
The Basic Details section captures the essential information about the manuscript.
Complete all mandatory fields before proceeding to the next step.
Manuscript Information
Provide the basic information about your manuscript.
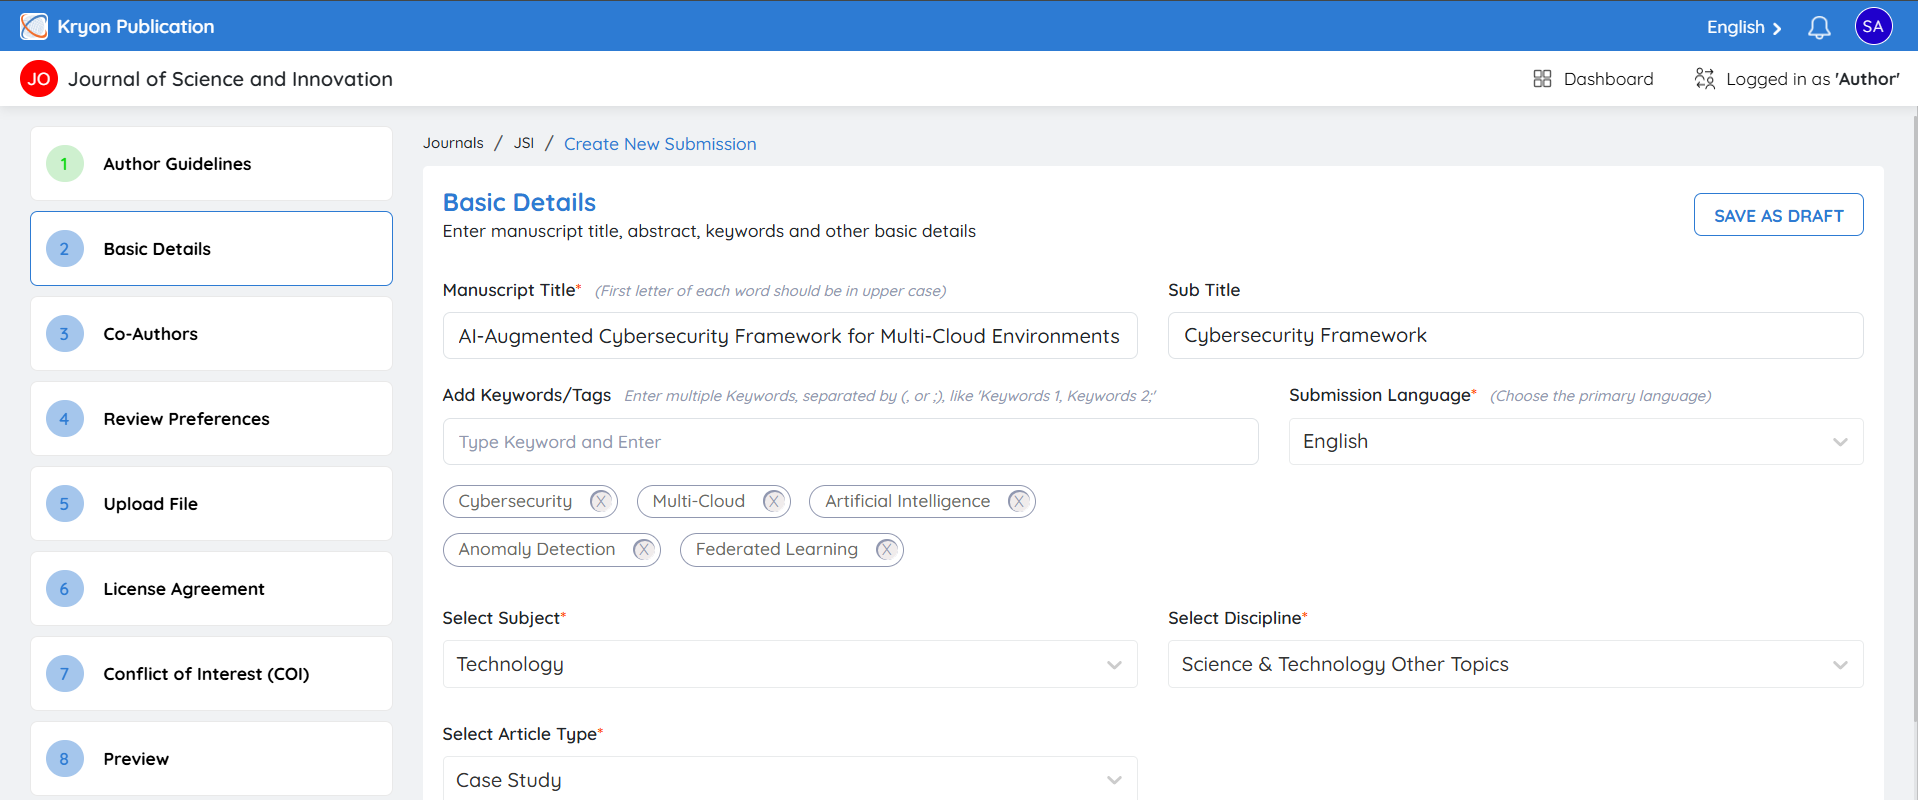
Manuscript Title*
Enter the full title of your manuscript.
Example
Artificial Intelligence Applications in Healthcare Systems
Subtitle
If applicable, enter a subtitle for the manuscript.
This field is optional and provides additional context to the main title.
Keywords / Tags*
Enter keywords that best describe your manuscript.
-
Separate multiple keywords using commas (,) or semicolons (;).
-
Choose keywords relevant to your research topic to improve discoverability.
Example
Artificial Intelligence, Machine Learning, Healthcare, Medical Imaging
Submission Language*
Select the primary language of the manuscript from the available list.
Example
-
English
-
French
Subject*
Select the subject area that best matches your manuscript.
Selecting the appropriate subject helps route the manuscript to the appropriate editorial team.
Discipline*
Choose the specific discipline within the selected subject from the drop-down.
Example
Subject: Computer Science
Discipline: Artificial Intelligence
Article Type*
Select the appropriate article type.
Examples include:
-
Original Research
-
Review Article
-
Case Report
-
Short Communication
-
Editorial
-
Letter to the Editor
The available article types depend on the journal's configuration.
Abstract*
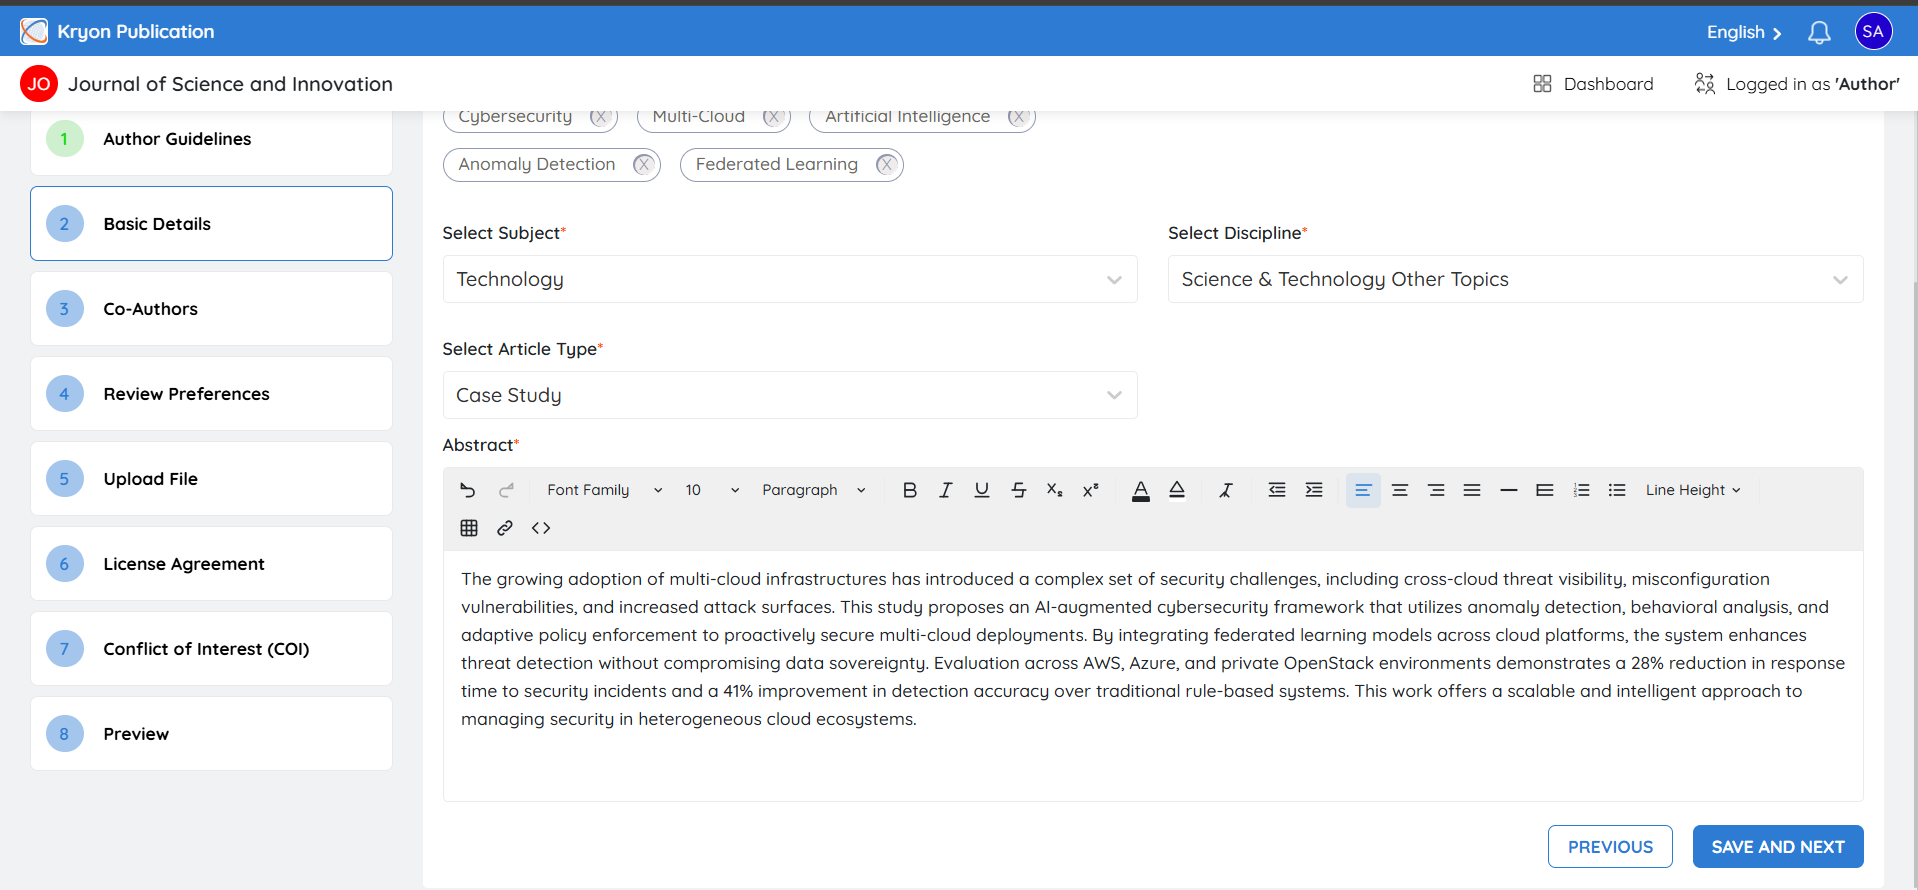
Enter the manuscript abstract.
The abstract should clearly summarize:
-
Research objective
-
Methodology
-
Key findings
-
Conclusions
Tip: Follow the journal's word limit and formatting requirements when preparing the abstract.
Co- author
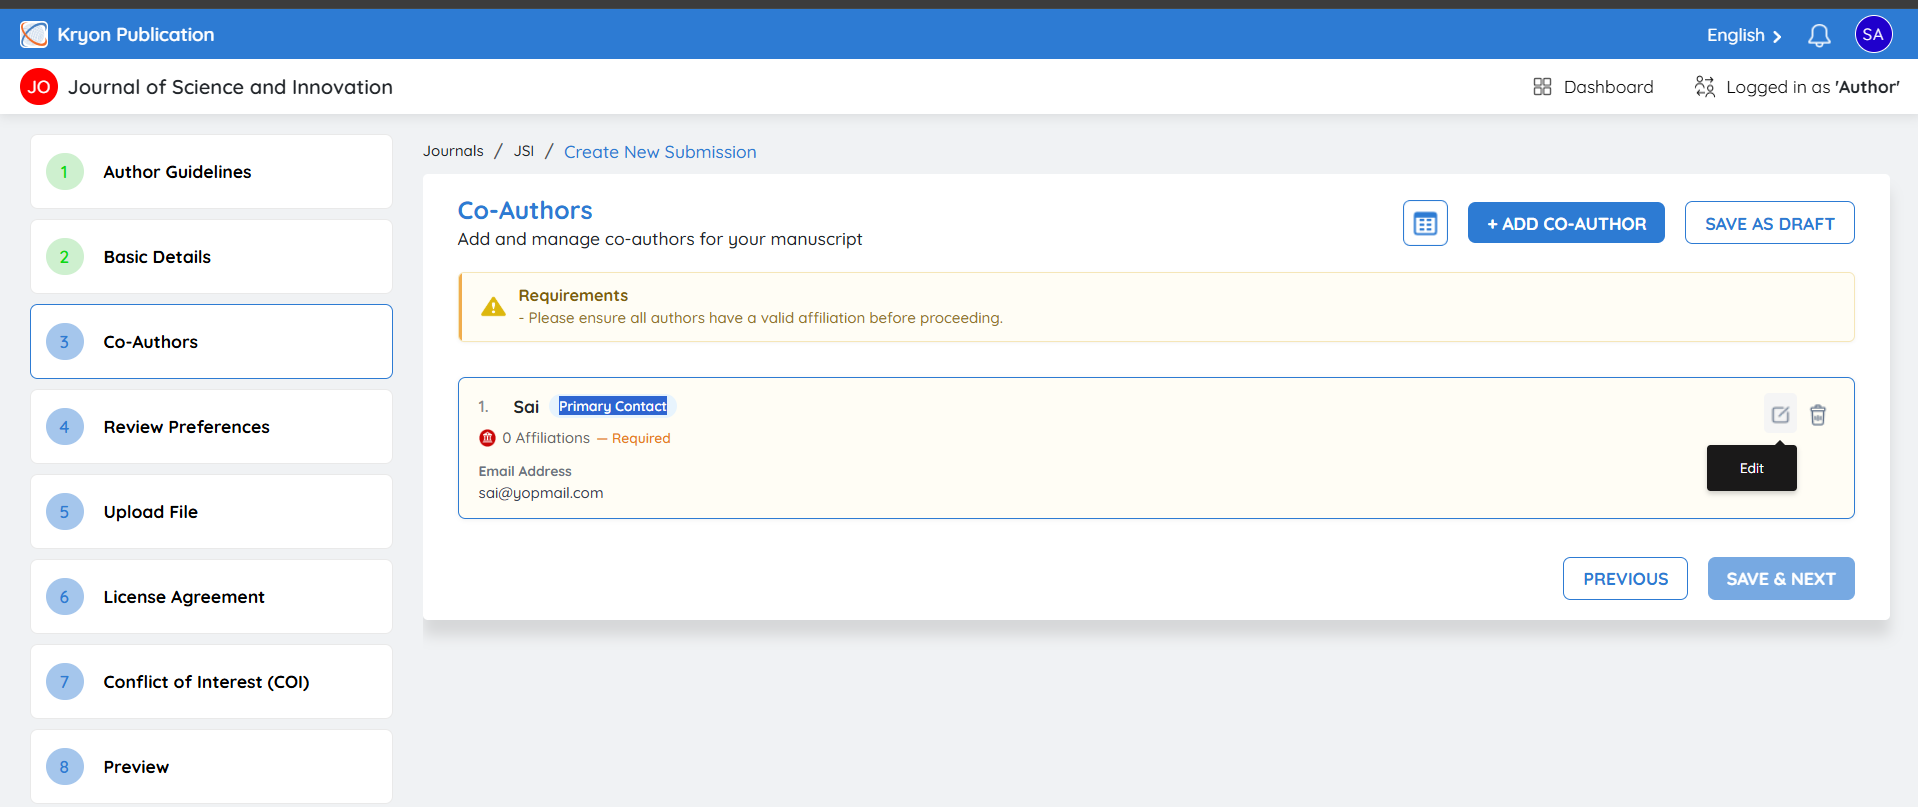
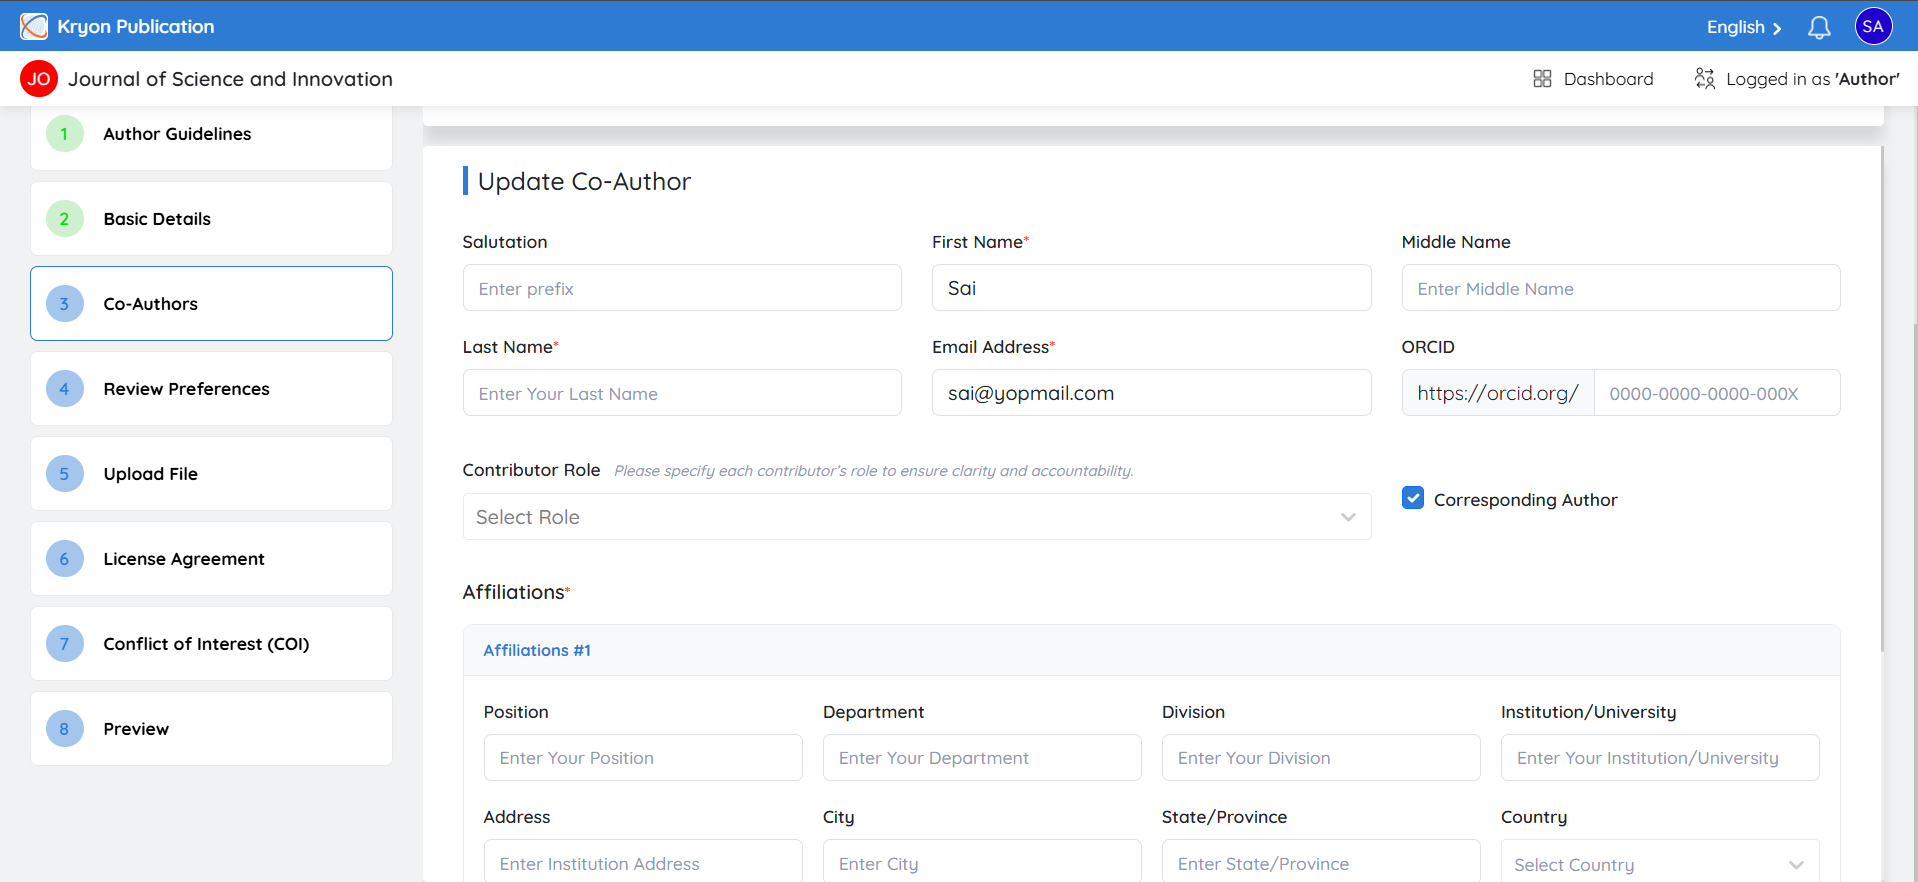
Before adding co-authors, the corresponding author must complete their own profile and affiliation details.
To update your information:
- Click the Edit icon next to your profile.
Personal Information
Complete or verify the following information:
-
Salutation
-
First Name*
-
Middle Name
-
Last Name*
-
Email Address*
-
ORCID ID
Providing an ORCID ID is recommended as it uniquely identifies researchers and improves author attribution.
Contributor Role
Select your role in the manuscript.
Examples include:
-
Corresponding Author
-
Author
-
Co-Author
-
Principal Investigator
The Corresponding Author is responsible for all communication with the journal throughout the editorial and publication process.
Author Affiliations
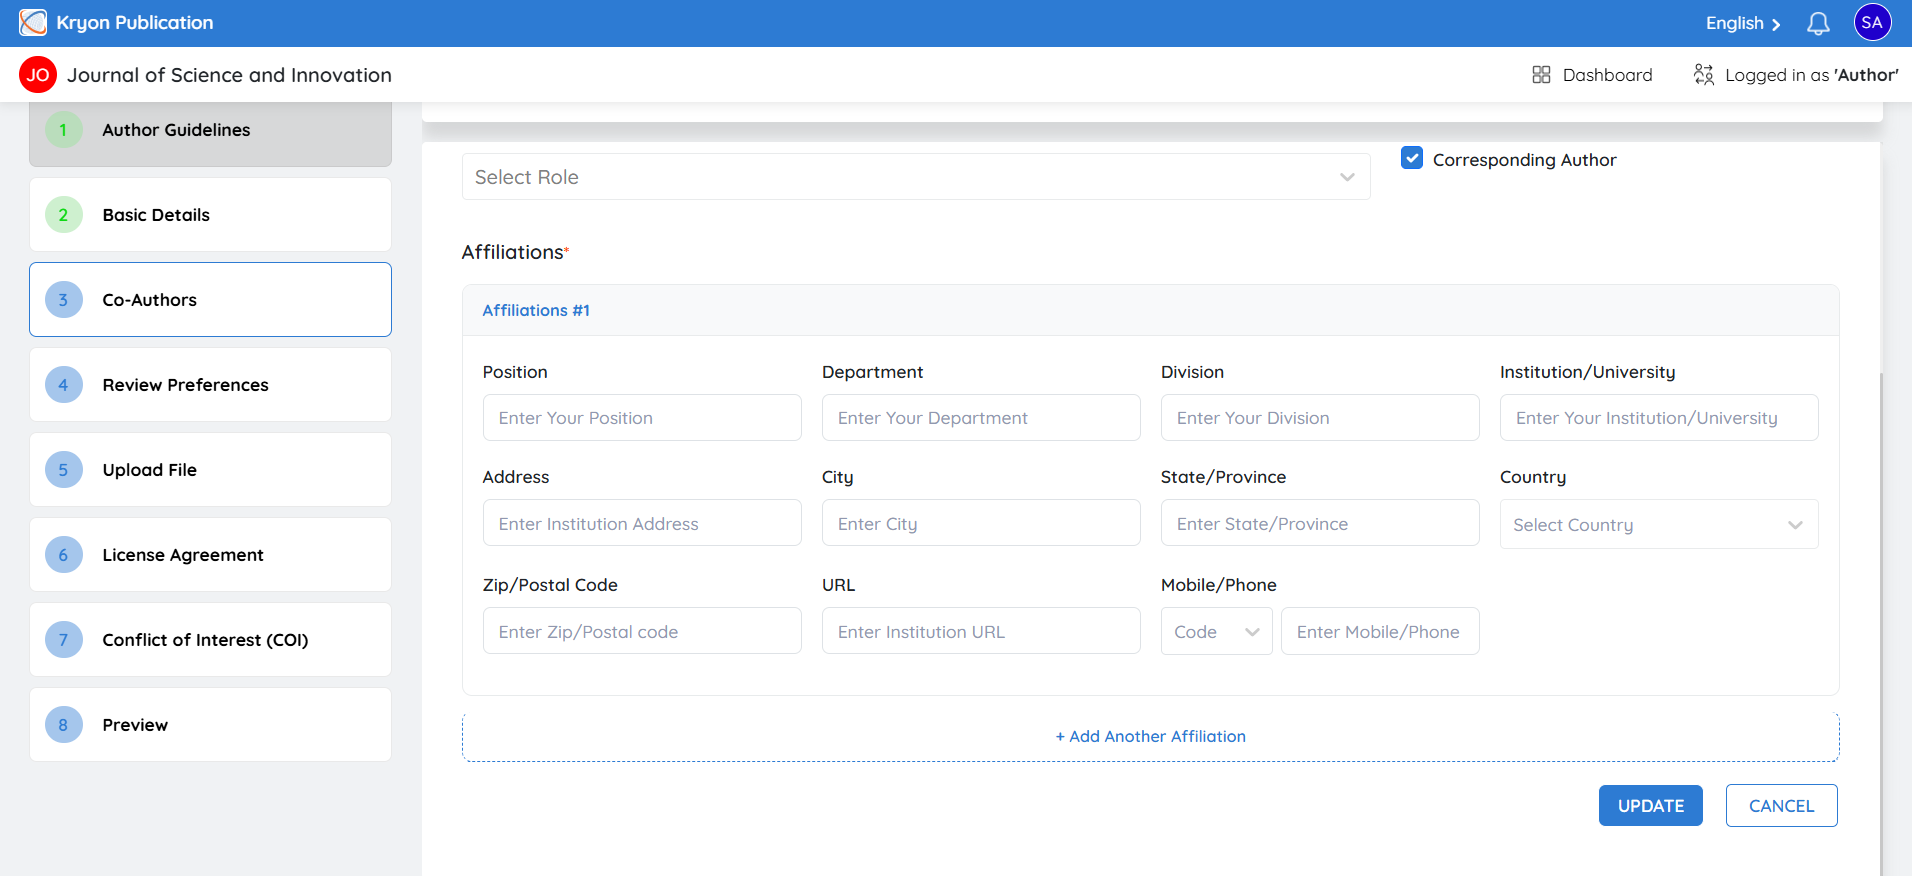
Each author must have at least one affiliation.
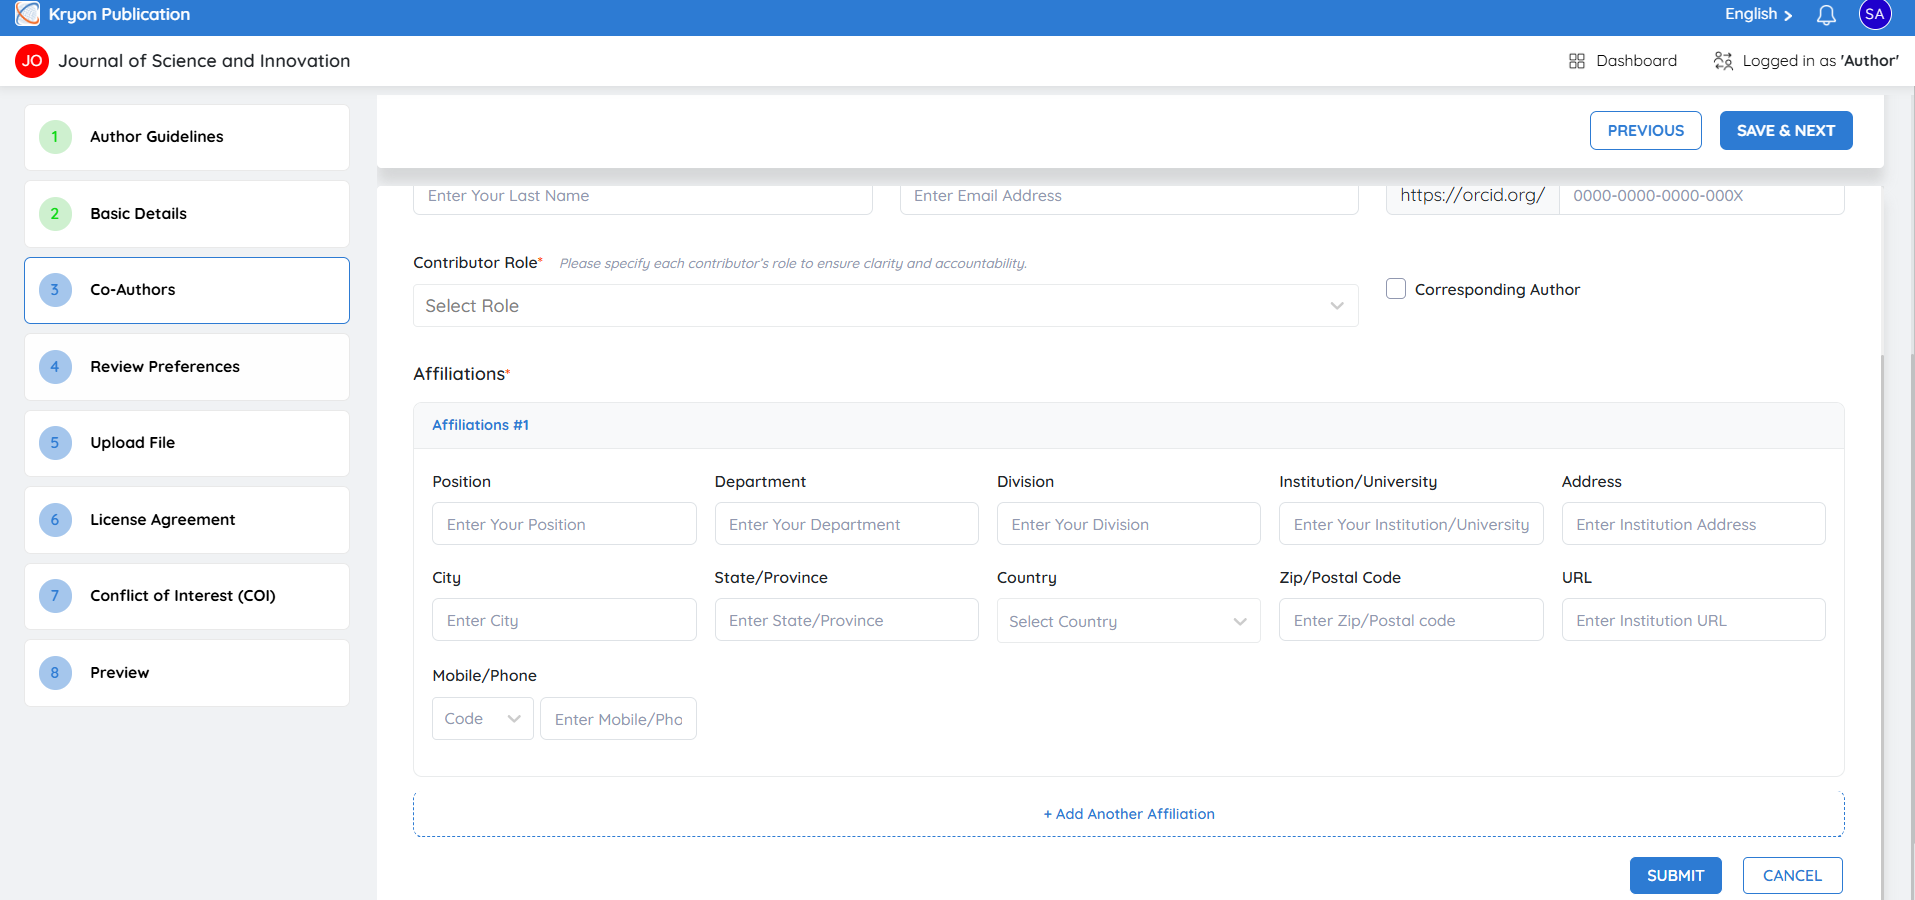
Complete the affiliation details:
-
Position
-
Department
-
Division
-
Institution / University
-
Address
-
City
-
State / Province
-
Country
-
ZIP / Postal Code
-
Institution Website (URL)
-
Mobile / Phone
After entering the information, click Update.
Adding Multiple Affiliations
If you are affiliated with more than one institution:
-
Click + Add Another Affiliation.
-
Enter the additional affiliation details.
-
Click Update.
Multiple affiliations can be associated with the same author.
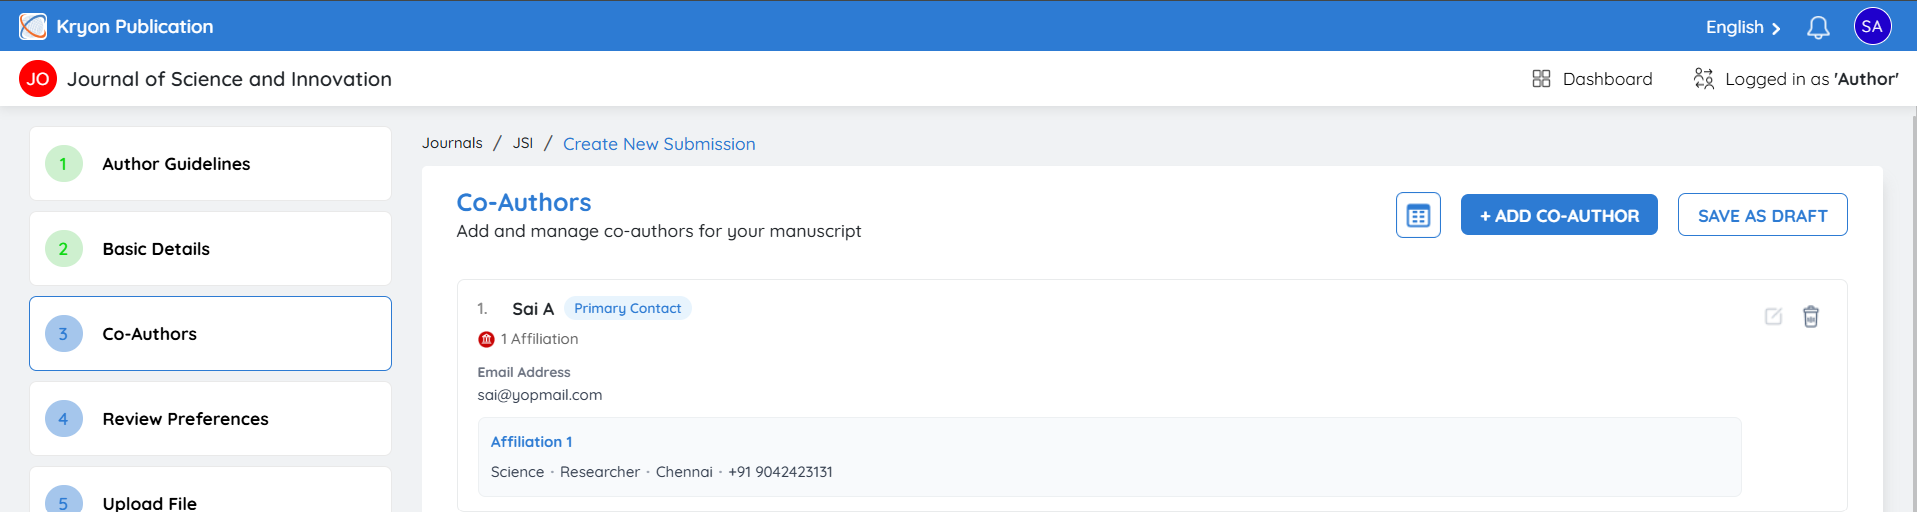
Adding Co-authors
After completing your own profile, you can add co-authors.
Click Add Co-Author.
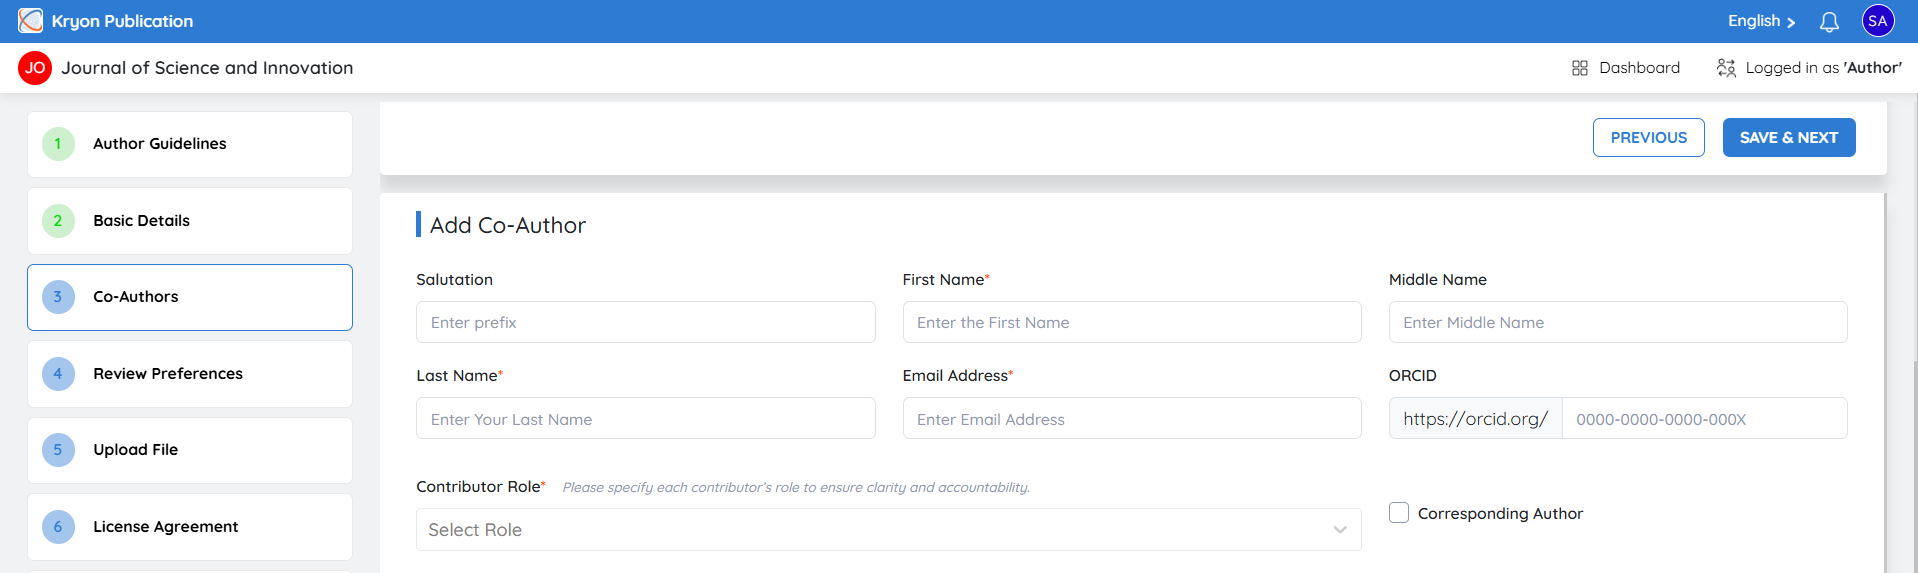
Enter the following information:
Personal Details
-
Salutation
-
First Name*
-
Middle Name
-
Last Name*
-
Email Address*
-
ORCID ID (Optional but recommended)
Contributor Role*
Select the contribution made by the co-author.
Examples include:
-
Co-Author
-
Corresponding Author
-
Data Curator
-
Methodology
The available roles may vary depending on the journal's contributor role configuration.
Affiliation
Provide the co-author's institutional affiliation.
Complete:
-
Position
-
Department
-
Division
-
Institution / University
-
Address
-
City
-
State / Province
-
Country
-
ZIP / Postal Code
-
Website
-
Phone Number
Click Submit to save the information.
Repeat the process to add additional co-authors.
Importing Co-authors
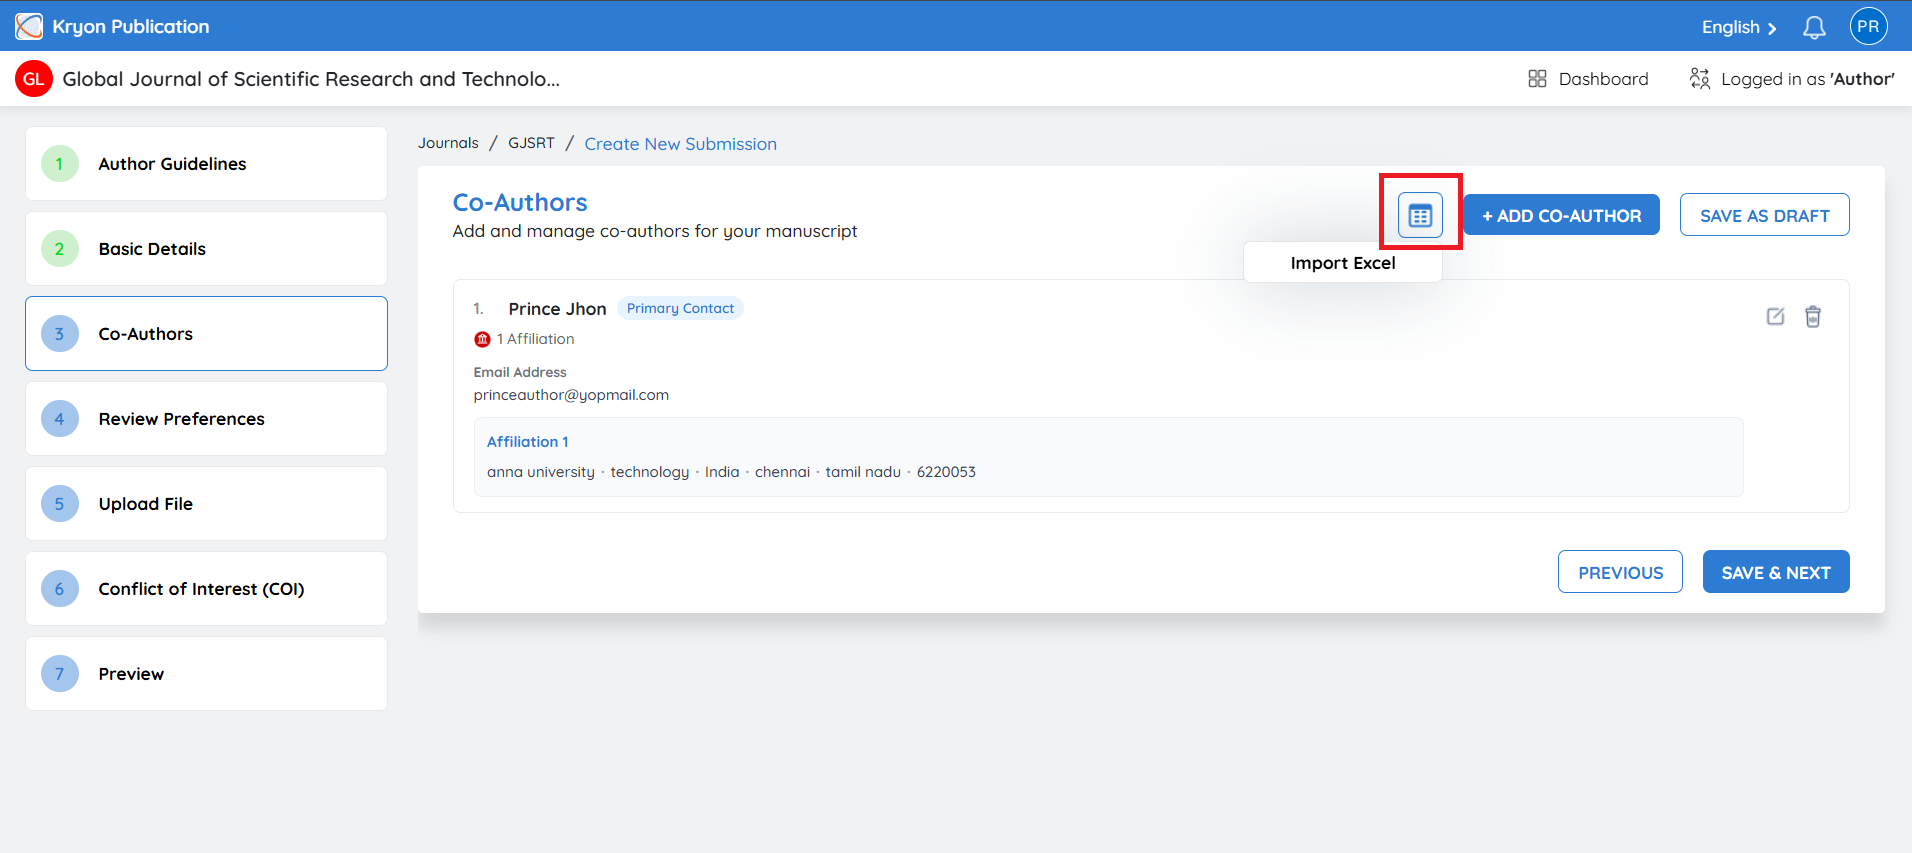
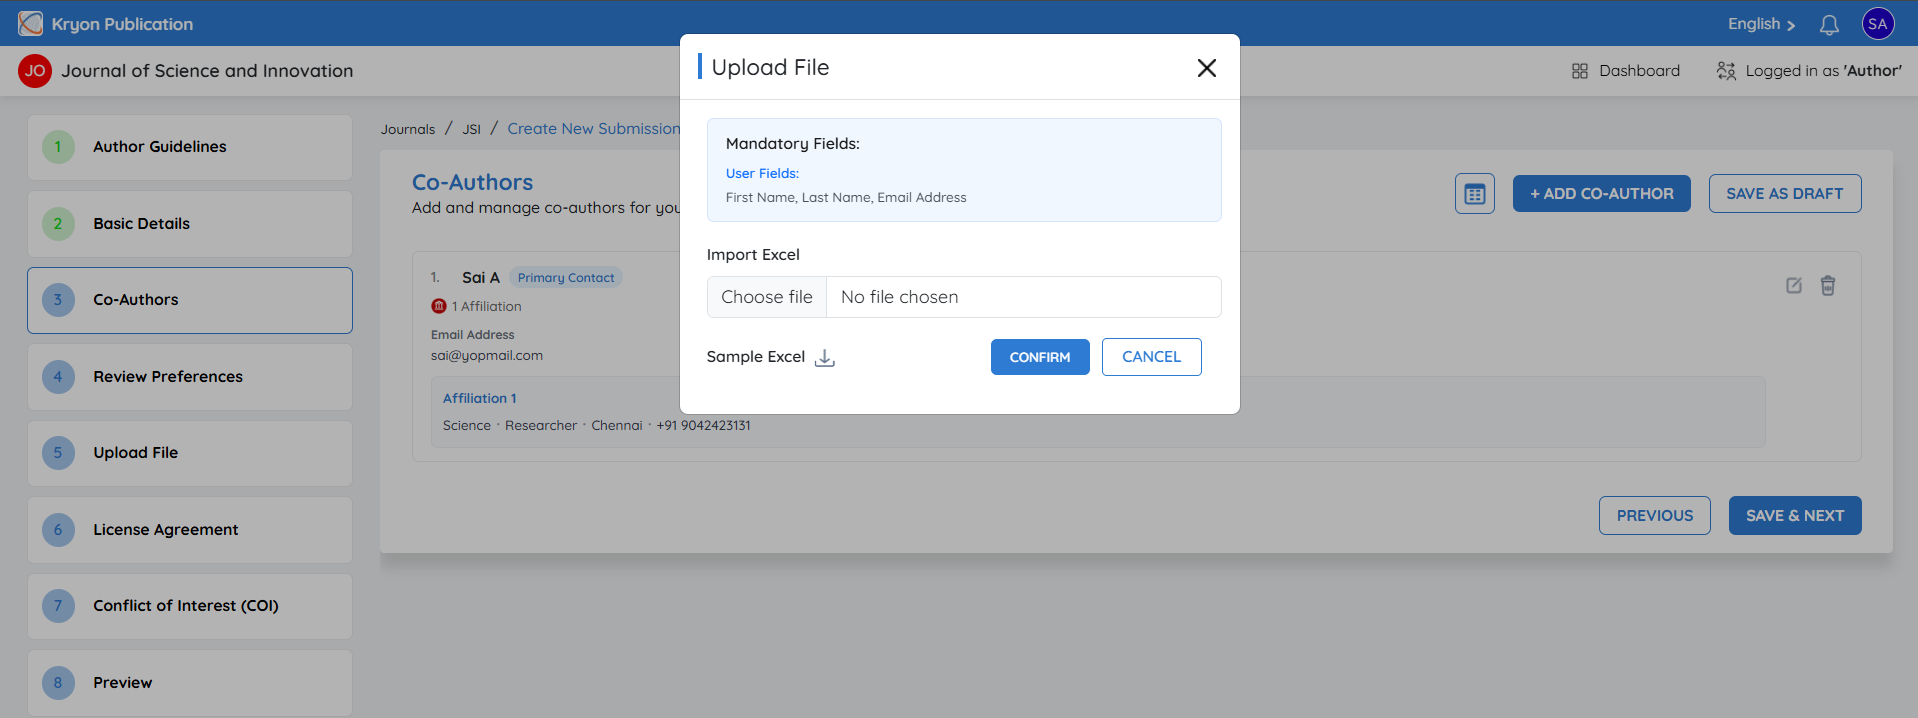
If you have multiple co-authors, you can import their details in bulk using the predefined Excel template instead of entering each author manually.
Steps to Import Co-authors
-
Click the Import icon in the Co-authors section.
-
Click Download Sample Excel to download the template.
-
Open the template and enter the required co-author information in the specified columns.
-
Save the completed Excel file.
-
Click Choose File and select the completed Excel file.
-
Click Confirm to upload the file.
The system validates the uploaded data and automatically adds the co-authors.
Ensure that all mandatory fields in the Excel template are completed and the file format remains unchanged. Any missing or invalid information may prevent the import from completing successfully.
Reviewer Preferences
Overview
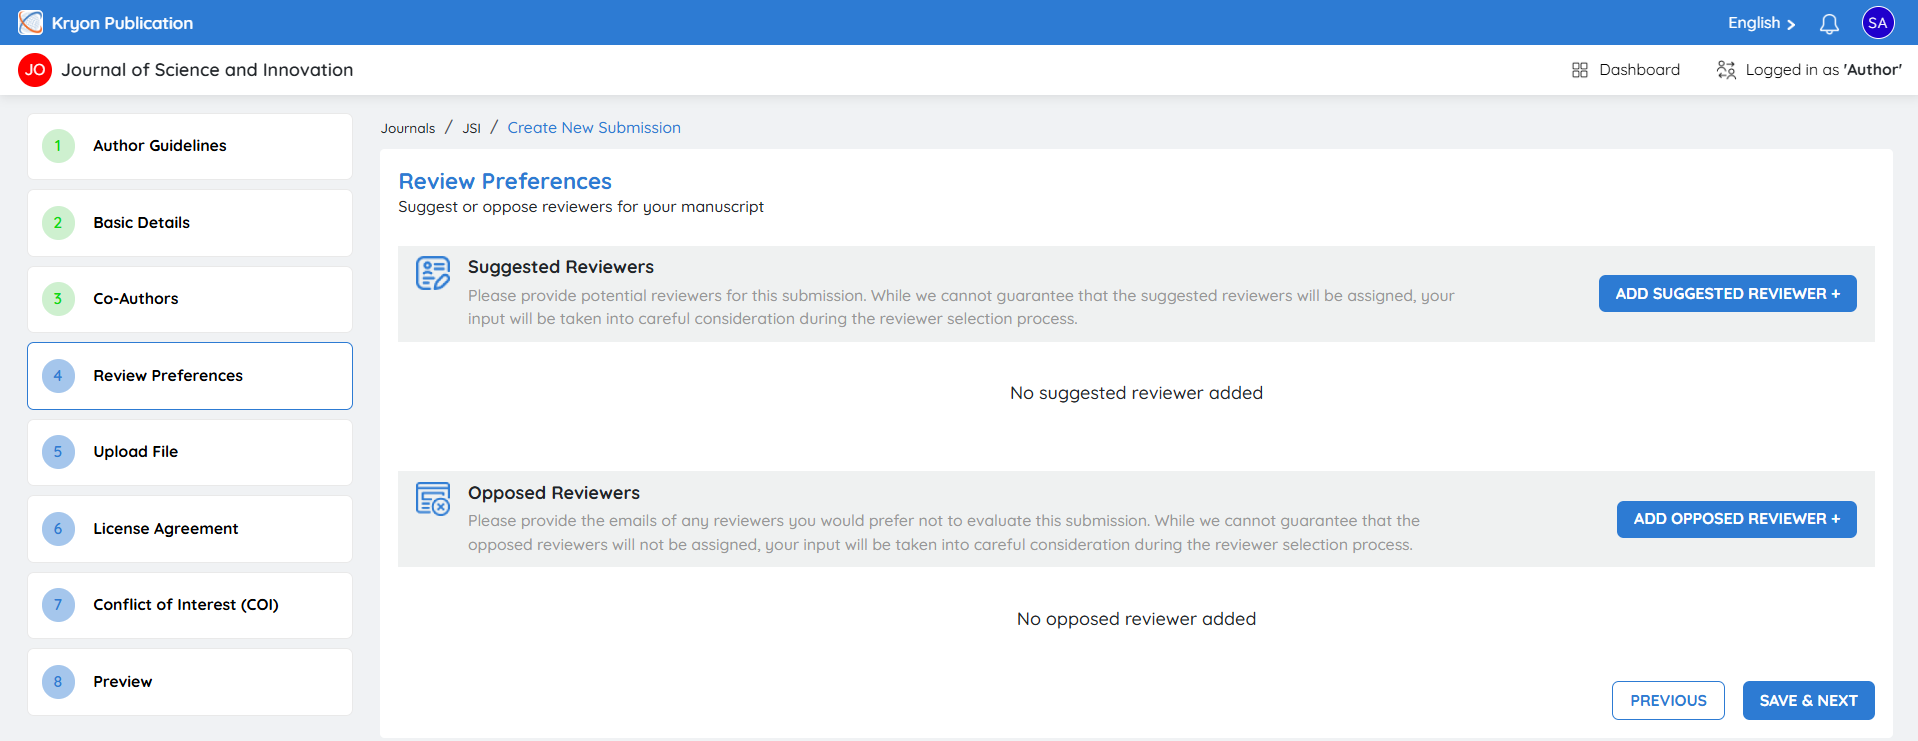
The Reviewer Preferences section allows authors to recommend qualified reviewers and identify individuals they prefer not to review their manuscript. While the editorial team retains full authority over reviewer selection, these preferences help editors make informed decisions during the peer review process.
This section consists of:
-
Suggested Reviewers
-
Opposed Reviewers
Reviewer preferences are considered by the editorial team but do not guarantee reviewer selection or exclusion.
Suggested Reviewers
Authors may recommend experts who are qualified to review their manuscript.
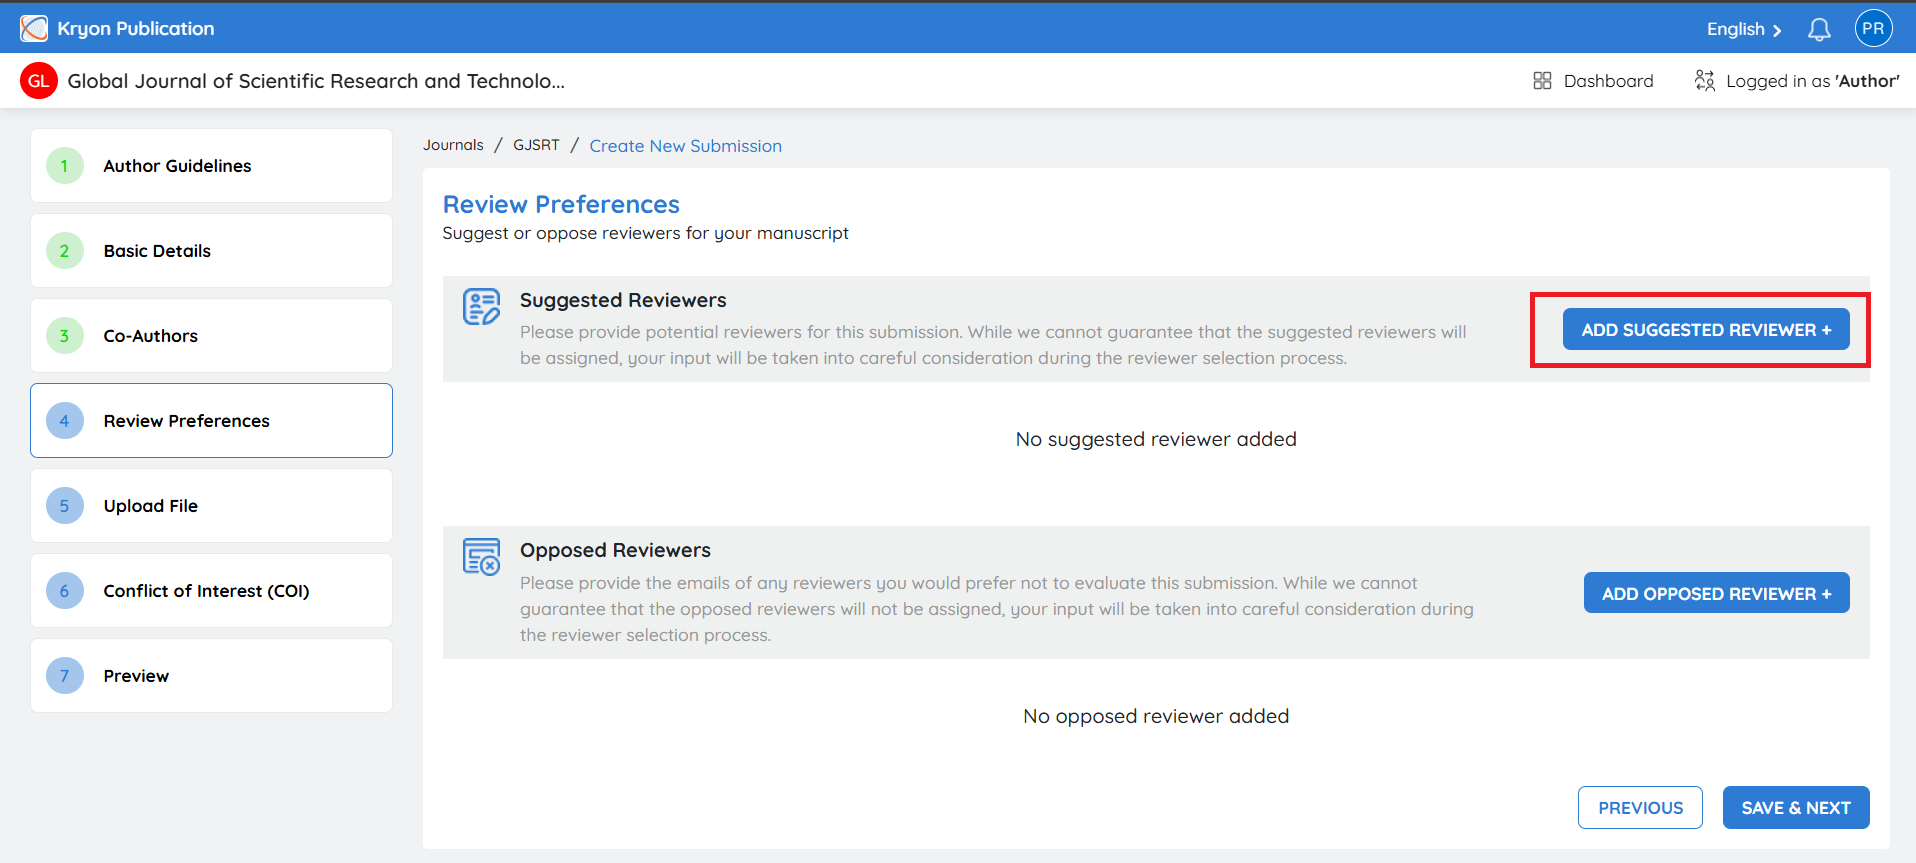
To add a suggested reviewer:
-
Click Suggest Reviewer.
-
Enter the required reviewer information.
-
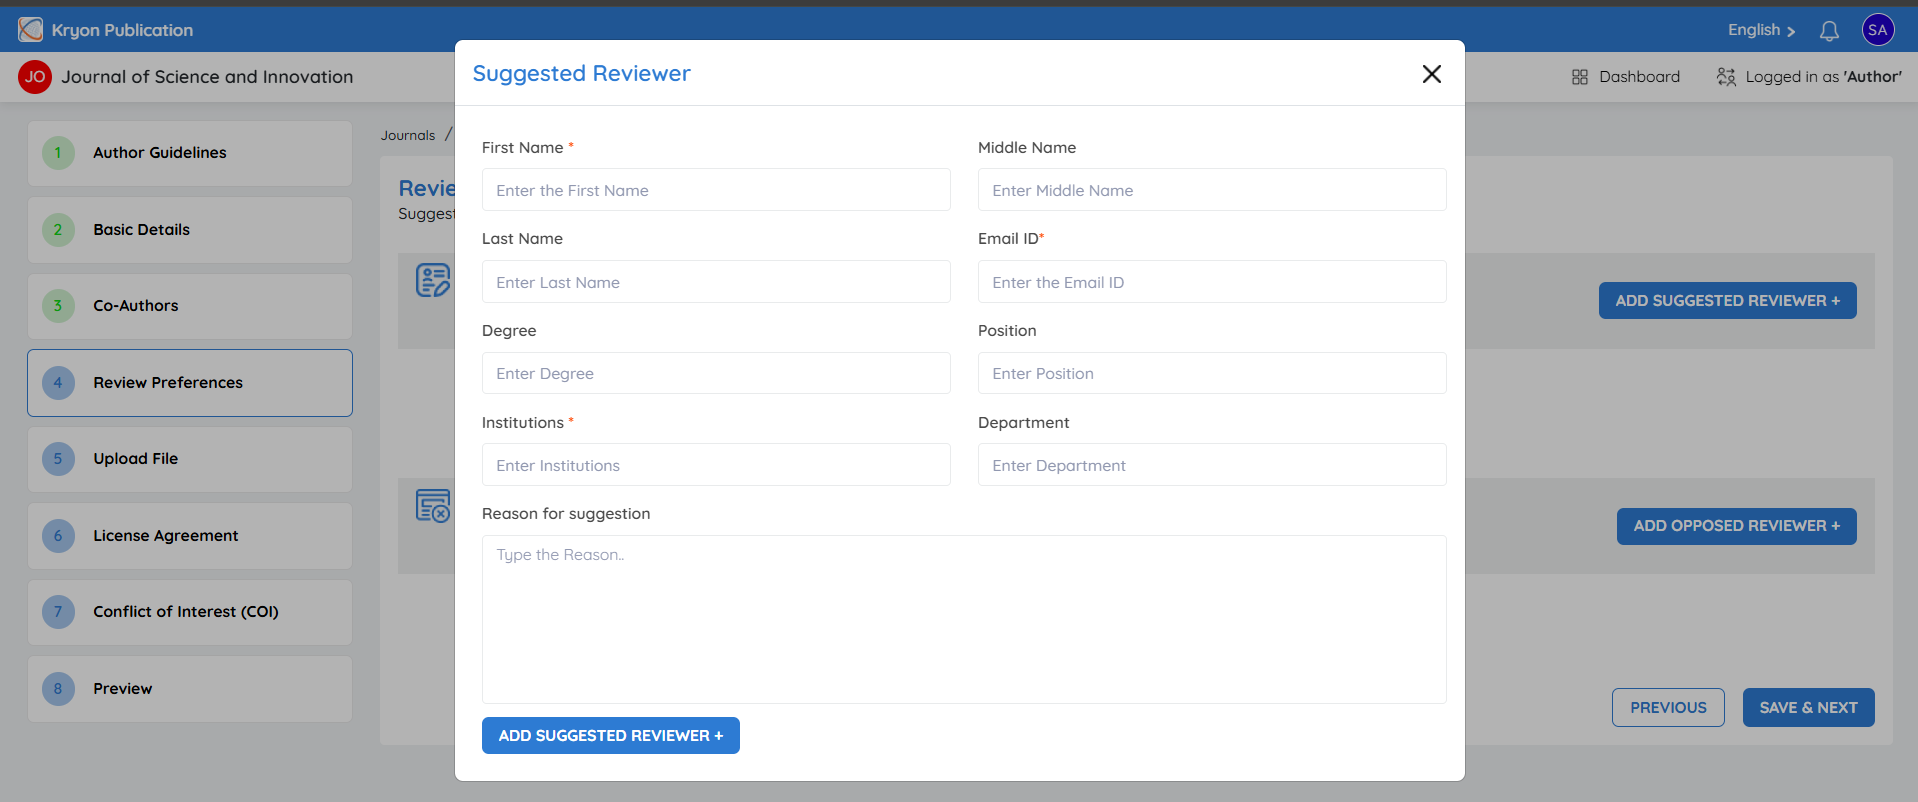
Click Add Suggested Reviewer to save the reviewer.
Reviewer Information
Complete the following fields:
Reviewer Name*
Enter the full name of the reviewer.
Institution*
Enter the reviewer's institution or organization.
Email Address*
Enter the reviewer's professional email address.
Affiliation
(Optional)
Provide additional affiliation details if applicable.
Reason for Recommendation
(Optional)
Provide a brief explanation describing why the reviewer is suitable to evaluate the manuscript.
Examples include:
-
Subject matter expert
-
Published extensively in this research area
-
Specialist in the methodology used
-
Experienced researcher in the field
After completing the information, click Add Suggested Reviewer.
The reviewer is added to the suggested reviewer list.
Managing Suggested Reviewers
Once a reviewer has been added, it will appear in the suggested reviewer list. Under the Action column, you can:
- Delete the reviewer if they were added by mistake or are no longer required before submitting the manuscript.
Opposed Reviewers
If there are individuals whom you prefer not to review your manuscript due to potential conflicts of interest or other valid reasons, you may identify them in the Opposed Reviewers section.
The editorial office will consider your request during reviewer selection.
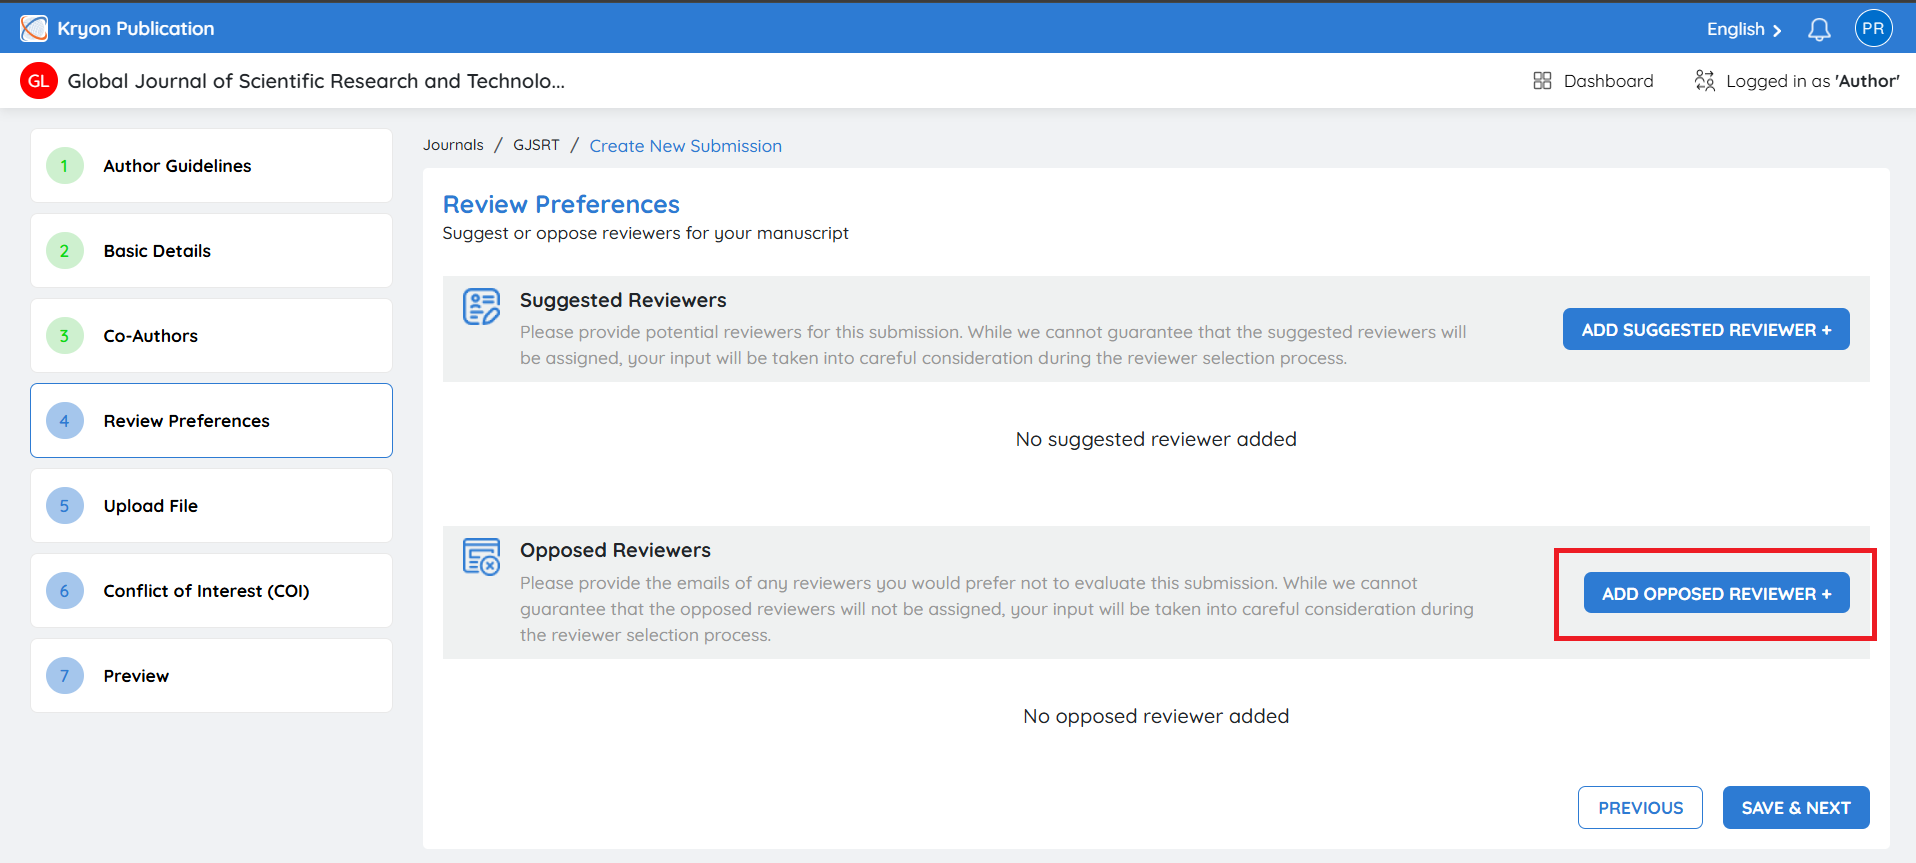
To add an opposed reviewer:
-
Click Add Opposed Reviewer.
-
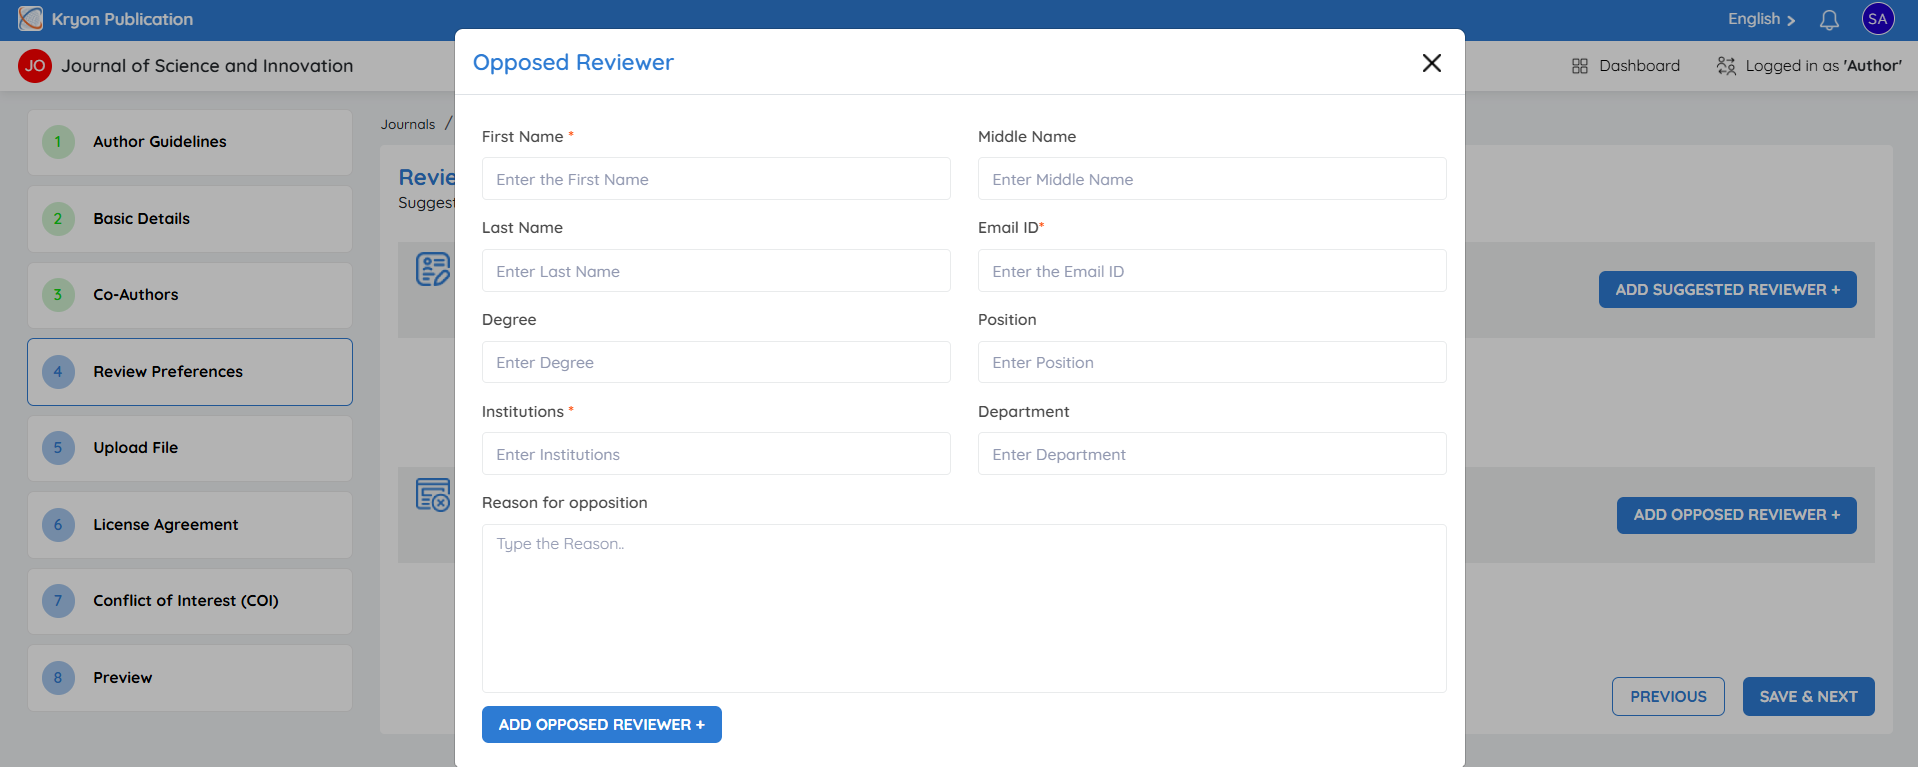
Enter the reviewer's information.
-
Click Add Opposed Reviewer to save the entry.
Next Step
After completing the Reviewer Preferences section, click Save and Next to continue to the Upload Files section, where you will upload your manuscript and all required supporting documents.
Upload Files
Overview
The Upload Files section allows authors to upload the manuscript and all supporting documents required for editorial review and publication.
Before proceeding, ensure that all mandatory files have been prepared according to the journal's submission guidelines.
Uploading Manuscript Files
To upload your files:
-
Navigate to the Upload Files section.
-
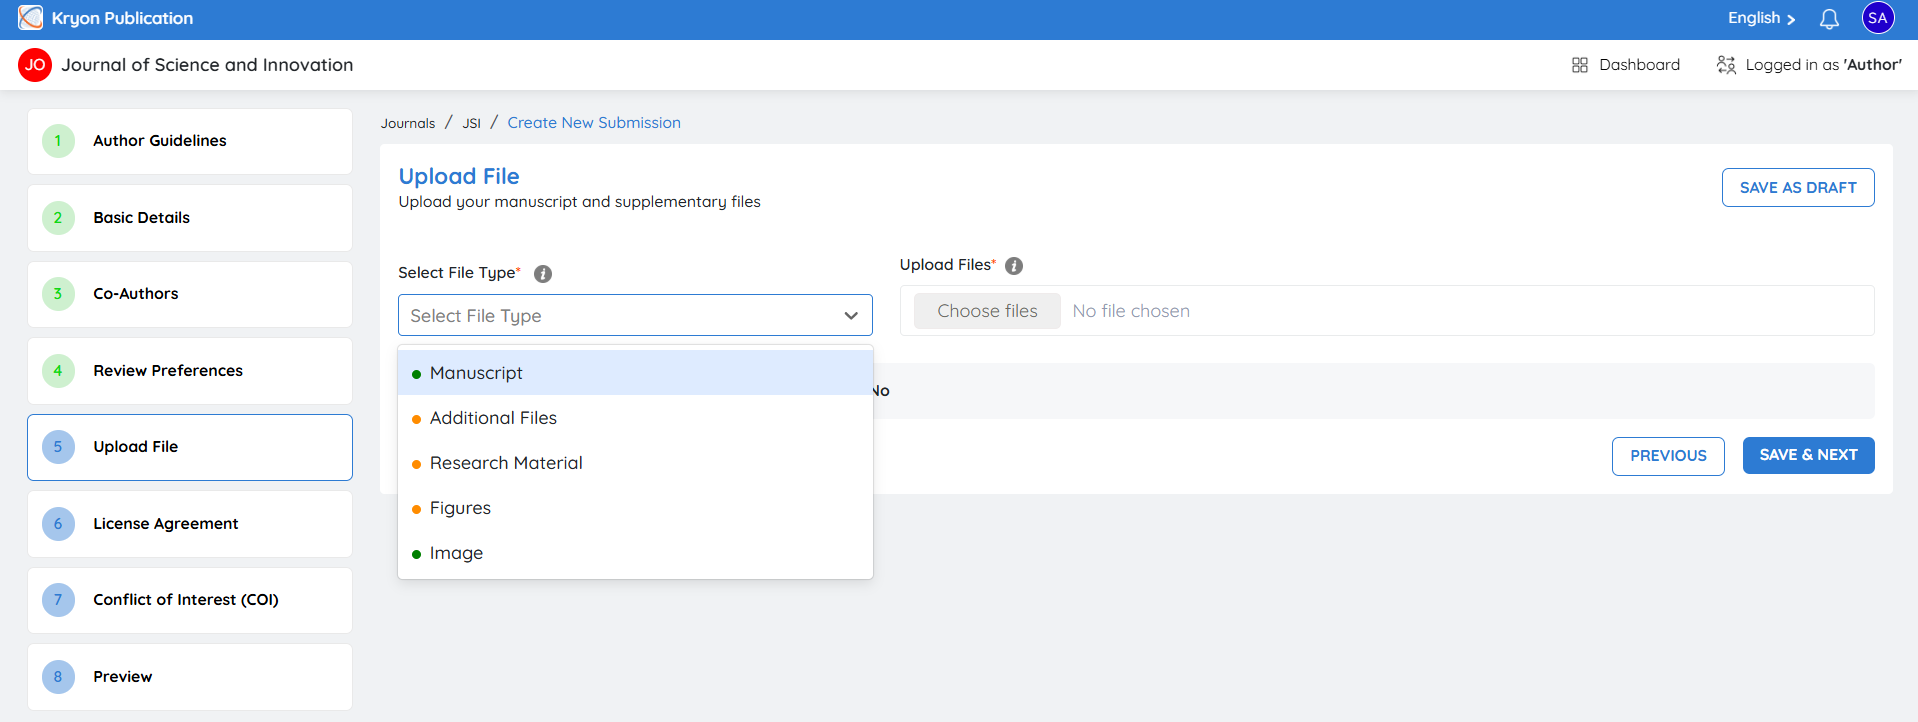
Select the appropriate File Type from the dropdown list
-
Click Choose File.
-
Browse and select the required file from your computer.
-
Click Upload.
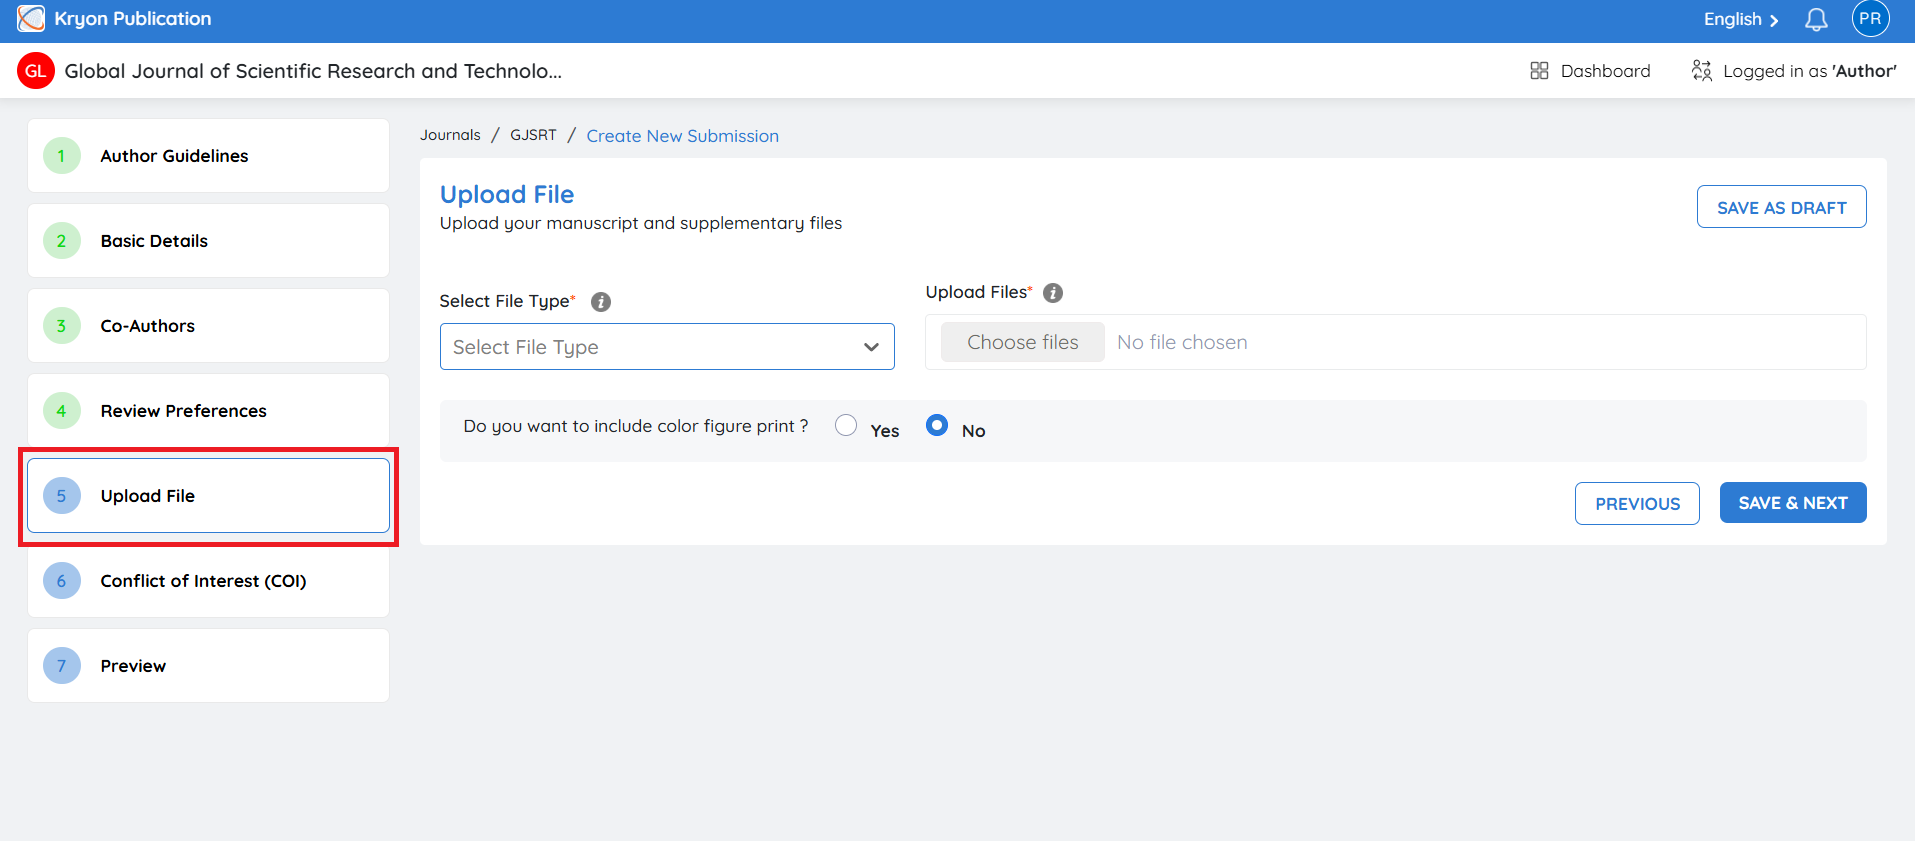
The uploaded file will be added to your submission.
Repeat these steps for each additional file.
Mandatory and Optional Files
Each file type is identified using a color indicator.
-
Green – Mandatory file. This file must be uploaded before the submission can be completed.
-
Orange – Optional file. Upload only if applicable to your manuscript.
Important: The system will not allow you to proceed until all mandatory files have been uploaded.
Managing Uploaded Files
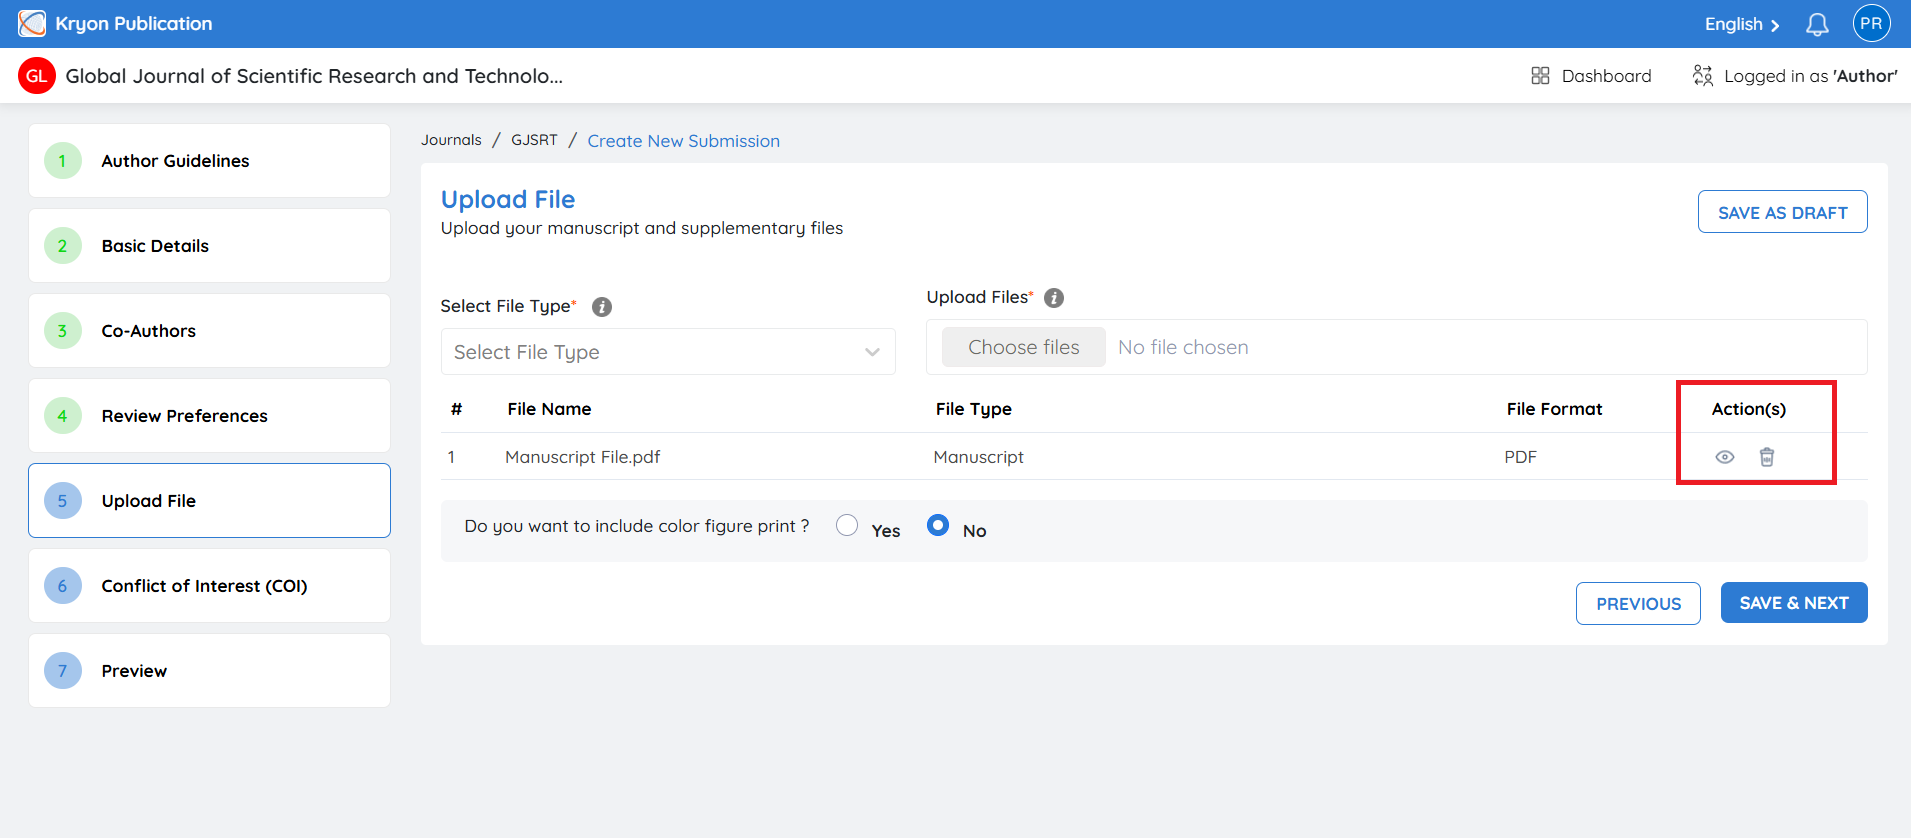
After uploading a file, it appears in the uploaded files list.
For each uploaded file, you can:
-
View the uploaded file
-
Delete the file before submission
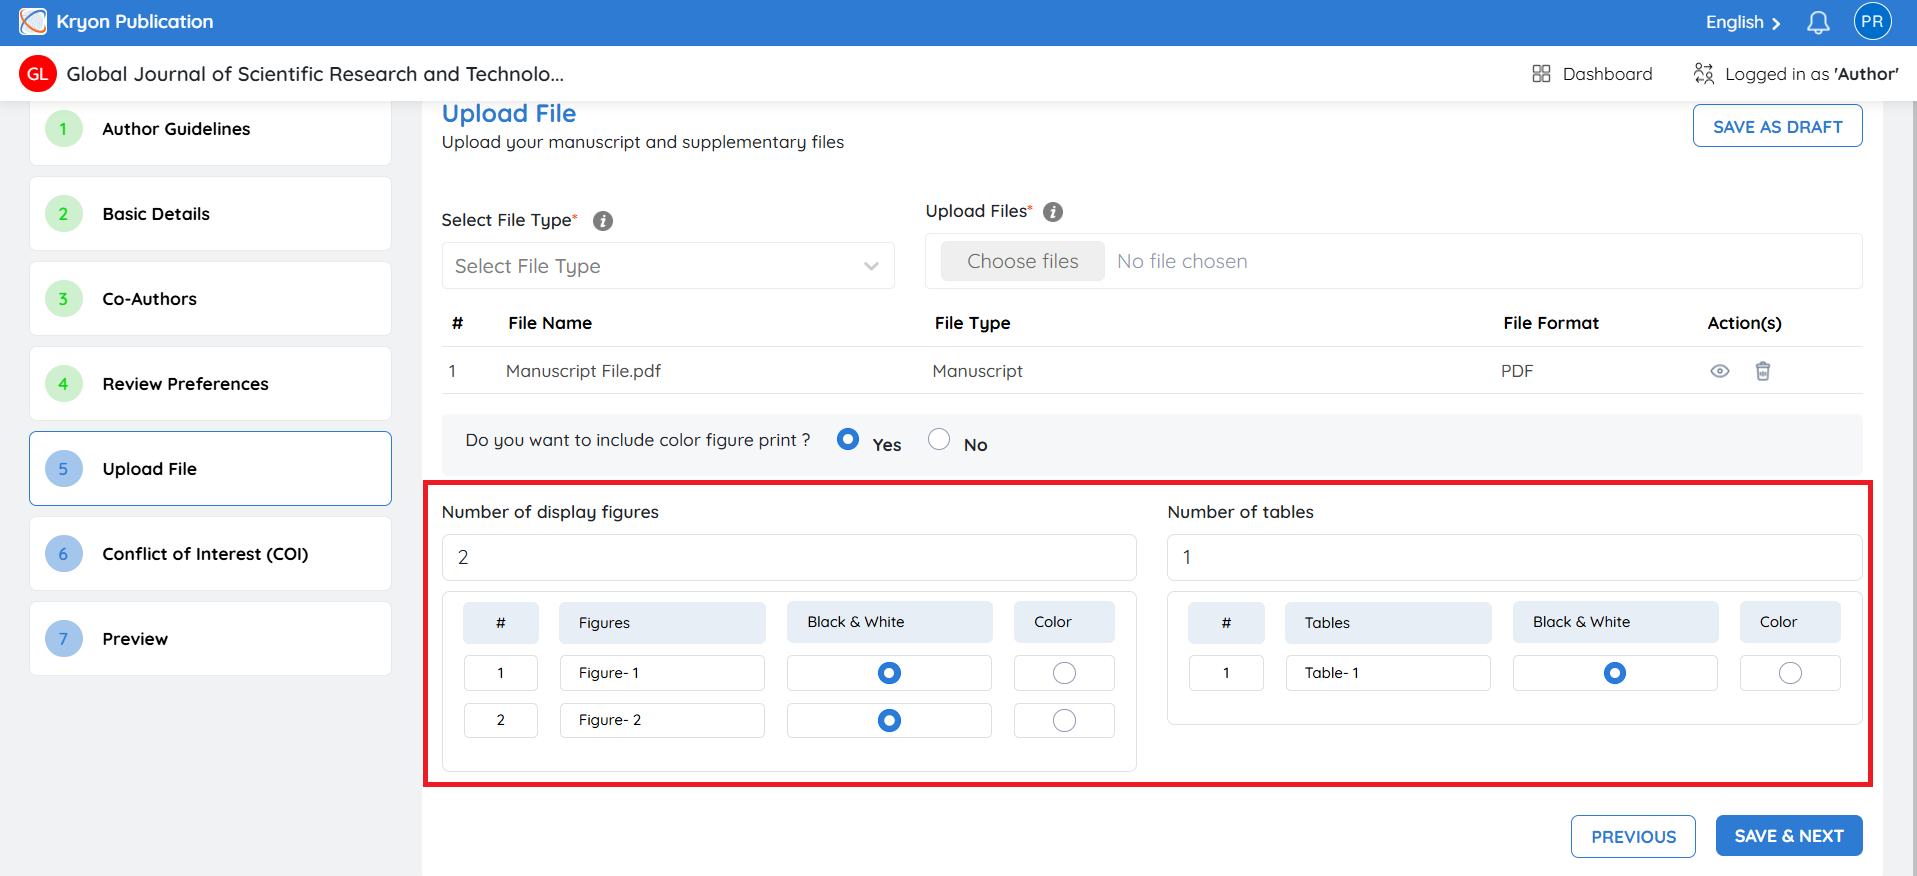
Color Figures and Display Items
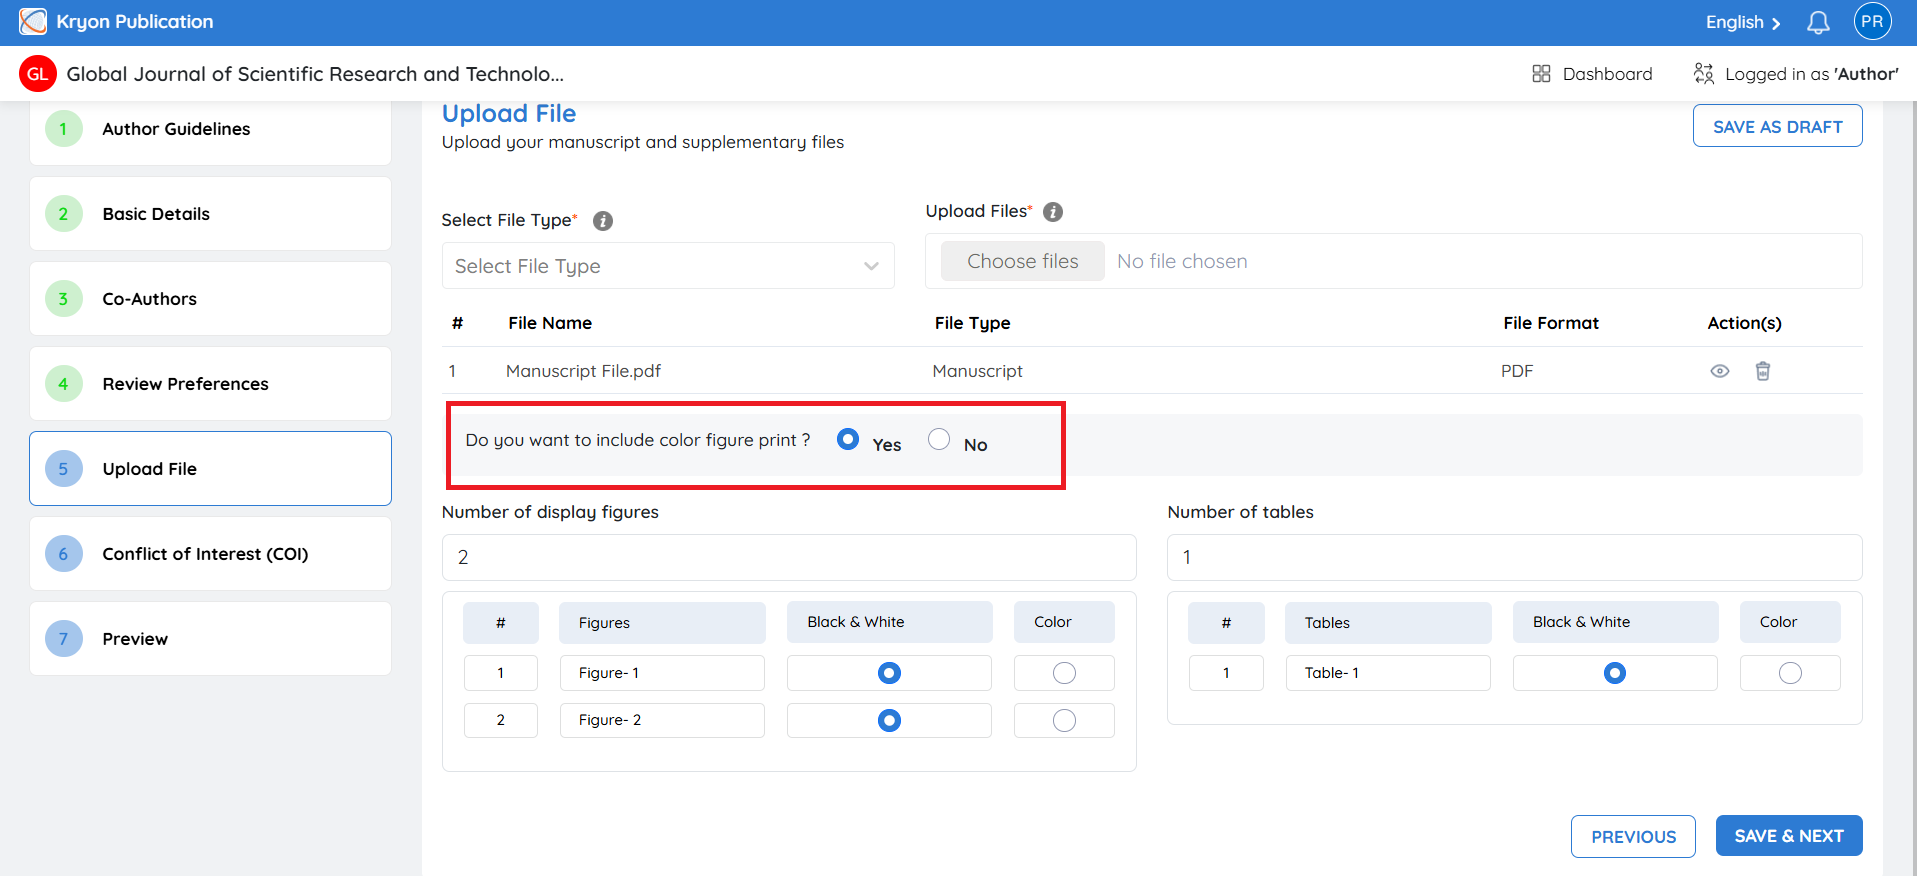
If your manuscript contains figures that require color printing, you can specify your printing preferences during submission.
Color Figure Printing
To request color printing:
- Enable the Do you want to include color figure print? checkbox.
Number of Display Figures
Enter the total number of figures included in your manuscript.
For each figure:
-
Enter the figure label (for example, Figure 1, Figure 2).
-
Select the preferred print format:
-
Black & White
-
Color
-
Repeat this process for all figures included in the manuscript.
Number of Tables
Enter the total number of tables included in your manuscript.
For each table:
• Enter the table label (for example, Table 1, Table 2).
• Select the preferred print format:
-
Black & White
-
Color
This information helps the production team prepare the final print and online versions accurately.
After completing the Upload Files section, click Next to proceed to the License Agreement section.
License Agreement
Overview
The License Agreement defines the legal terms under which the manuscript will be published. It specifies the publishing rights granted by the author and the conditions governing the distribution and reuse of the published work.
The license presented during submission is determined by the journal's publishing model and editorial policies.
Depending on the journal's configuration, the license may be automatically assigned and may not require author selection.
Reviewing the License Agreement
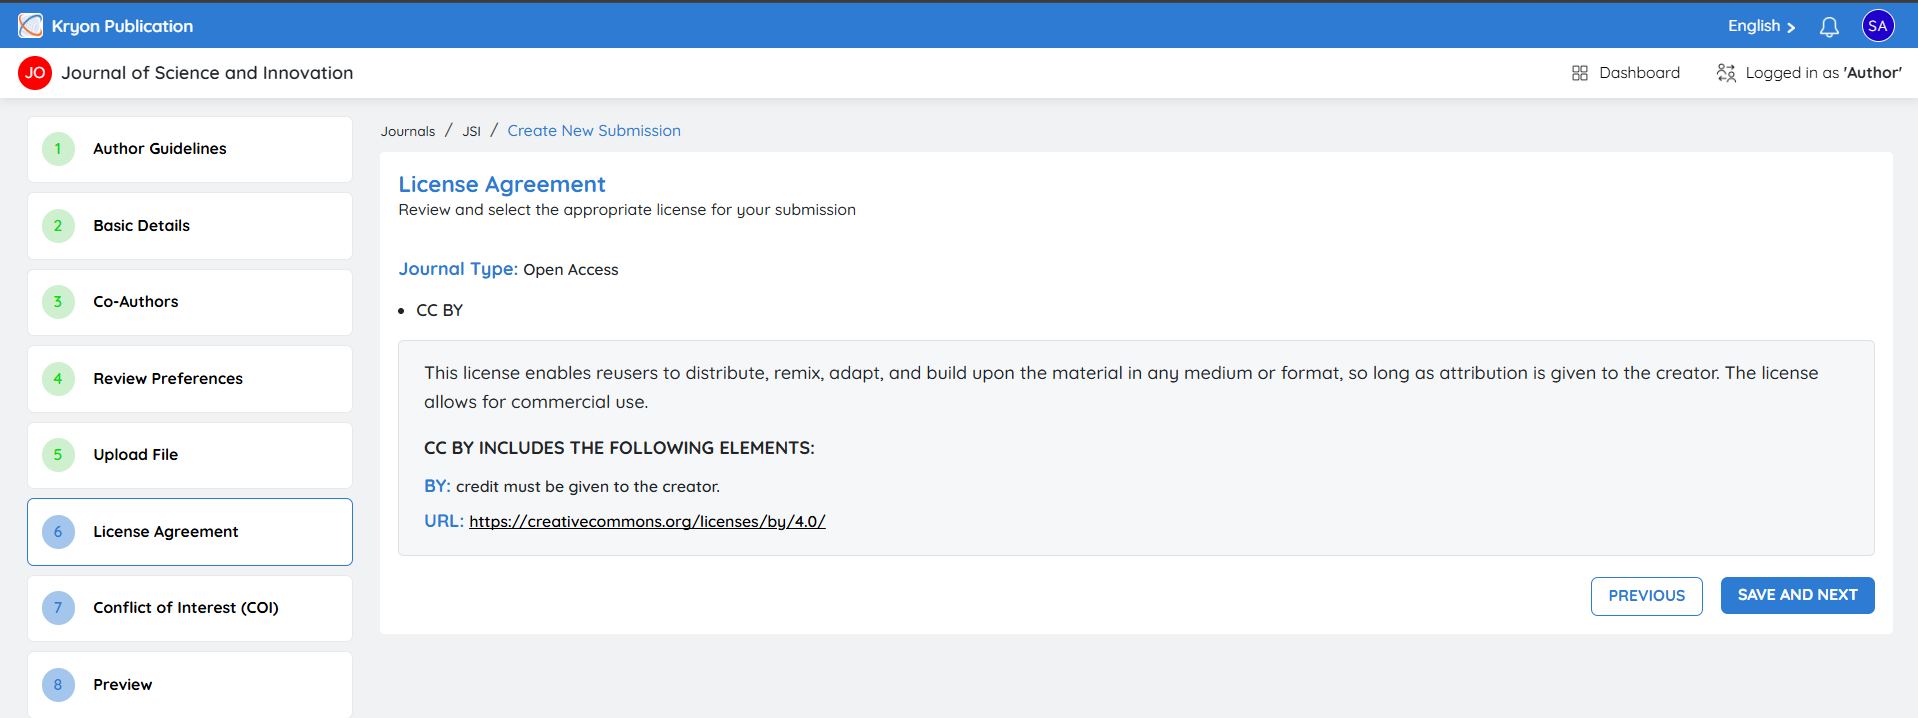
The License Agreement page displays the following information:
-
Journal Type (e.g., Open Access)
-
Selected License (e.g., CC BY)
-
License description
-
License terms and conditions
-
Reference URL for the complete license details
In this example:
-
Journal Type: Open Access
-
License: CC BY (Creative Commons Attribution 4.0 International)
The CC BY license allows others to distribute, remix, adapt, and build upon the published work, including for commercial purposes, provided appropriate credit is given to the original author(s).
A reference link to the official Creative Commons license is also provided for additional information.
Proceeding to the Next Step
After reviewing the license information:
-
Verify that the displayed license is appropriate for your submission.
-
Click Save and Next to continue to the next step.
Conflict of Interest (COI) Form
Overview
As part of the manuscript submission process, authors may be required to submit a Conflict of Interest (COI) Form.
The COI form enables authors to disclose any financial, professional, or personal relationships that could influence the research or its publication.
Providing accurate disclosure promotes transparency and supports the integrity of the peer review process.
Downloading the COI Form
To obtain the required form:
-
Click Download.
-
Save the COI form to your device
-
Complete all required sections of the document.
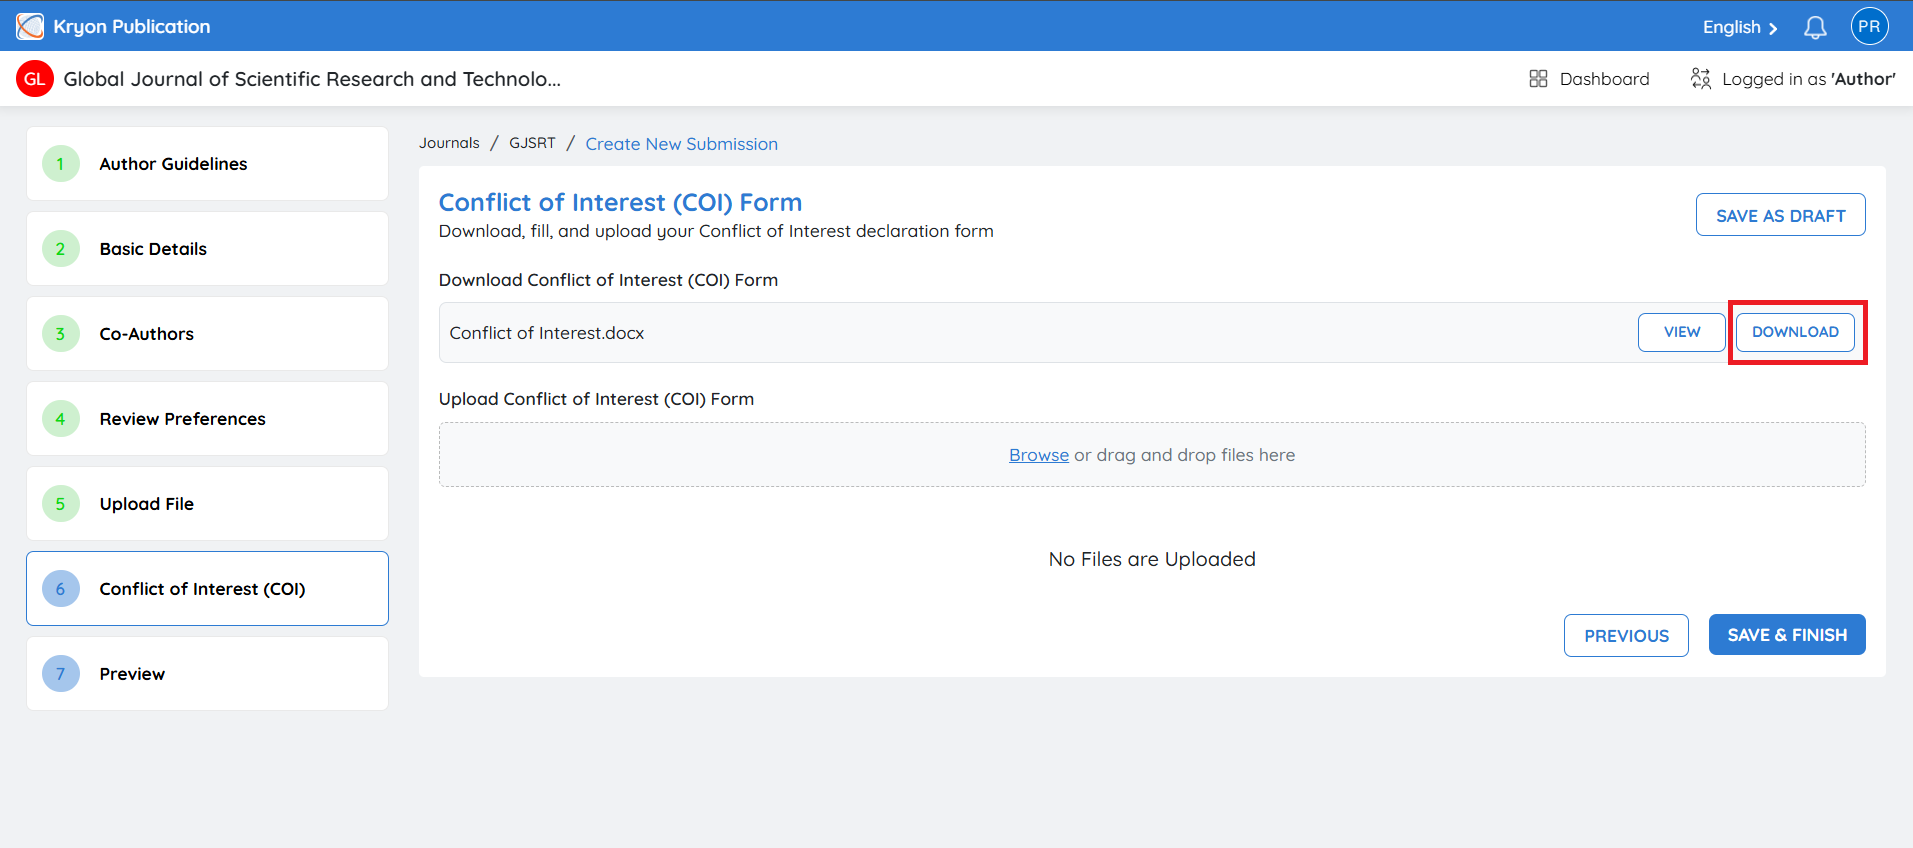
Ensure that the information provided is accurate and complete before uploading the form.
Uploading the COI Form
After completing the form:
-
Click Upload COI Form.
-
Select the completed COI document from your computer.
-
Click Upload.
The uploaded COI form will be attached to your manuscript submission and made available to the editorial office for review.
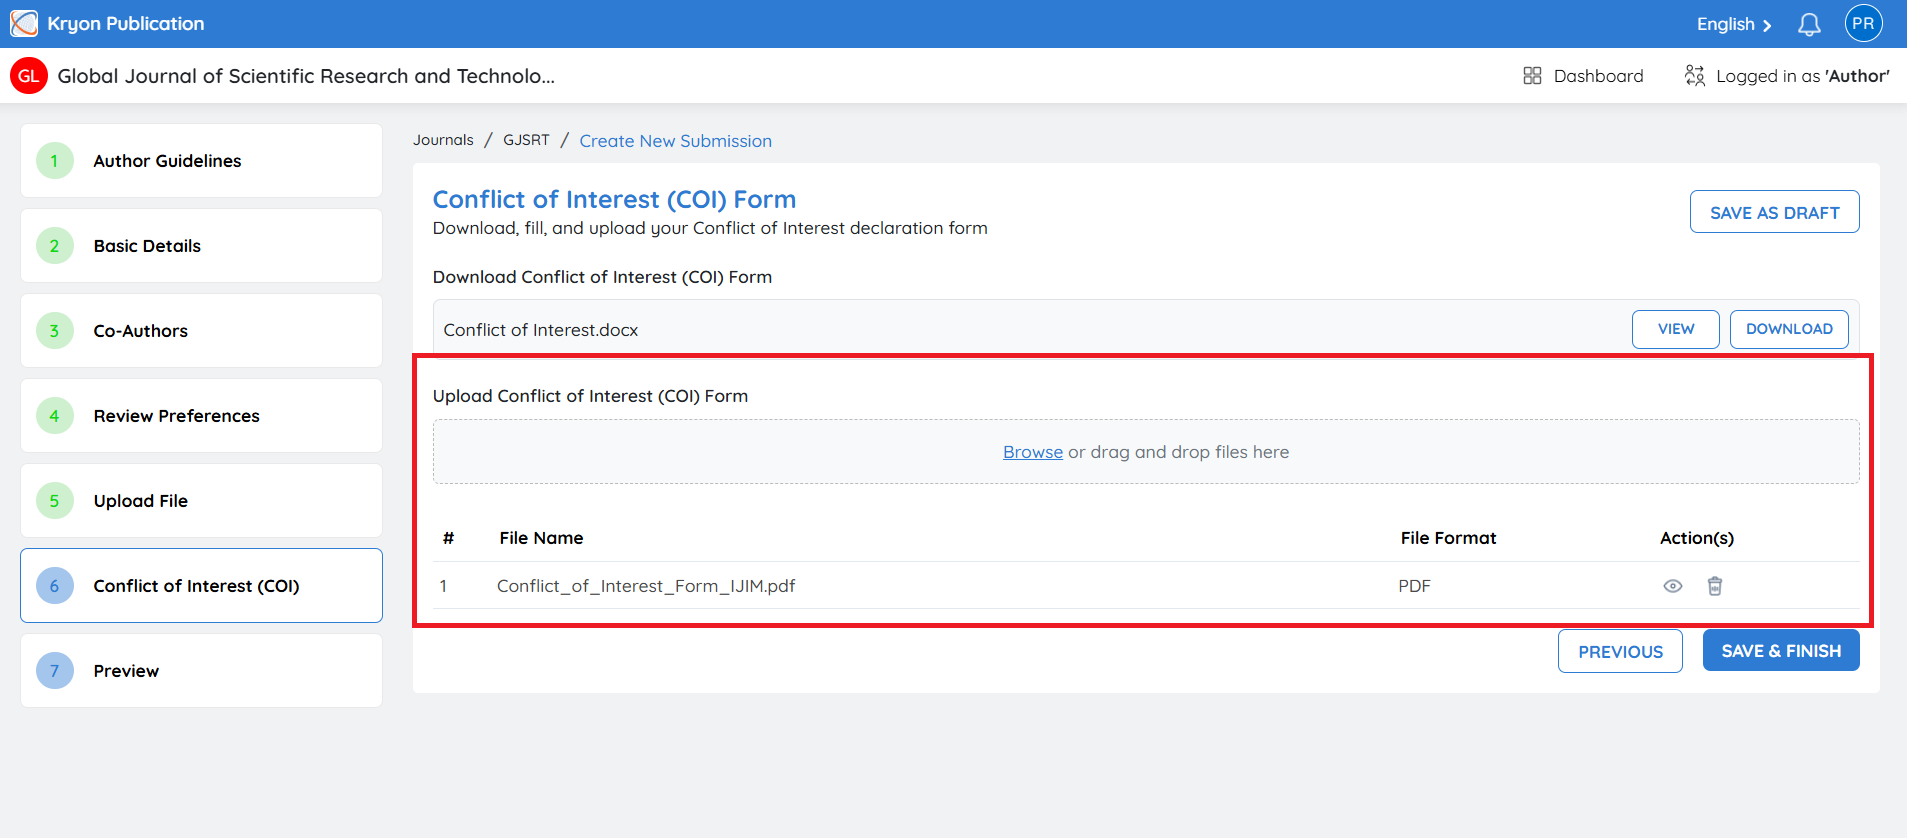
Managing the Uploaded COI Form
After the upload is complete, the COI form will appear in the submission.
Under Action Section, you can:
-
View the uploaded document.
-
Delete the uploaded file and upload a new one, if permitted.
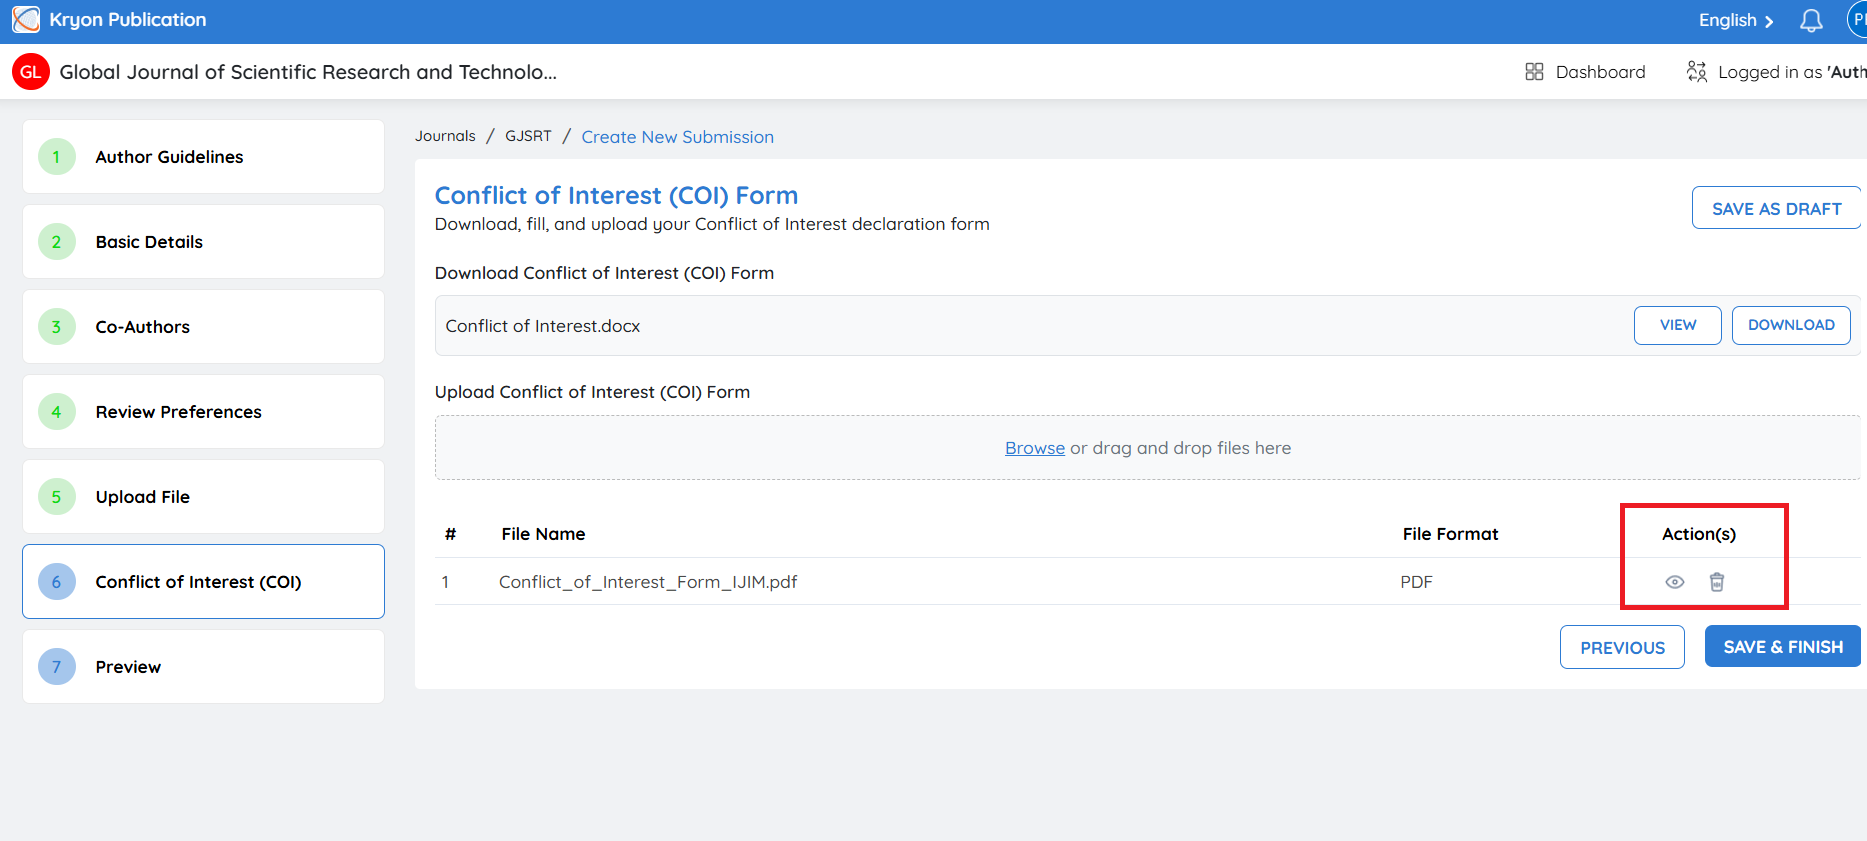
Important: A mandatory COI form must be uploaded before the manuscript can be submitted. The system will not allow you to complete the submission until all required documents have been provided.
Submission Preview
Overview
The Submission Preview page provides a final review of all information entered during the submission process. Authors can verify manuscript details, author information, uploaded files, reviewer preferences, and supporting documents before submitting the manuscript.
Carefully review all information to ensure it is accurate and complete.
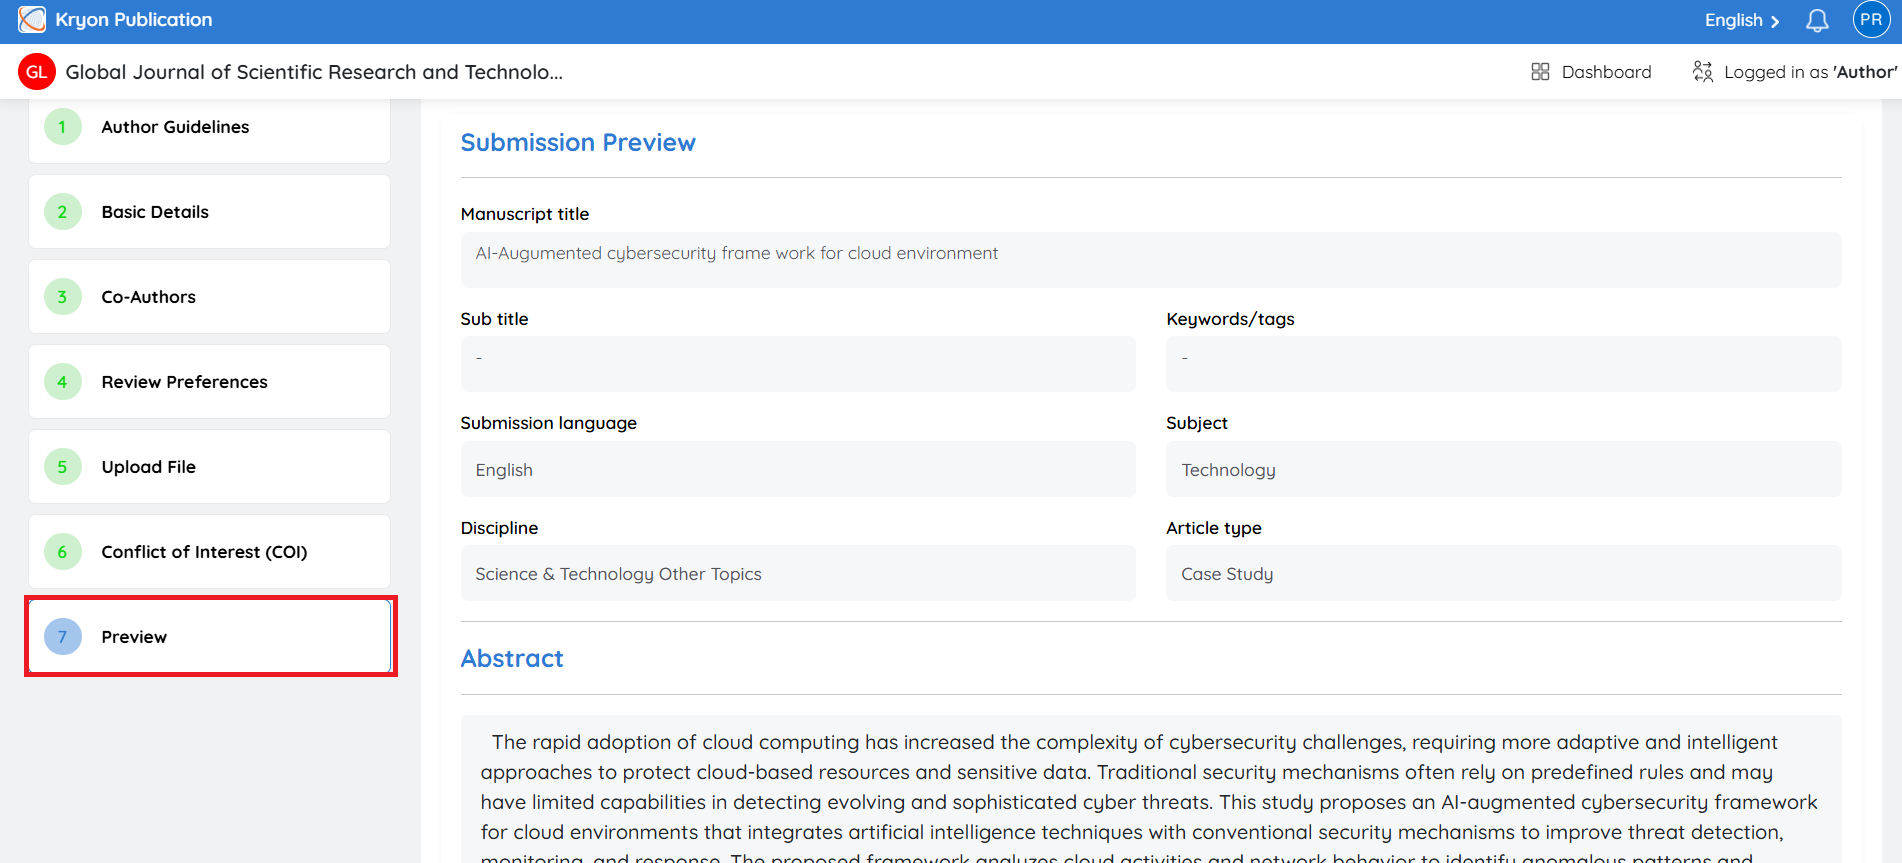
Editing Submission Details
If you need to make changes:
-
Navigate to the relevant section using the Previous button.
-
Update the required information.
-
Save your changes.
-
Return to the Submission Preview page.
Final Confirmation
Submitting Your Manuscript
Once you have verified all submission details:
-
Review the submission summary one final time.
-
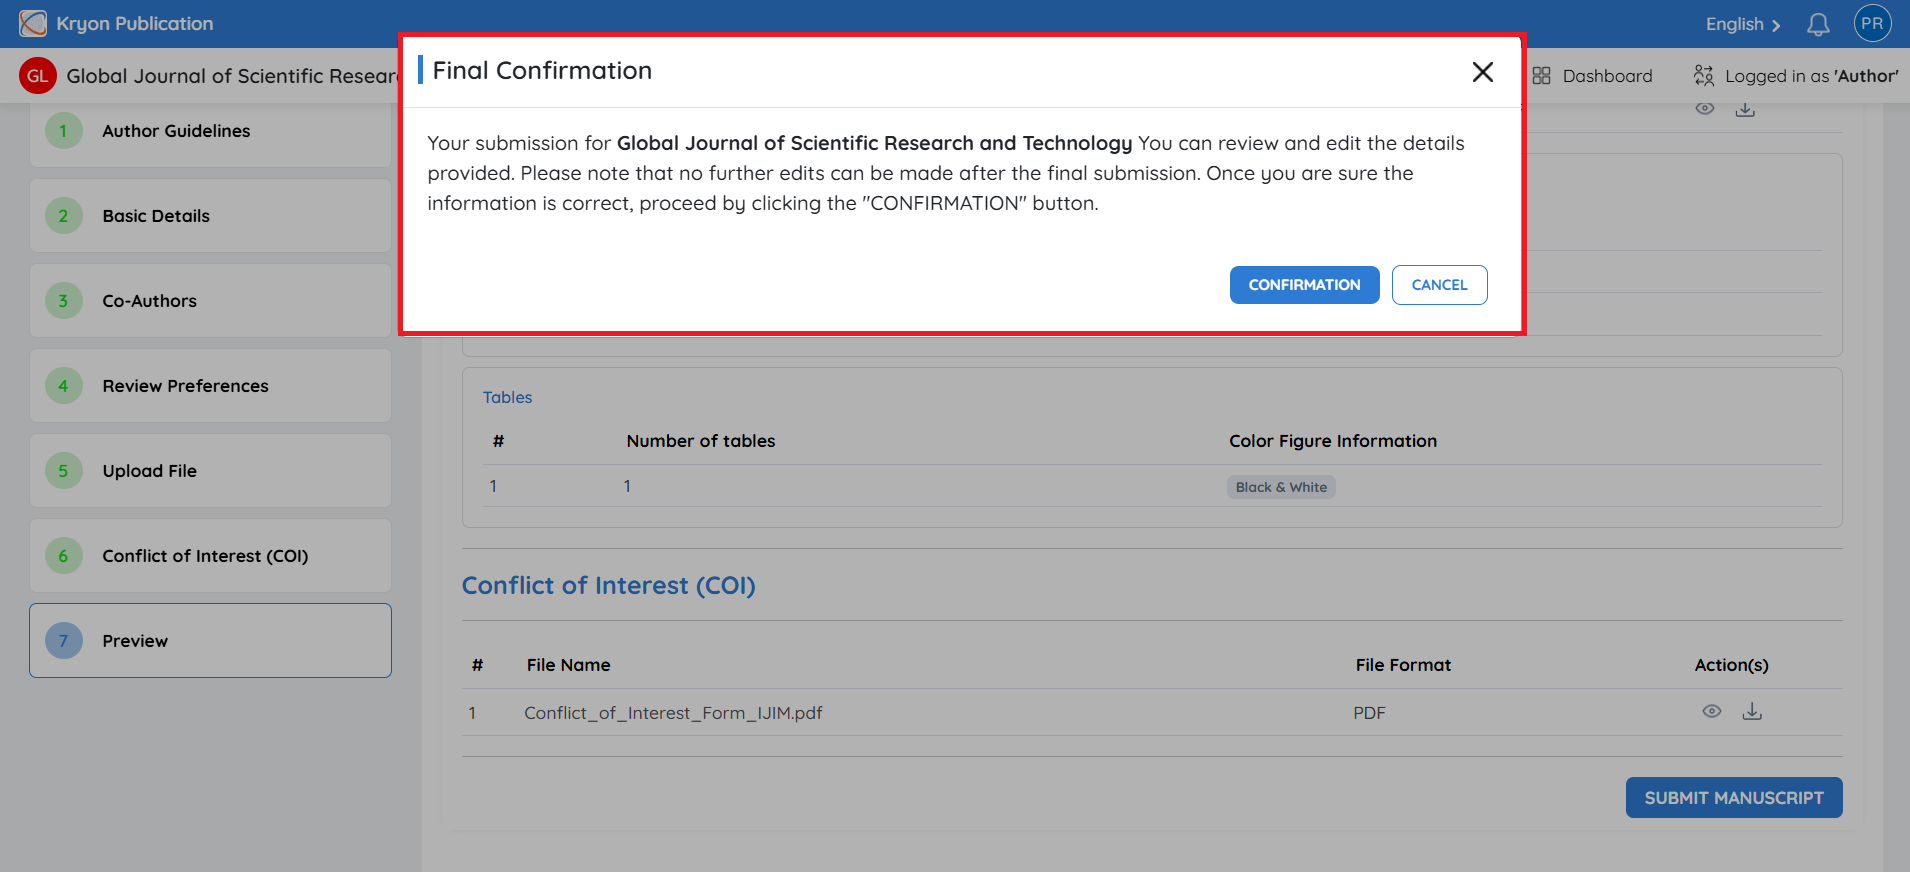
Click Submit Manuscript.
The system displays a final confirmation message indicating that no further modifications can be made after submission.
To complete the submission:
- Click Confirmation.
Your manuscript is submitted successfully and enters the journal's editorial workflow.
Important: After clicking Confirmation, the manuscript is officially submitted. Authors cannot modify the submission unless the editorial office returns it for revision or requests additional information.
Submission Successful
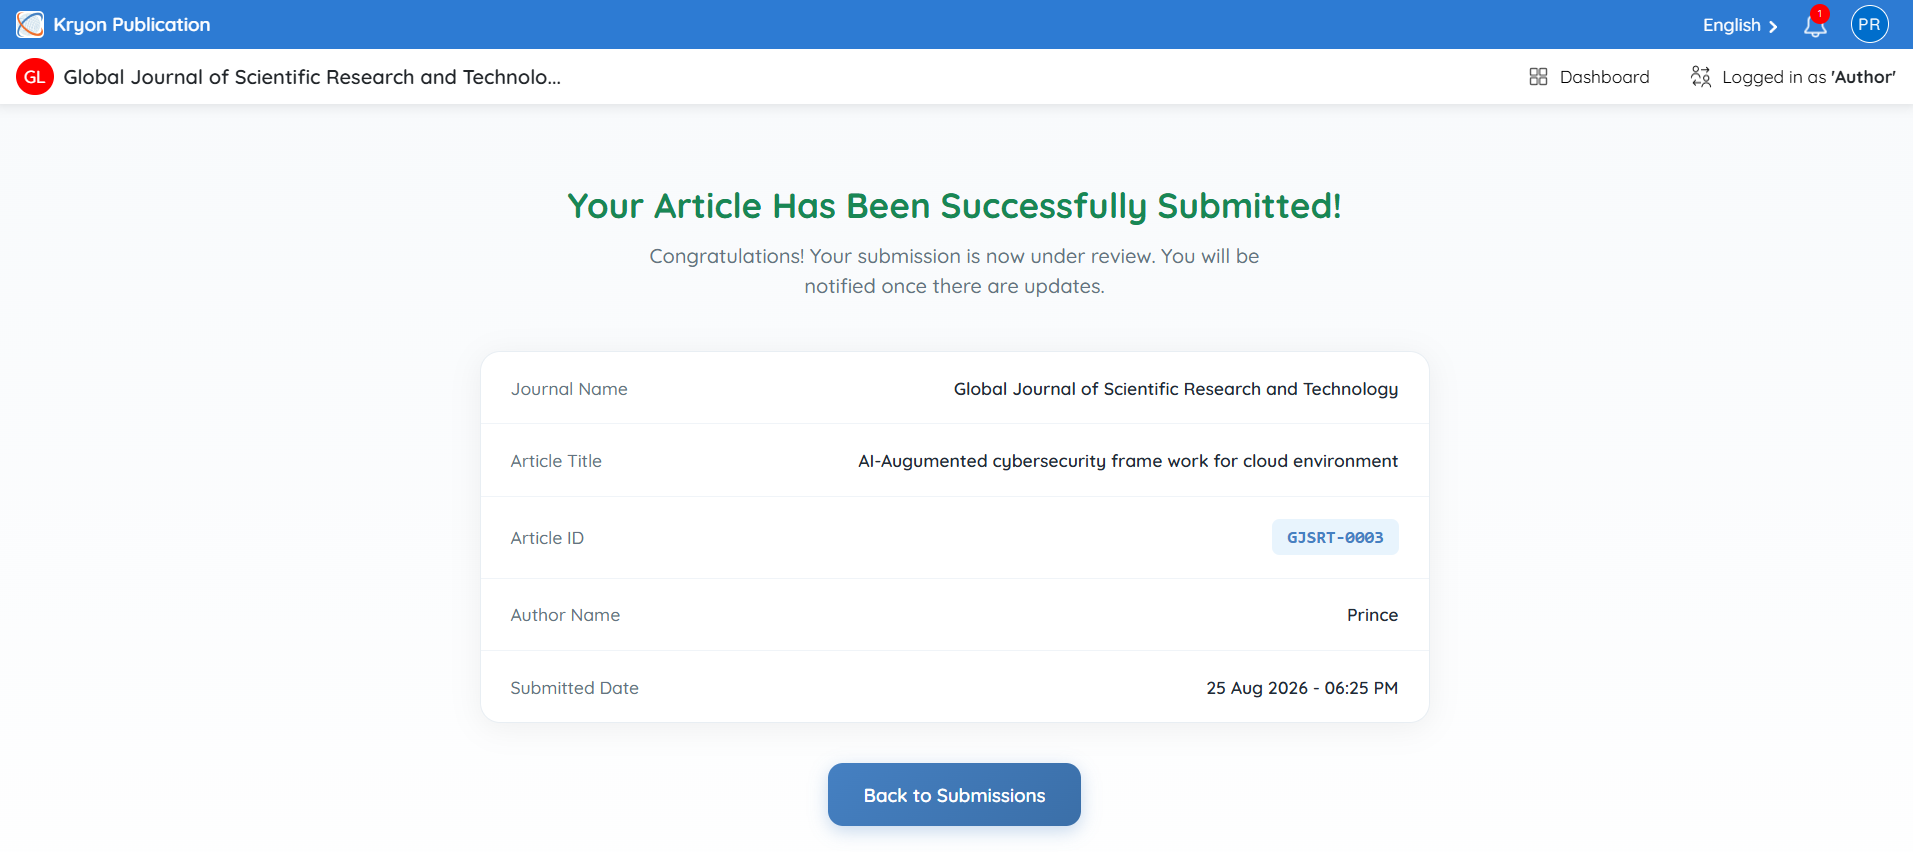
After successful submission:
-
A confirmation message is displayed.
-
A unique Manuscript ID is generated.
-
The submission status changes to Article Submitted.
-
A confirmation email is sent to the corresponding author.
-
The manuscript becomes available in the My Submissions section of the Author Dashboard.
To view your submitted manuscript, click Back to Submission.
Next Steps
After submission, the manuscript enters the journal's editorial workflow. Authors can monitor the progress of their submission through the Author Dashboard, where they can track manuscript status, receive editorial notifications, respond to revision requests, and view editorial decisions throughout the publication process.
Submission Dashboard
The dashboard provides two tabs:
-
Active Submissions
-
Draft Submissions
Authors can also search submissions, switch between list and grid views, and view detailed information for each manuscript.
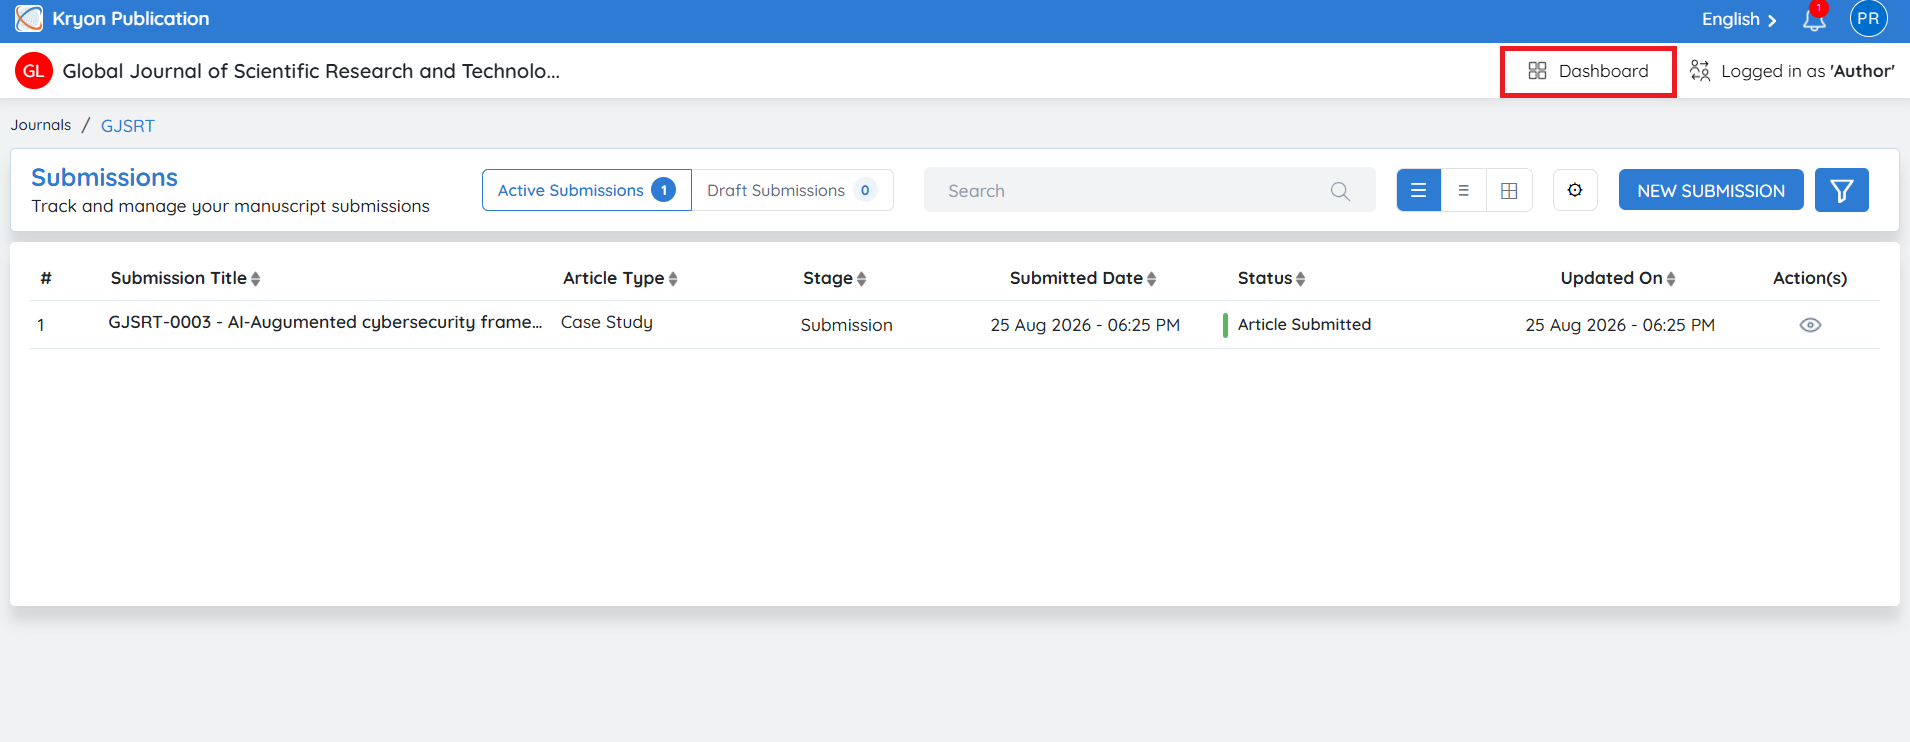
Active Submissions
The Active Submissions tab displays all manuscripts that have been successfully submitted to the journal and are currently progressing through the editorial workflow.
Each submission includes the following information:
-
Submission Title – Displays the manuscript ID and title.
-
Article Type – Indicates the selected article category.
-
Stage – Shows the current workflow stage (e.g., Submission, Review, Production).
-
Submitted Date – Date and time the manuscript was submitted.
-
Status – Displays the current manuscript status.
-
Updated On – Shows the most recent activity on the submission.
-
Actions – Provides options to view the submission details.
Viewing a Submission
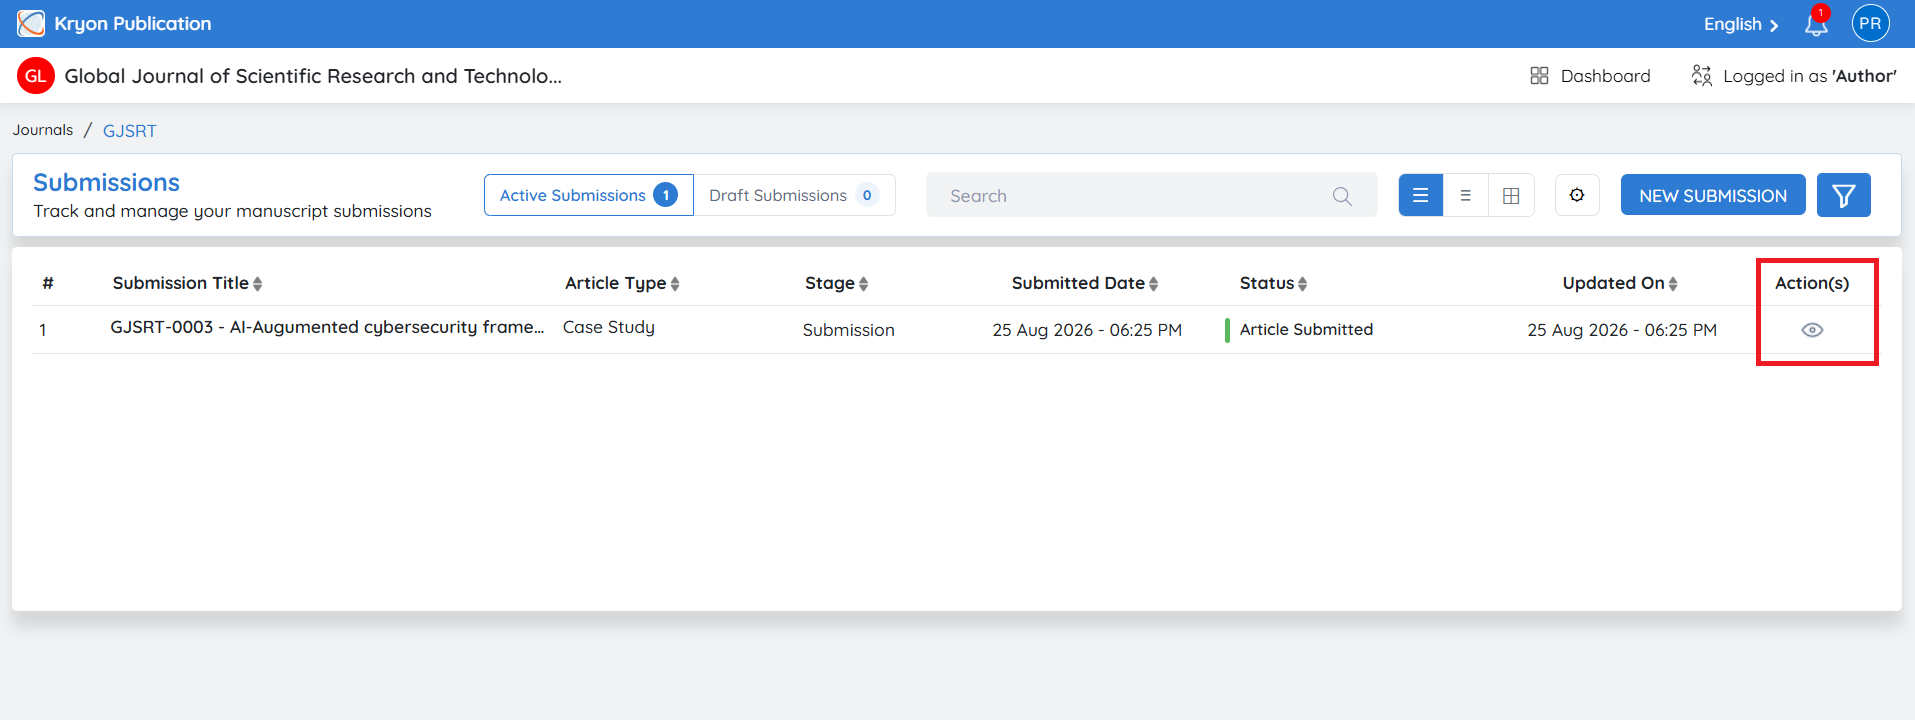
To view the complete submission details:
-
Navigate to the Active Submissions tab.
-
Locate the required manuscript.
-
Click the View (👁) icon under the Actions column.
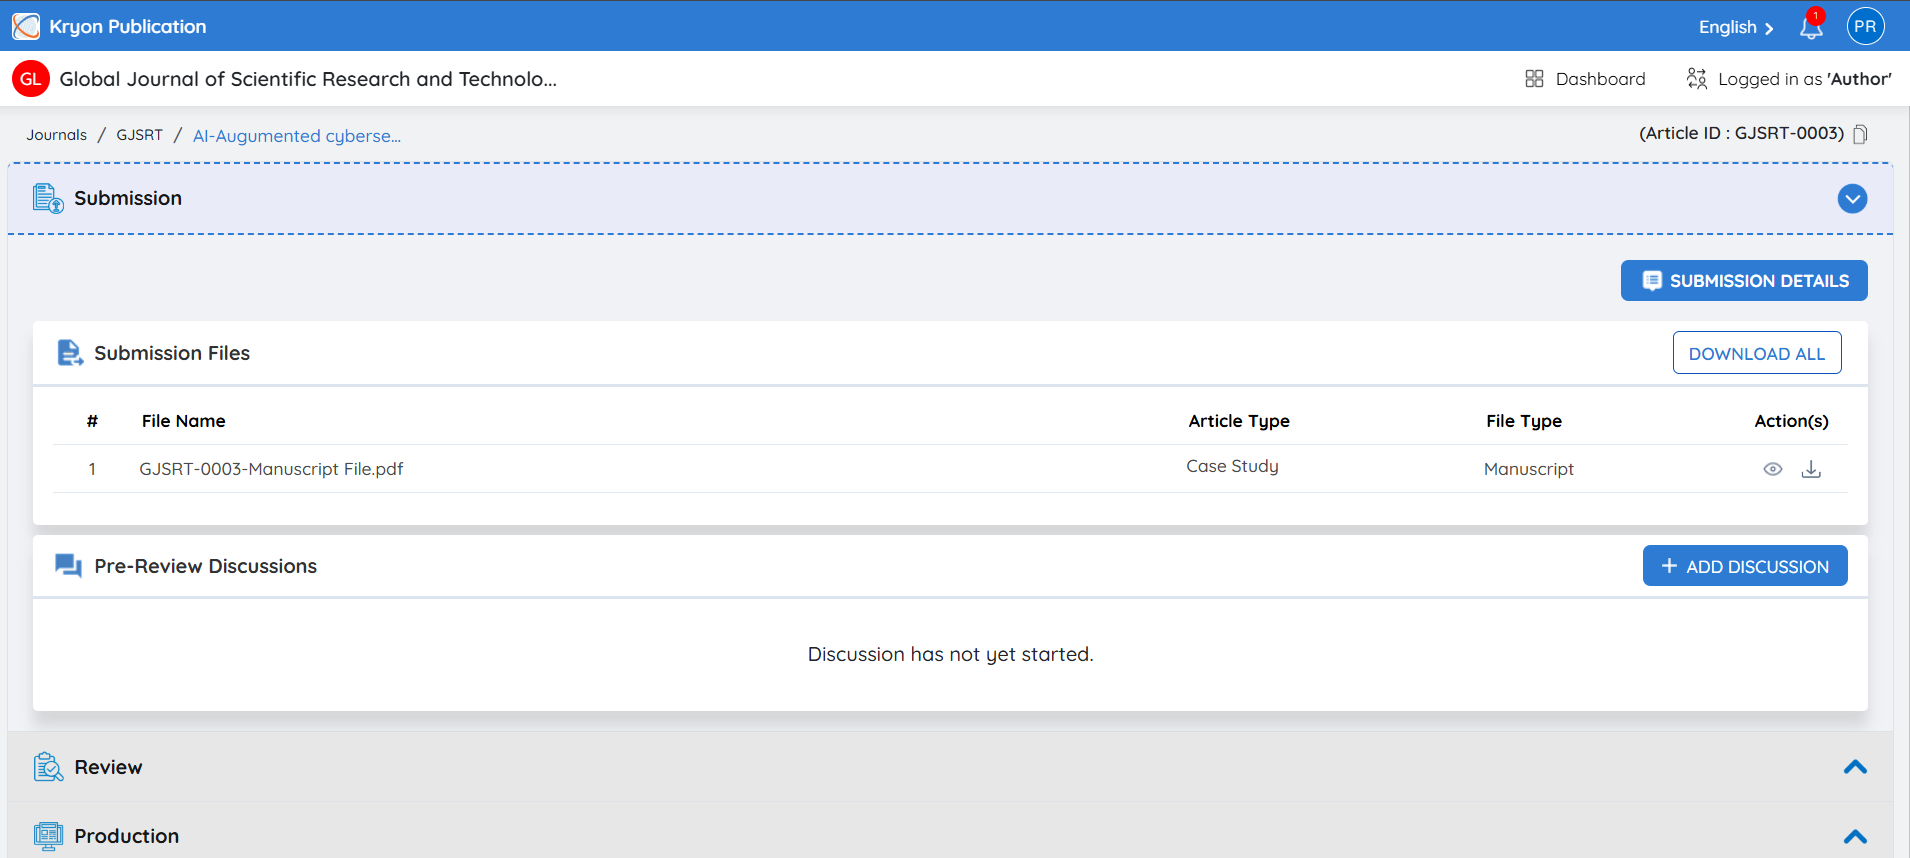
The submission details page displays the manuscript information, workflow progress, uploaded files, editorial decisions, and communication history.
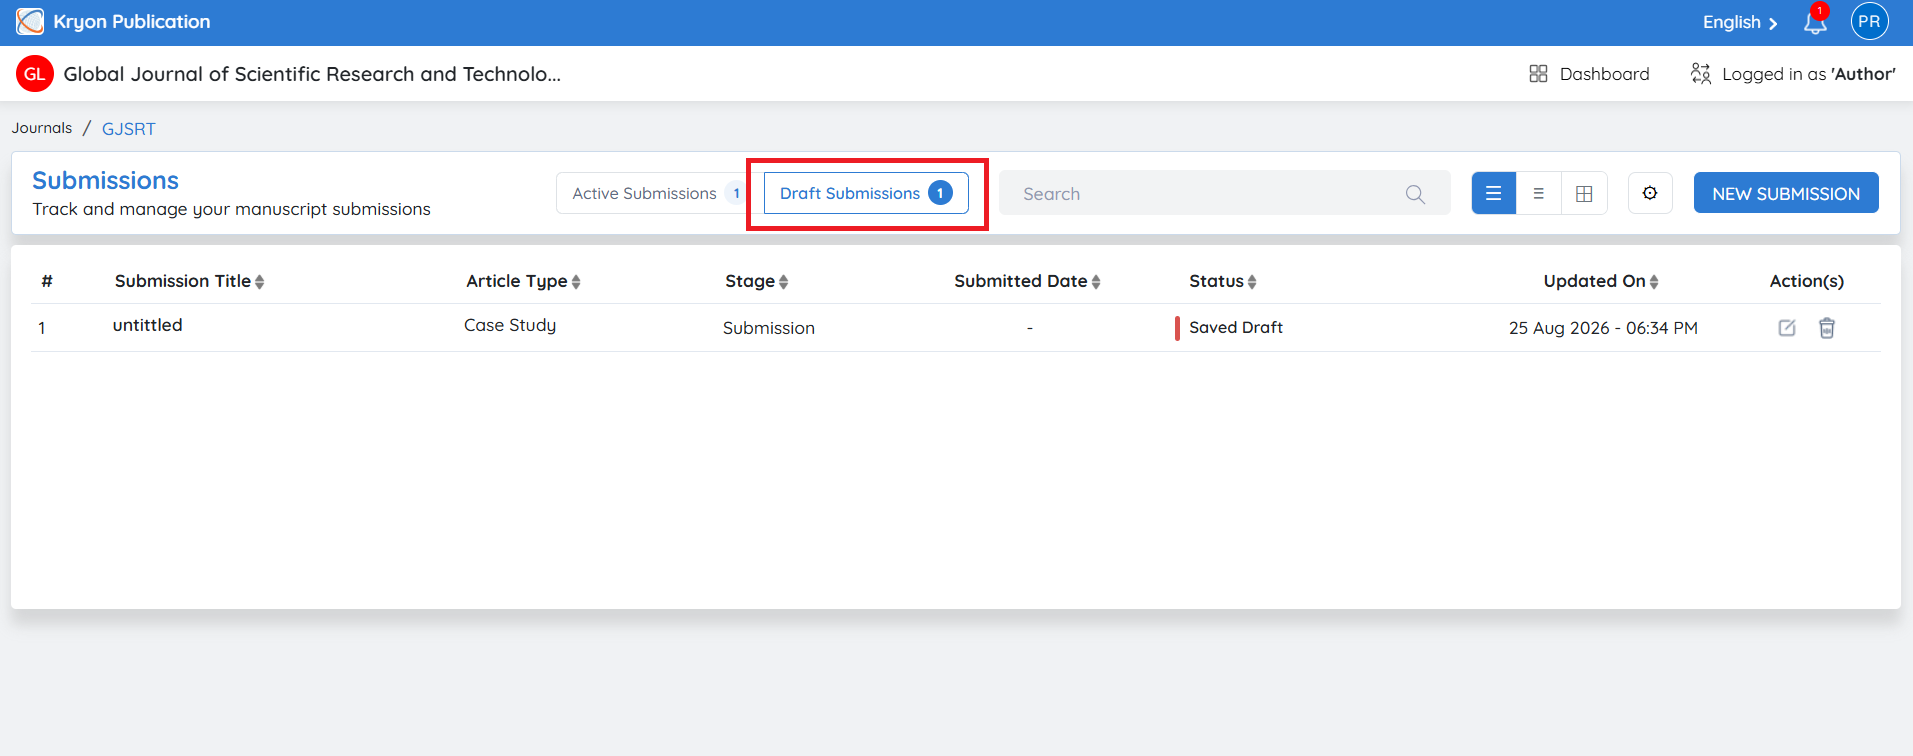
Draft Submissions
The Draft Submissions tab contains manuscripts that have been started but not yet submitted.
Drafts allow authors to save their progress and continue the submission process later without losing any entered information.
Continuing a Draft Submission
To resume a saved draft:
-
Click the Draft Submissions tab.
-
Select the required draft manuscript.
-
Click Edit
-
Complete the remaining submission steps.
-
Submit the manuscript when all required information has been provided.
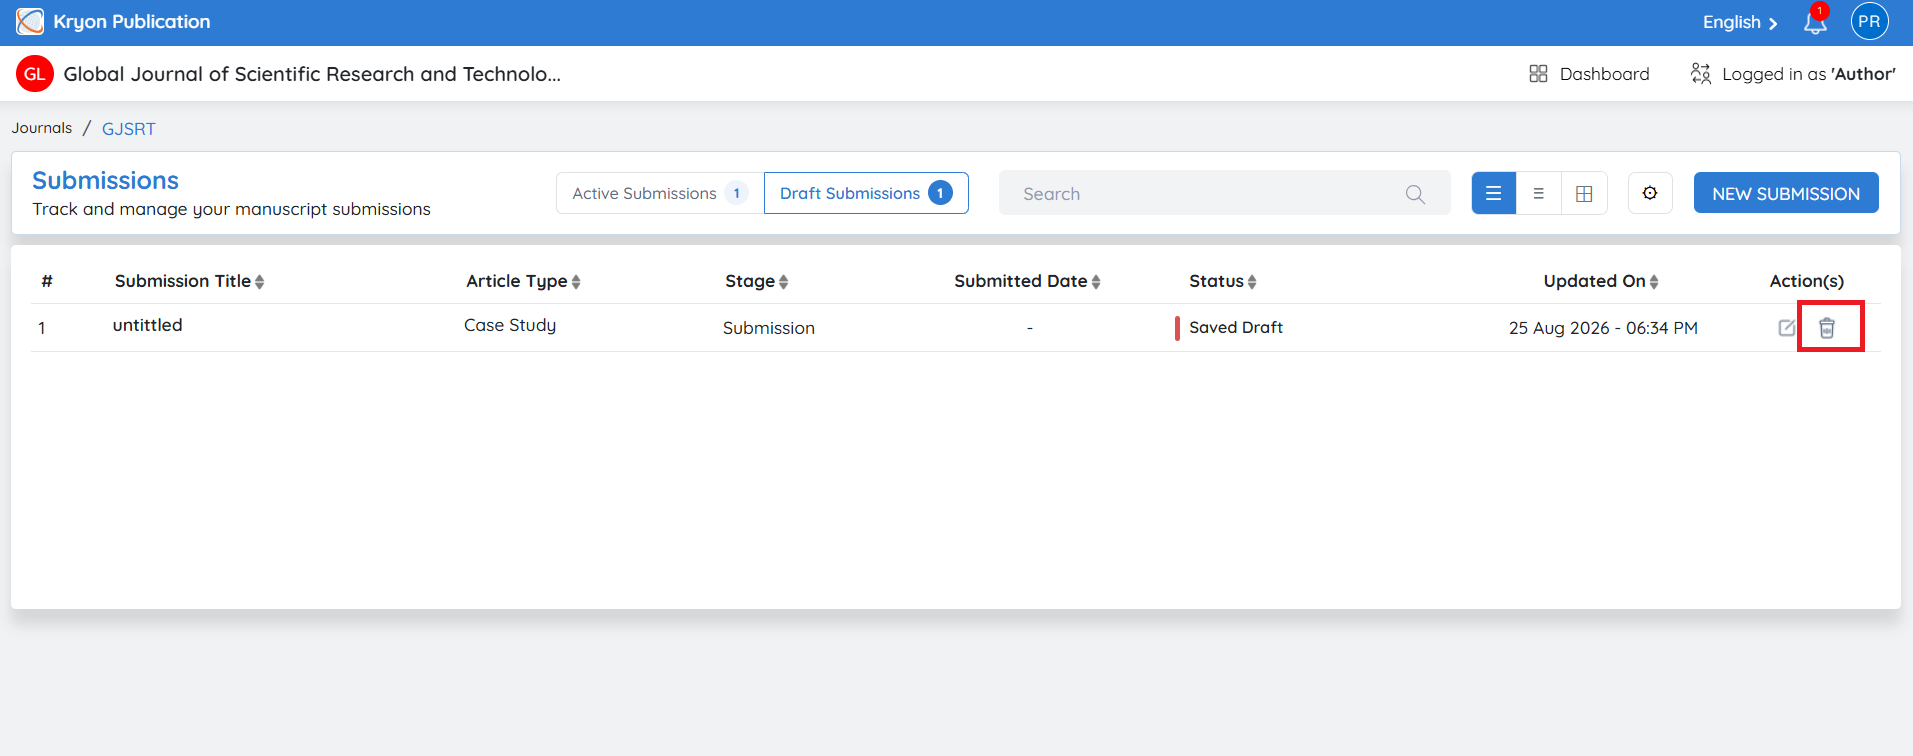
Delete a Draft Submission
If a draft is no longer required, it can be removed.
To delete a draft:
-
Locate the required draft submission.
-
Click the Delete (🗑️) icon under the Actions column.
-
Confirm the deletion when prompted.
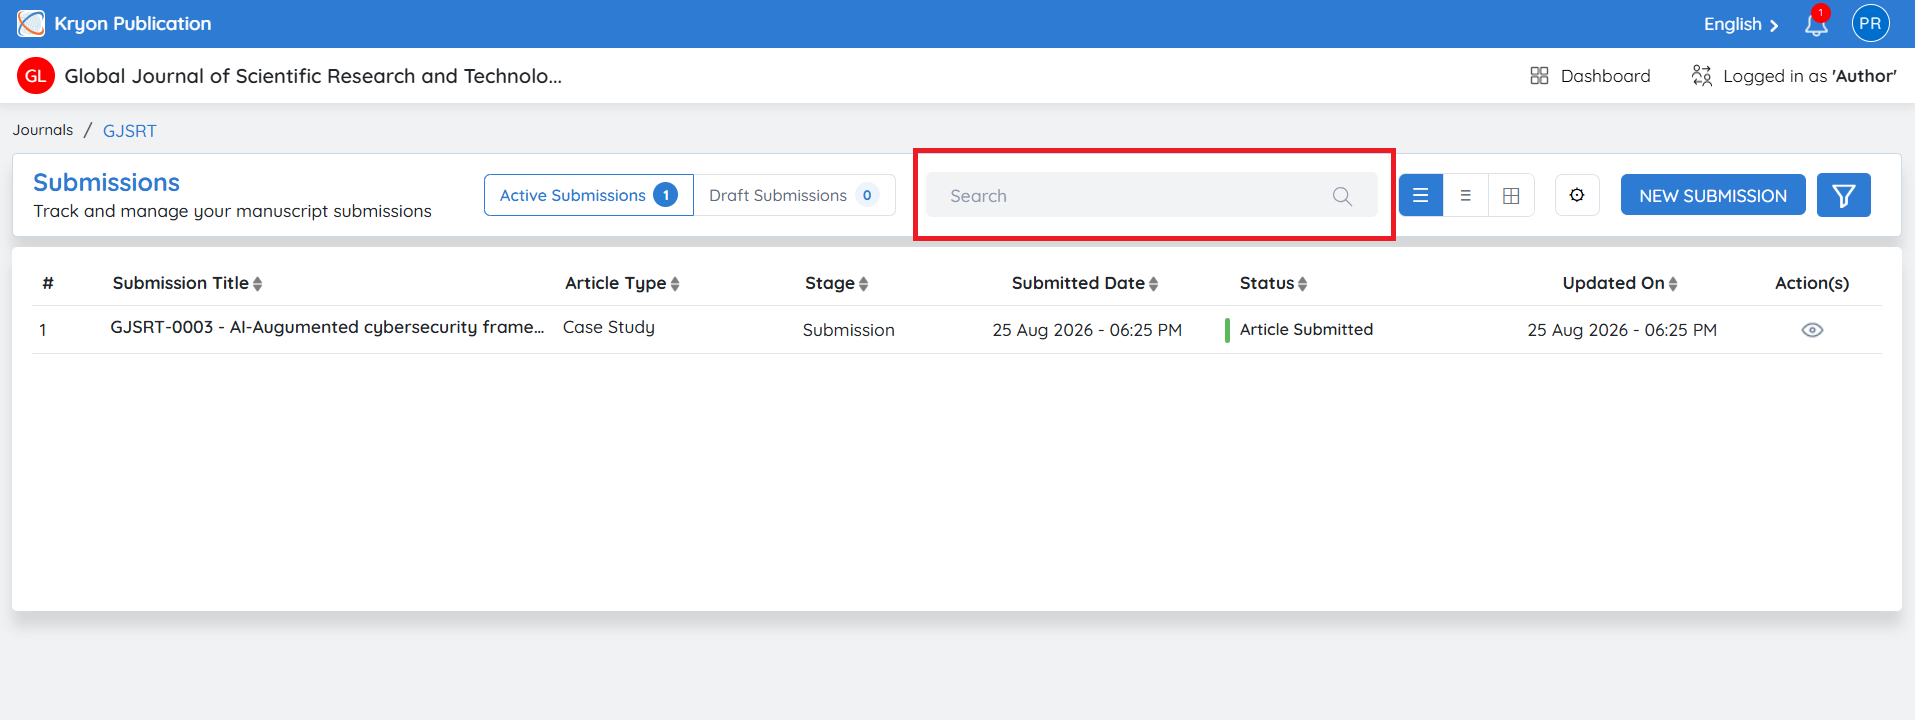
Searching Submissions
Use the Search box to quickly locate a manuscript by entering keywords such as:
-
Manuscript ID
-
Submission Title
-
Article Type
The submission list is automatically filtered based on the entered search criteria.
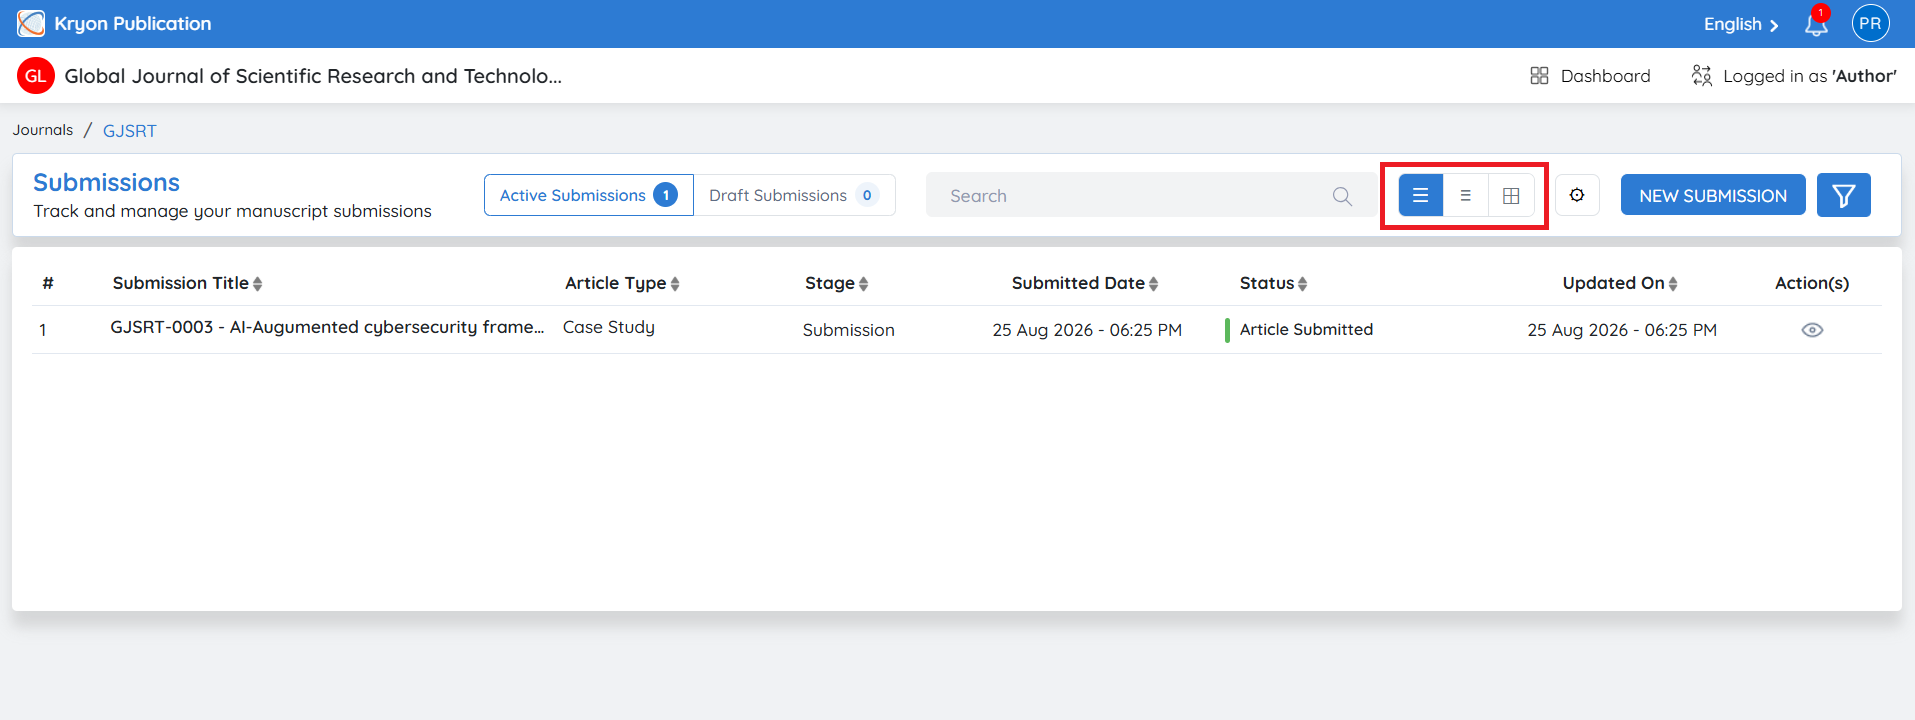
Changing the View
Authors can change how submissions are displayed using the available view options:
• List View – Displays submissions in a detailed table format.
• Compact List View – Displays a simplified list with reduced spacing.
• Grid View – Displays submissions in a card-based layout for easier browsing.
Customizing the Submission List
Authors can customize the information displayed in the submission list.
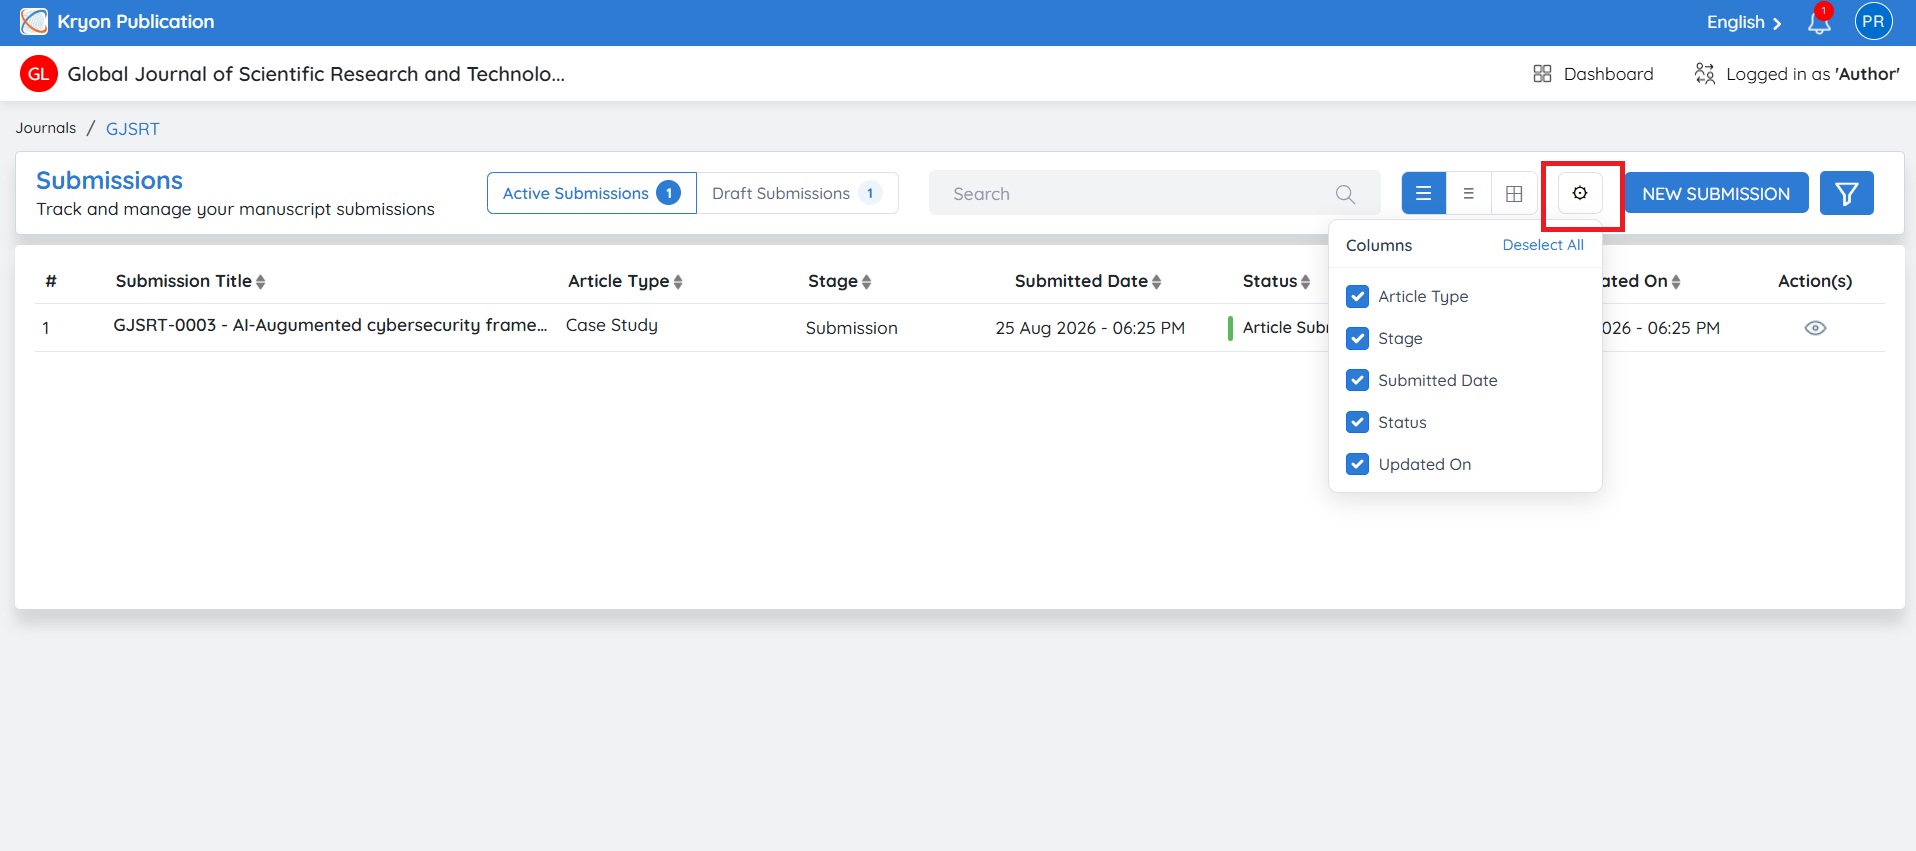
To customize the displayed columns:
-
Click the Column Settings icon.
-
Select or clear the checkboxes for the columns you want to display or hide.
-
The submission list updates automatically.
The available columns include:
-
Article Type
-
Stage
-
Submitted Date
-
Status
-
Updated On
Column customization changes only the current display and does not affect the submission data.