Roles
The role configuration feature in JMS is one of its most important capabilities. Every journal is unique and may require different roles to manage its operations effectively. With JMS, you can configure specific roles and permissions to ensure that each user has the appropriate access levels for their responsibilities.
Organization-Level Permissions
It is important to note that all role and permission settings in JMS apply at the organization level, not just to individual journals. This means:
- When a user is assigned a role with specific permissions, those permissions are valid across all journals within the system, not just one.
- Permissions cannot be restricted to a single journal; they apply to every journal under the JMS platform.
For example, if an administrator grants the "Manage Journal" permission to a user, they will be able to create, edit, and manage all journals within the system, rather than just one specific journal.
Key Features
- Customized Role Assignment: Define and assign roles that align with your journal's structure—whether it's for administrators, editors, reviewers, or other team members.
- Tailored Permissions: Set specific permissions for each role to control access to various features and sections of the system. This ensures that users can only perform actions relevant to their responsibilities.
- Enhanced Security: By restricting access based on roles, you help maintain the security and integrity of your journal's workflow.
- Flexible Configuration: Modify and update roles as your journal evolves, ensuring that your team always has the right tools and permissions to work efficiently.
This robust role configuration system helps you to manage user access effectively, making it easier to maintain a well-organized and secure editorial process within JMS.
Each permission controls access to different functionalities within the JMS. You can assign one or more permissions to the new role depending on what responsibilities the role should have. Here are the available permissions and their purposes:
Manage Users
The Manage Users permission allows authorized users to oversee all aspects of user management within the Journal Management System (JMS). This includes the ability to add, update, or remove users, ensuring efficient access control and role assignments within the platform.
- Create Users: Add new users such as authors, editors, or reviewers to the system.
- Edit User Details: Update user information like contact details, credentials, or roles.
- Disable Users: Inactive users or restrict access for users who no longer require it.
Example: An admin can invite a new editor to JMS, update their profile info, or disable access if they leave the organization.
Manage Roles
The Manage Roles permission allows administrators to define, modify, and assign user roles within JMS. This ensures that users have access only to the features they need.
- Create New Roles – Define roles such as "Editor," "Reviewer," or "Journal Manager."
- Assign Permissions – Grant appropriate access based on role responsibilities.
- Add Users to Roles – Assign users to specific roles after creation.
- Modify or Delete Roles– Adjust existing roles or remove outdated ones.
Example: If a journal needs a new "Production Manager" role, a user with Journal Manager permissions can create it and assign relevant permissions, such as managing journal submissions.
Manage Journal
The Manage Journal permission gives users complete control over journal operations. This is ideal for editors and journal managers who handle submissions, reviews, and publishing.
- Create and Edit Journals – Set up new journals and update journal details.
- Manage Submissions – Accept, reject, or modify submitted manuscripts.
- Invite Users – Bring in authors, reviewers, and editors as needed.
Example: A managing editor can use this permission to review new submissions, assign them to reviewers, update journal policies, and more.
Auditing
The Auditing permission allows users to track system activity and monitor changes made within JMS. This is essential for ensuring transparency and accountability.
- Review User Activity Logs – See who made changes to the system.
- Monitor Submission History – Track manuscript revisions and editorial decisions.
- Generate Reports – Export audit logs for internal reviews or compliance purposes.
Example: If a submission status is changed unexpectedly, an auditor can check the logs to see who made the modification.
Supplier Management
The Supplier Management permission allows users to manage external service providers associated with the journal workflow.
- Add New Suppliers – Register external vendors for tasks like copyediting, typesetting, or proofreading.
- Monitor Supplier Performance – Track task completion and review supplier efficiency.
- Enable or Disable Suppliers – Control which suppliers have active access to assignments.
Example: If a journal outsources typesetting to a vendor, the administrator can assign them tasks and monitor progress within the JMS.
Developer Options
The Developer Options permission is intended for technical users responsible for integrating JMS with other systems.
- Manage APIs– Configure API access to connect JMS with third-party tools.
Example: A developer might use API access to integrate JMS with an external manuscript submission system.
Administration and Billing Management
The Administration and Billing Management permission grants access to financial and subscription-related functionalities in JMS.
- View and Update Subscription Plans – Monitor the journal’s current JMS plan.
- Manage Billing Information – Update payment details and process renewals.
- Access Usage Reports – Generate reports on storage, submissions, and active users.
Example: A finance manager can use this permission to download invoices and track system usage.
Each permission in JMS plays a key role in managing journal operations efficiently. Assigning the right permissions ensures a smooth workflow while maintaining security and access control.
Now, let’s explore how each permission functions in real-time scenarios
How to Create Role
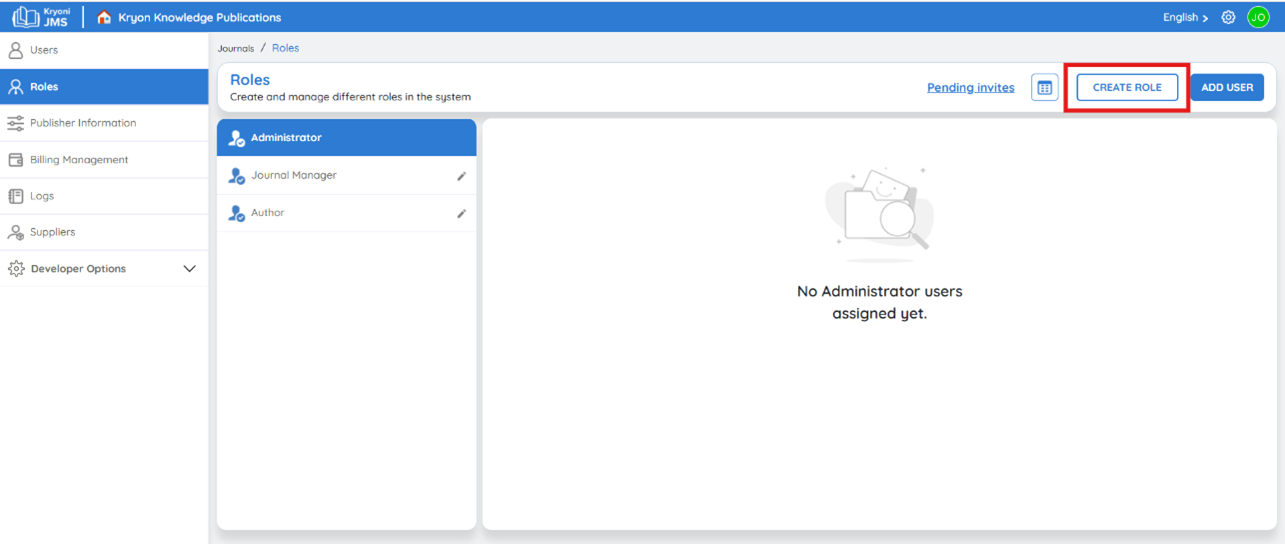
This interface displays the current roles. At present, only the Administrator role is available,
Administrator Role: Controls every aspect of the system—from managing settings and users to configuring permissions.
Now, let’s create a new role and assign specific permissions.
How it Works?
Creating a Role
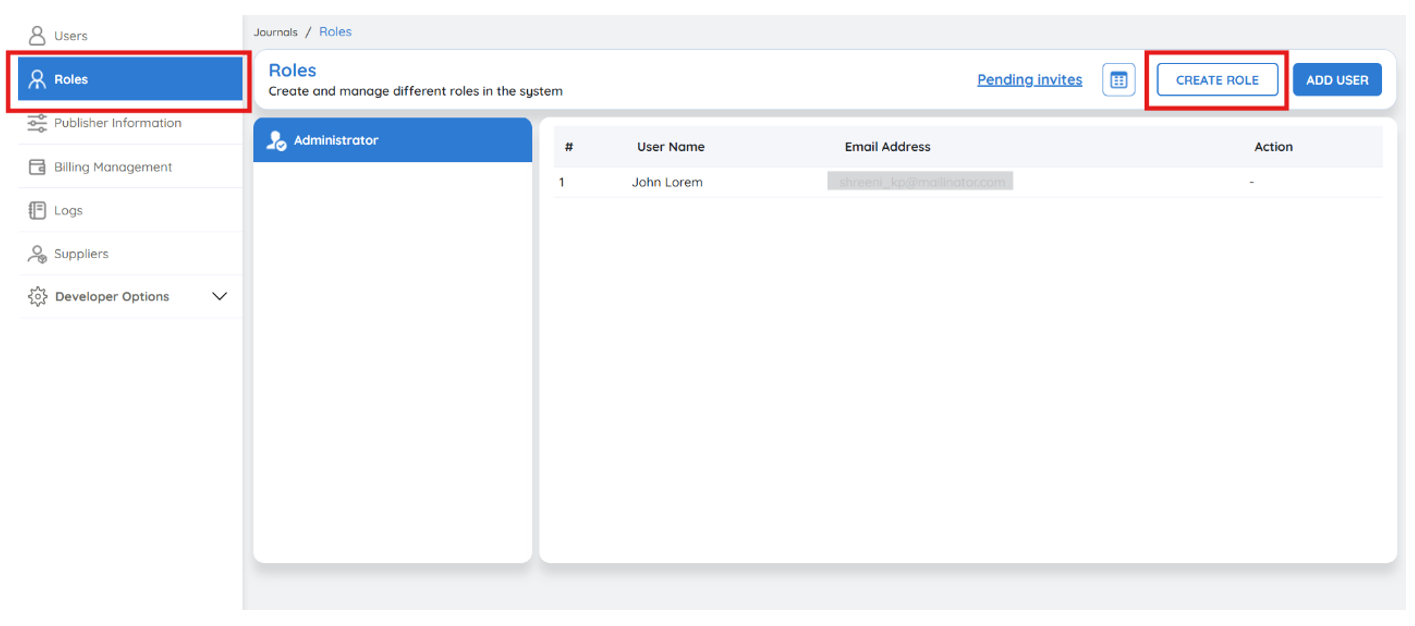
1. Navigate to Role Management
-
Navigate to Settings > Manage > Role Management.
-
Click Create Role
2. Enter Role Name
-
In the Role Name field, enter the name of the role (e.g., "User Management").
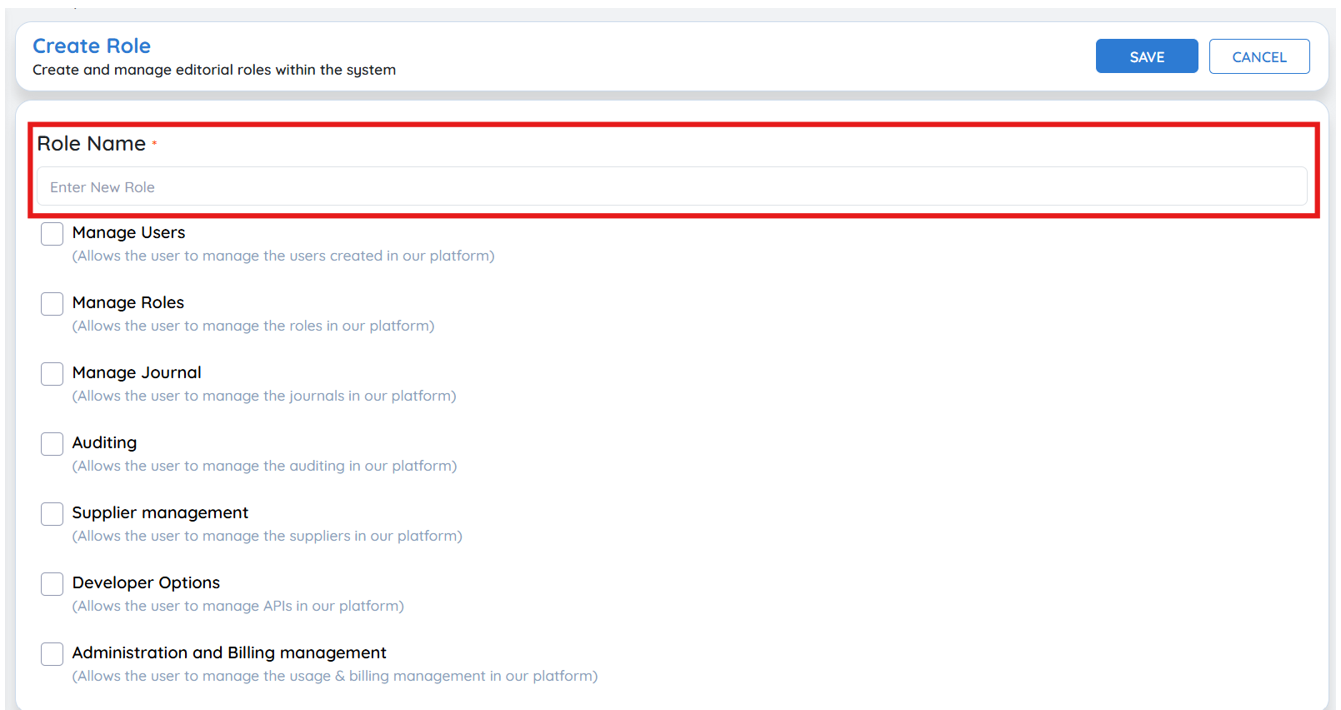
3. Select Permissions
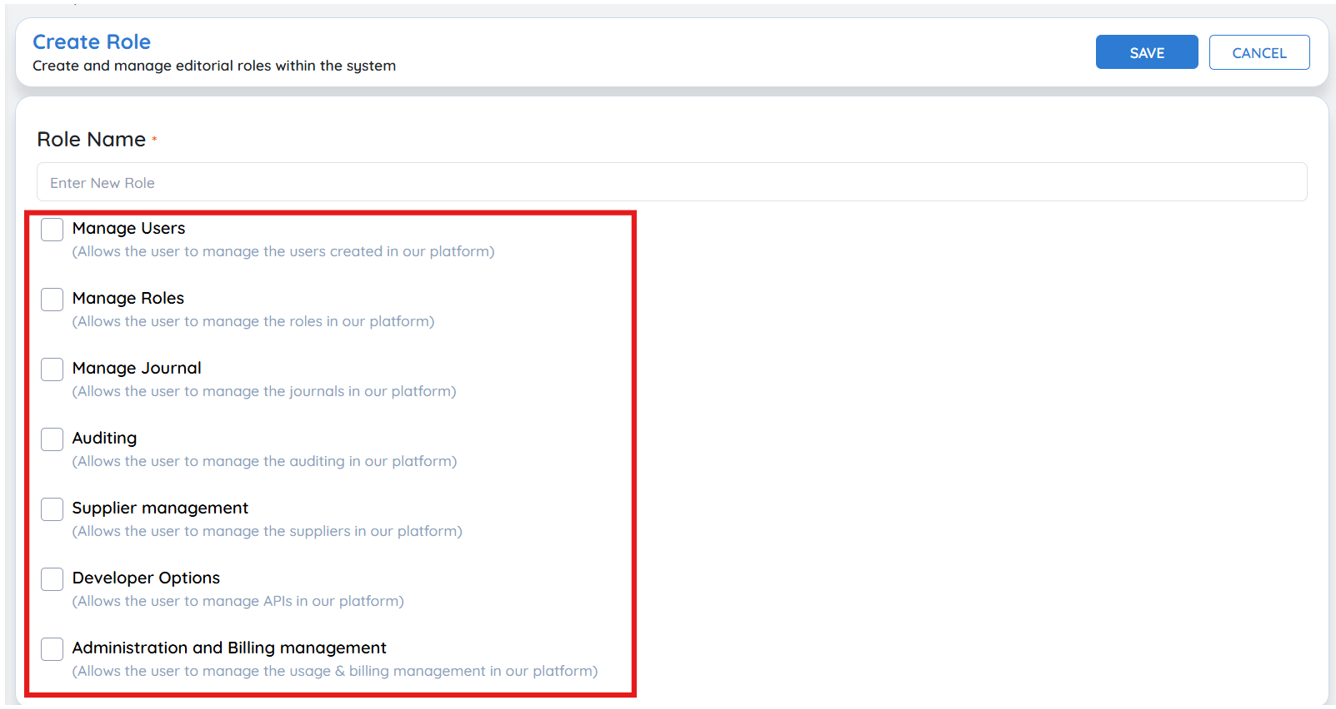
- Check the box next to the appropriate permission(s) for the role.
- Example: If creating a User Management role, select the Manage Users permission.
- A single role can have Multiple Permissions assigned.
- Make sure the selected permissions align with the user's duties to maintain system security and efficiency.
4. Save the Role

- Click Save to finalize the role creation.
- The new role is now available for user assignment.
Once a role has been created, the next step is to assign users to it. Follow the steps below to add users to a specific role.

Access User Management
-
Navigate to the User Management section in the JMS dashboard.
-
Click on "Add User" to begin the process.
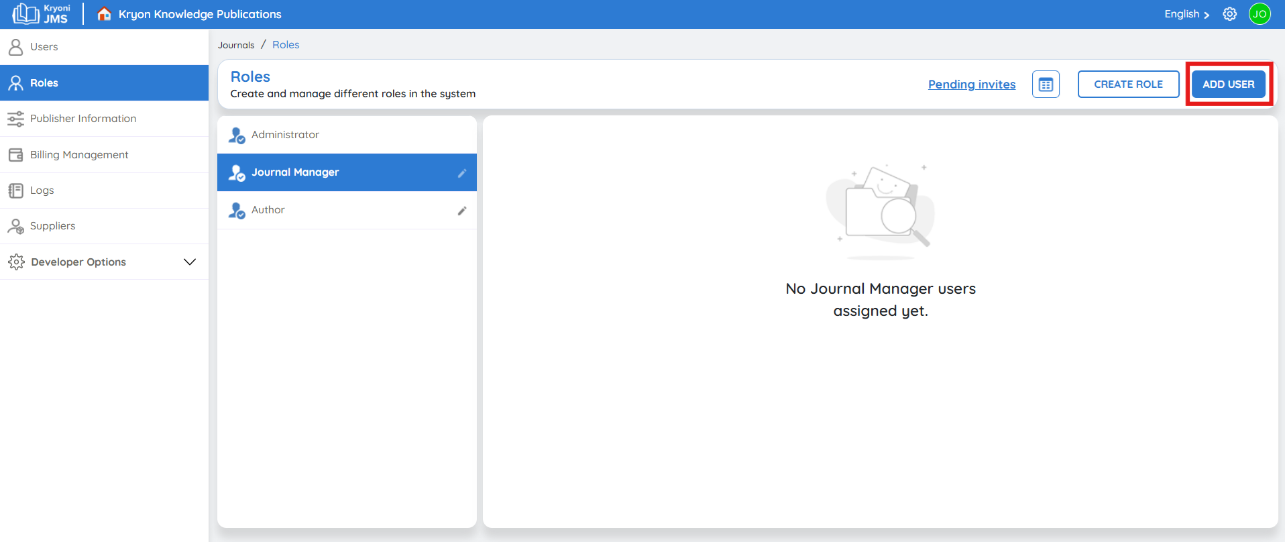
Assign a Role to a User
1. Select Role
-
From the dropdown menu, choose the appropriate role you created (e.g., User Management).
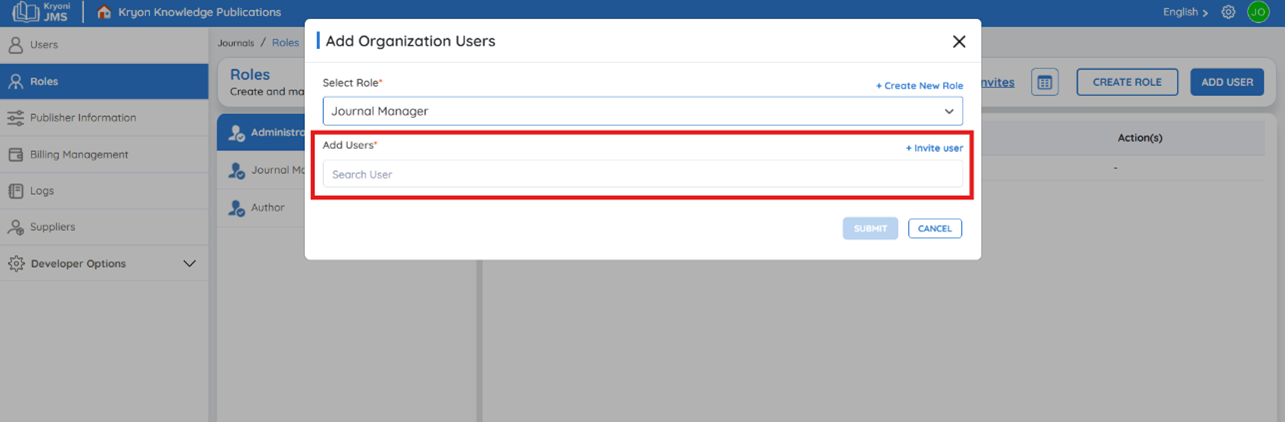
2. Select User
- Choose the user to whom you want to grant permissions.
- If the user already exists in the system, select them from the available list.
3. Invite a New User (If Needed)
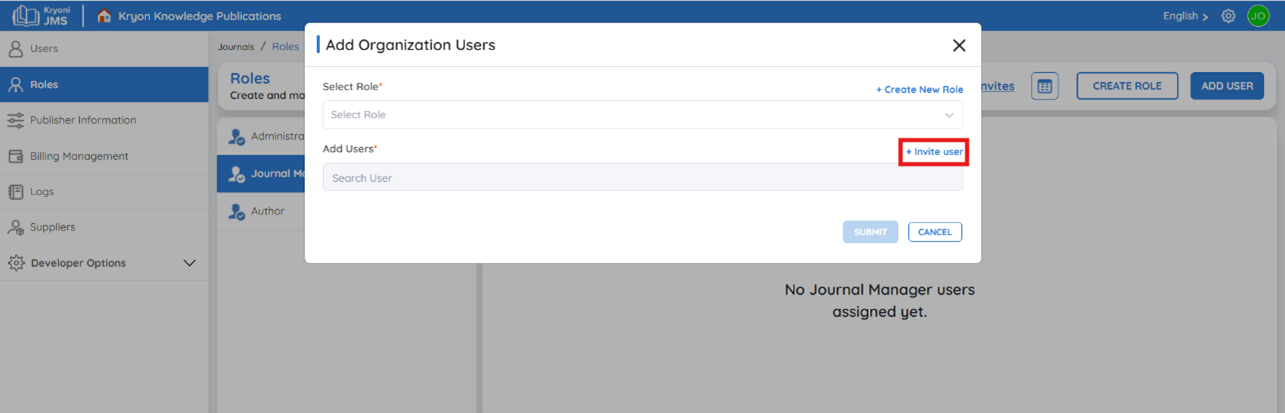
- If the user is not registered yet, click "Invite User" to send an invitation.
- Refer Inviting New Reviewers to Page for detailed instructions on inviting new users.
4. Save the Assignment
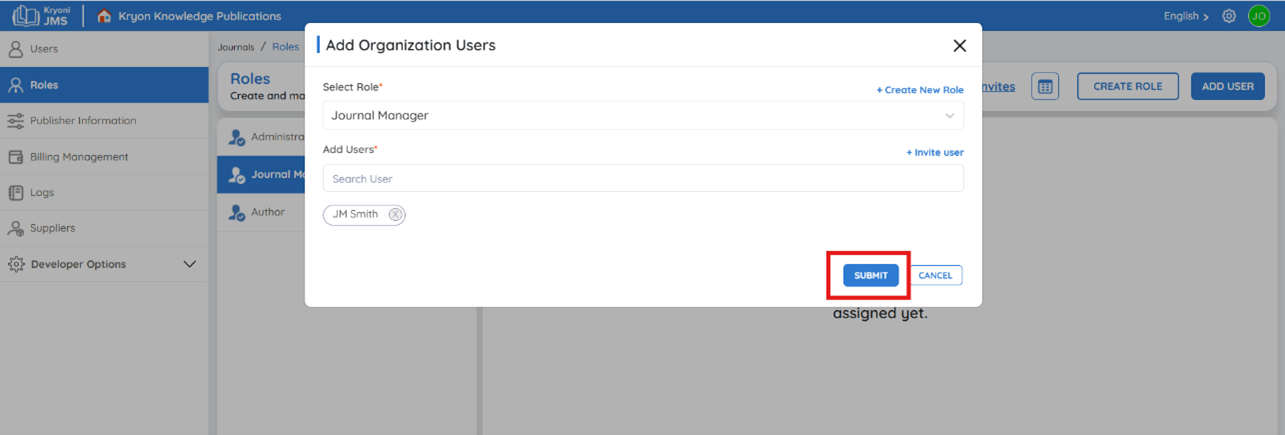
- Click Submit to finalize the process.
- The selected user is now assigned to the specified role and will have the associated permissions.
The process for configuring and assigning roles follows a standard method across various permissions in JMS. This ensures that administrators can efficiently control access for different functionalities. The same approach applies to
- Auditing
- Supplier Management
- Developer Options
- Administration and Billing